Modern 90S Chunky Highlights By Mirella Manelli | Kenra Color | Kenra Professional
- Posted on 18 March, 2020
- Fusion Hair Extensions
- By Anonymous
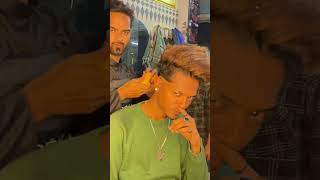
The 90s and 00s inspired chunky highlights is one of the top hair color trends in 2020. Mirella's client is looking for a modern 90s vibe hair color so she'll be touching up her existing highlights and richening up her copper shade. Mirella will show the entire process including formulas and techniques, so make sure to watch until the end!
Products Used:
Simply Blonde Blue Powder Lightener + 20Vol
https://www.kenraprofessional.com/prod...
Kenra Color 6RC Permanent
https://www.kenraprofessional.com/prod...
Kenra Color 6BC Permanent
https://www.kenraprofessional.com/prod...
Kenra Color 8GB Demi-Permanent
https://www.kenraprofessional.com/prod...
Kenra Color 8C Demi-Permanent
https://www.kenraprofessional.com/prod...
Kenra Color 10G Demi-Permanent (We now suggest 9GG in its place)
https://www.kenraprofessional.com/prod...
Interested in Kenra Color? Submit your information and we will reach out to you: http://bit.ly/KenraColorInYourSalon
WANT TO WATCH MORE?
Learn About Halo Hairpainting Technique Here: https://youtu.be/chETJMaZjz4
Watch Air Touch Balayage Tutorial Here: https://youtu.be/lMDb3gGbRMU
If you enjoyed this video, make sure to give it a thumbs up and tell us in the comments below what you'd like to learn next!
SUBSCRIBE NOW: http://bit.ly/KenraProfessionalSubscri...
VISIT OUR WEBSITE: https://www.kenraprofessional.com
About Kenra Professional
We are a purely professional brand dedicated to understanding and serving today’s stylists. Our passion is developing best-in-class innovations, delivering superior and reliable results. Kenra Professional strives to elevate the stylists’ artistry and craft.
CONNECT with US
FACEBOOK: https://www.facebook.com/KenraProfessi...
INSTAGRAM: https://www.instagram.com/kenraprofess...
TWITTER: https://twitter.com/kenrapro
Modern 90s Chunky Highlights by Mirella Manelli | Kenra Color | Kenra Professional
#chunkyhighlights #kenracolor #haircolor #trendyhaircolor
Hey everyone, its Marella Minelli here and today, I'm going to show you how to achieve 90s chunks with a modern twist using all kenra color, so stay tuned and check it out. This is my model Morgan and, as you can see, she hasn't had her hair touched up in about five months and what we're really looking to achieve is giving her a modern, 90s vibe. By touching up her highlights and then really rich thing up, this copper shade. I'M starting out by taking a four inch wide section, utilizing the arch of the eyebrows as a guide to create my mohawk section, and I bring that all the way back down past the apex and then bring that section all the way down right behind the ear And make sure each section is clipped away. I then start out by taking a V section right in the back, and this is where I will get my highlights started for this project, I'm using kenra professional, simply blonde blue powder. Lightner. Add a 1/2 mixing ratio with 20 volume developer, I'm utilizing a lower developer since I will be doing color and highlights all at the same time, because we're going for a more bold look and we want her highlights to really pop. I am gon na take slices throughout the back just to get it started. These V suctioned slices, though, however, are gon na veil over the back of the head. So that way, there's not a stopping point on the very very bottom, even if we were to put in lots of layers throughout the back, I'm applying first about four inches away from the roots and then stroking the product right on up to feather it. So that way, it has a softer line of demarcation. I make sure to thoroughly saturate these sections, and a little tip is that, when you're working with slices make sure that they are thin enough, so that way the product can thoroughly go through to the other side, and that way the lightener can do its job of Lifting to the desired level, once I was done applying my slices throughout the back in my V shaped section and I'm gon na move on towards the front traditionally, 90s chunks were really heavy in the front, so this is just where the modernization comes into play. So I decided to go in with a little bit of a lighter weave right on the hairline, with two back-to-back baby lights. Now, if you want it to go full on nineties, chunks, then definitely just take back-to-back slices in this section. But I thought I would just make it a little bit more of a softer and more wearable for 2020, a little tip when doing these baby lights right in the front. Hairline is to comb the hair entirely back so that we have a much more cleaner working space. This is going to give you a nice tension as well as really being able to isolate the hair. So that way, you don't have any other hair to mess with, while you're trying to foil. This is a really great technique, because again it just isolates it and it gives you that proper tension. So you can get the foil really nice and close, and I would highly recommend that you take your time in this section, because this is definitely an important piece of hair that your client is gon na see. First, so you want to make sure that it's just perfect and right now to get started on the actual chunks. I'M gon na go about two inches, maybe two and a half inches back from the previous section. So the way I like to start, my chunks is start from the back side and then work my way up, so I'm already guesstimating about where they're going to land and then you're just gon na do about two two, maybe three back-to-back slices. So the width of your chunk is completely up to you, but you already know where they're gon na begin and end because we already did a pre sectioned mohawk section. So that's really where you're gon na get that pop of blonde. In addition, with the slices, as well as the square space that we're working with for my application of these slices, I am taking the lightener all the way to the root. Now, if you want it to be a little bit more diffused, I would definitely go in with location. Much like I did the back slices by feathering the product right on up, instead of taking it right at the root. But the reason why we did this here is for a couple reasons: one we are gon na slightly shadow root it and two. We want really to evoke that 90s vibe by taking the chunks all the way towards the roots. Now you can also see here she has some previous chunks that were attempted by a previous stylist and now I'm kind of going through and doing a little bit of a color correction here. So I am isolating those previous chunks just putting them aside because they are previously lightened, and then I'm going in on the hair that was not lightened and applying that Lightner. A little helpful trick for me is that when I am doing some color correction with Lightner is, I will apply a foil in between the hair that was not lightened and lightened, so I'll make sure to thoroughly saturate on the original foil with the liner and then Place an additional foil right on top and then just use conditioner to get the hair to stick now. The reason why I'm doing this is because later on, we are going to be putting in color in between her foils. So I really need this hair to be tucked away so that way, the color that's place in between ur foils does not touch the mids and ends of those previously lightened pieces. To complete this top section, I'm gon na do a total of three chunks, so you'll notice that I'm doing those back-to-back slices and then I'm gon na finish off with my third chunk right on the crown and then just to finish off and complete it. I am gon na add in some very chunky, weaved pieces, so the slices - I just really wanted those to pop just again to evoke that 90's vibe and then right underneath that last third chunk, I'm gon na go in with a very heavy chunky weave. So I'm still doing lots of color correction, but I want to make sure that all this hair that is in this foil is nice and safely, tucked away with both Lightner and conditioner, because we are going to go through and color in between each of these foils. With permanent hair color, my model is a natural level 5 and she wants a rich copper shade. So we decided to go in with equal parts of 6 BC and 6 RC with equal parts of 20 volume developer. So she gets one level of lift and nice vibrant result and deposit on some of those previously lightened pieces, I'm starting out by applying her color in the back, and this is just because it'll give me a much more cleaner working space. So I started out by applying onto the roots and then bringing the hair down and applying the color on the mids and ends and just thoroughly saturating. I'M gon na try to get this on in less than 15 minutes from roots to ends and I'm not worried about hot roots or anything, because we are only lifting one level at the roots and then just depositing and also rich inning up and brightening. Her mids and ends, and this formula is perfectly suited to have 20 volume from roots to ends. Once I was done applying to the underside on the back of the sides, I made sure to thoroughly saturate in between each of the foils and just taking nice thin sections applying roots to ends now that our foil and colors, all in we're just gon na process. Her room temperature for 30 minutes and then get ready to do her final glaze for my models. Final glaze, I decided to mix up two different formulas for a very slight color melt, so I'm mixing up 8gb and demi-permanent at a one to two mixing ratio with nine volume developer and then I'm gon na mix up a separate formula of 10g with a few Ribbons of 8c at a one to two mixing ratio with nine volume developer. I started out by applying the 8gb formula onto the first two inches of where the highlights were placed once I was done applying that formula. I then took the 8g with HC formula and applied that throughout the mids and ends making sure to thoroughly saturate. I applied this formula onto towel-dried hair and then processed her room temperature for 15 minutes and here's. The final result on how to achieve in 90's chunks with a modern twist. So, just to recap, what we went in with for her highlights was Ken, a professional simply blond blue powder Lightner at a 1/2 mixing ratio with 20 volume developer and then in between her foils. We went in with permanent hair color, equal parts of 6 BC and 6 RC with equal parts, 20 volume developer and then processed her for 30 minutes and then for her final glaze. We went in with 8gb at a 1/2 mixing ratio with 9 volume developer right into 10 G, with a little ribbon of 8 C and 1/2 mixing ratio with 9 volume developer and processed her for 15 minutes. So I really hope you enjoyed this hair tutorial and if you did give it a thumbs up subscribe and I hope to see you guys next time -


Comments
Mirella Manelli: so glad people are loving this!
Mrs. JMeyels: I could never pull this off and I don’t think I’d ever try but oh my goodness this is the best version of 90s/2000 hair! Perfect timing for me to find this I have a client wanting this exact method ❤️❤️
Rebeca Diaz: My brain is confusing me, I hate chunky highlights but I kinda love this lol
Derek Lee: I would've loved to see if a shadow root would've made it more modern or feel more natural. The colors work really well!
Stephanie Rodriguez: Thanks for the placement I’ve been getting requests for this look and this was a huge help. Question, on the triangle section did you leave that out for dimension or did you slice/weave some hair? It was hard to tell in the video. Thank in advance
lil.lina_diary: The highlights turned out so pretty. Would this have the same appearance on straight hair? I was thinking of getting my hair done like this but I like to keep my hair straight so would it just end up looking like stripes rather than highlights?
Redrumromeo: This was the best video I have ever seen on the chunky 90’s vibes. Thank you I will be trying this!!!
Cilla Morales: I knew this hair color was the vibes back in the lace 90’s early 00s I want it done so bad. Just a bit darker red
y/n: the colour, the highlights, the everything, i love it!!
Desirée JC: When washing her hair out, did you wash it out all together or did you wash the red out then was out the foils? Would the red bleed into the blonde highlights?
Jennifer Rios: This is exactly what I went in today to get and they totally did it wrong:( your awesome!!!
Aiyana Carroll: Wow! You’re a great hairstylist!
DARIO ALEJANDRO MORENO: Hermoso te quedo. Me encanto
Melissa Yates: You're amazing . thank you. Your communication is spot on. Very helpful
Cute and Fluffy Pikachu: It definitely gives me Lindsey lohans hair in freaky Friday vibes I love the look
Emily Roman: Big fan of yours mirella!!! although it’s not my cup of tea, it looks great & i’m sure i could use this technique & add a root shadow to adjust it to my liking :)
Bratzbaby Rocio: My style is inspired by the 90's and 2000's so im totally going to do this to my hair
Lori Leveto: Love this!
Oriana Carvalho: Love this look gorgeous main colour and love the chunks what is her main colour thank you sooooo much showing this video
G Perry: What does process at room temperature mean? Love this look!
Hobisneakylink: i’m getting this technique done next week
Alice D D: This is looking amazing
Orsi L: I had this similar but Blonde brown combination.I miss it ..feeling old
Princess Warrior: I really love this may attempt to do this on myself lol looks kinda hard though
Lauren Davis: Why am I loving the chunky highlights?
xxcarolxannexx: I’ve always wondered how this was done
Elizabeth Feria: Excelente trabajo
Rebecca Riley: I so so love this n her hair is so pretty...
Girlseagoat: I can’t get anyone to do this on my hair every time I go to get my hair done I just have a blended subtle balayage look I want contract and blonde highlights
Flor Calvillo: How would the result vary if you haven’t done the last glaze?
Jose Rivera: That looks cute, actually. I’m kind of surprised.
Antares666: Do you have any reference of these in curly hair? Im desperate on finding it! T-T
Cynthia Powelson: Wow! Great job
Catherine Gaffney: Beautiful
Emily Weible: I had this exact look in 2003 hahaha
Madison Matthews: I love this I don’t care ❤️
Mika Thorpe: Not to be nitpicky or anything, but weren't the chunky highlights more of a early 2000s thing? I remember seeing them in the very late 90s, sure, but they were more prevalent in the 2000s.
Intan Mutiara: Nice technique....
D Smith: Very nice!
Jeanette king: What colors did you use aside from the blonde?
JKevin: They be like 90s Britney, Ooops I did it again!
Erica Rae's Way:
Makenna Marie: OMG
pingu spuds: i want this!!!
Hobisneakylink: am i the only one who thinks she kinda looks like nessa barrett?
La Ra: Please include the styling bit too.
Tina Frederick: How much did u charge for this
Soni Karia: in between bleach you said applying color? which shade
booZee: rlly trying to decide if i like this or not oof. too poor so i wanna do it by myself which i already know will be a bad idea
Dallas_Pandora4202: Fabulous
Adriana Tomic: The only reason I did no like them in 90s...they are hard to maintain...I mean your hair grows fast..about 1,5cm in 4 weeks..some more some less, depending on genes..but that is a lot of going to salon, you can not really maintain them alone..you can try, and fail. They really look ugly when you see your roots..unless they are under in the back of the hair, so you do not see roots of them...but if you color the rest of your hair regularly...4-8 weeks roots(so roots are 1,5-3cm)..that is just too much work not to go over them and not to ruin everything.
SVM: What a cool name you have!
Blakehomie: What is the upkeep on a style like this? Is it hard to maintain?
Azucena: Spice girls
Keiska KNB: Who else has to watch these tutorials on MUTE like..........omg
Anja R.: Sorry it was nice in the 90`s ( we still had it till 2005) but now... that doesn`t work in Germany, too old school and we hate stripy effects. But thanks also for sharing!
Amanda Adams: NO! Just No.
crispB: No. It’s not a thing. It’s hideous