Kera-Link Keratin Hair Extensions [Most Customizable Hair Extensions For Volume, Length & Color]
- Posted on 29 September, 2021
- Fusion Hair Extensions
- By Anonymous
In this video, I share my personal tips for installing Kera-Link (also known as fusion or keratin hair extensions)
Hair extensions by Donna Bella Hair https://donnabellahair.com
Use coupon code MIRELLA to save 10%
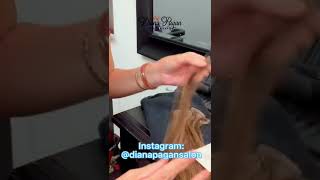
22 inch Kera-Link in color 1B and 2
To check out this models hair color transformation from blonde to brunette including how I filled the hair for a long-lasting result, click here: https://youtu.be/GuGR50QxMeI
See how these grew out and how they were removed: https://youtu.be/prC8zRHpMK0
For more education visit http://mirellamanelli.com
Instagram: https://www.instagram.com/mirellamanel...
Facebook: https://www.facebook.com/MirellaManell...
TIKTOK: https://www.tiktok.com/@mirellamanelli...?
Pinterest: https://www.pinterest.com/mirellamanel...
HairB&B IG https://instagram.com/hairbnb_podcast
Learn how to upstyle in 7 days course: https://mirella-manelli.mykajabi.com
Rebel Femme https://rebelfemme.com
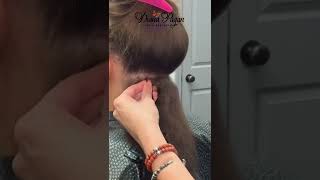
Hey it's marilla vanelli and today i'm going to show you how i did this customizable 22 inch carolink install for this gorgeous brunette hair, and i'm going to show you how i use two different colors as well as how i customized it especially around the hairline for A seamless look but before we get started, make sure you hit that subscribe button and turn on all notifications. So you don't miss a tutorial now, let's go ahead and get started so for my model today, what we're going to be doing is putting in a full head of carolink extensions. Now i already went ahead and color matched her and it overall looks like she has a solid brunette shade, but she actually has quite a bit of different colors going on for her color match. I decided to use color 1b and color 2 22 inch cara, link, extensions from donna bella hair, so i already pre-cut these cara links so that way they're a little shorter, so i just basically cut them right in half, so i have a lot less work with When i heat them up and roll them up, plus it's going to be so much easier to remove when she's ready to remove them in about six months. So i've already pre-sectioned my model. She normally wears her hair right down the middle, and then you can see here. I have it parted from the apex all the way down to behind the ear, and then i have everything cleanly sectioned with my hair clips, as well as these hair grippers. So these just kind of grab on to all of those little baby hairs. So it's out of the way. So some of the things that you're going to need is a protective disc from donna bella, as well as some clips and your heat connector, and when you're ready to remove your keralinks. This is a really great product that you're going to want to have on hand, which is your carolink bond remover. So i have her first section already sectioned out and i decided to go right where her occipital bone starts and just go straight clean across, and i felt like this was a good spot to start in. So that way, when she pulls her hair up you're not going to see any of the bonds, but again what i love about these care links is that when you heat them up, they really do blend in the best out of all of the extension methods. So right here on this bottom section, she kind of lives somewhere between these two shades. But you can see the color too is slightly lighter, so i'm just going to go in with the full row just using 1b. So i'm just going to go in about three finger lengths in just to get started and the reason why i do three finger lengths typically is so that way when she pulls her hair towards the side, you're not going to see where that bond is living. So that's where i'm typically going to start and using my quick pick, i'm just going to take a section, my favorite section, so these sections should be as wide as your carolink itself and what you're going to be doing is creating more of a rectangular section when Doing your install and then you're simply going to insert your protective disk, and what i like to do as a good measuring tool is, have the edge of this protective disc. So like right, where that opening is at sitting right at the bottom of the section of hair that i just picked up so overall you're going to want to make sure that this is at zero elevation. Because when you get ready to install, we don't want this hanging out of her head just like this. We want it to lay nice and flat, so it has a natural fall. So once you have this very first section here, you're simply going to take your cara link, and so this is color 1b and i'm just going to kind of slide this down a little bit and then taking my melting connector, i'm just going to heat this up! For just a few seconds so once you have that heated up for about three seconds or so you're just going to start to roll it on the top and on the bottom to get that all connected. So i'm just going to move on and i'm actually going to install these right next to each other. So again, you want it to be the width of that carelink and the whole purpose of this disc, too, is just to make sure that you are not getting any fly. Aways you're not getting any of those little hairs going on and it just keeps that nice clean section plus it does protect your client from everything from the heat of the melting connector to even you, possibly snagging their hair. So that's really important that you use this tool as you start to do your install. So i'm just going to go ahead and complete this row till i get to the very end of it, so making sure that i'm about two to three fingers length on the side. Okay, so i have her first row in and we are ready to move along. So it feels really comfortable throughout you. We have that 360 motion throughout i've asked her throughout. If they feel comfortable, we don't have any snagging, so it feels great so we're going to go ahead and move on and i'm actually only going to take a quarter. I'M sorry a half inch subsection down and we're going to really want to build up this foundation down here. So it has a lot of weight towards the bottom and it looks really really full because we want to do minimal cutting for these 22 inch extensions. Okay, so i took my next section down so now you can see. I just want to show you exactly how much hair i'm taking down so that way we have that weight line here, but this on this particular row since it's our second one. I want to start incorporating the different color of brunette going on so that first one first row we did 1b and this is color two. So we're now going to be mixing and alternating these one after the other. So i'm going to start with one b and then put a color two one b, two one b two. So it's gon na create a lot of dimension throughout okay. So i'm just gon na go in again about two to three fingers within and i'm going to take that deep triangle section right on down putting my protective disk in making sure to bring that right on down. So that way i get that zero elevation. When i get ready to install - and i usually like to use about two clips for this disc - i know some people like to do one, but i like mine, to be relatively flat when i get ready to do my install and i'm just personally starting out with The darker color, just because overall her hair matches closely to this one and that dimension is going to come through the interior, so a little tip when you're doing this for the first time and something that kind of stuck with me is when you get ready to Do your melting connector to the caroling itself is you're going to want to make sure you're pulling this down like just a little bit, especially if you're going to cut these in half like i did and then you're going to melt these for just three seconds or Two to three seconds and then slightly pull it up just as a smidge and what that's going to do is allow you to melt that fully and then also roll it with ease. So one two three and then i'm going to pull that up and then start to close it on each side and roll it okay. So i'm just going to move on to my next one and just like i did on that very first row. I'M going to place my next extension right next to that piece, but this time i'm going to be using my color too, and it's such a subtlety. But it's going to make such a difference and make it look so natural when we're all done. I'M just going to go ahead and continue on alternating my different colors of 1b and color 2., and i'm gon na finish up this row and i'll show you when we get towards the top, how it changes up a little bit me so now i have my Third row complete we're going to go ahead and move right on up and i'm actually going to start incorporating this front section, but i'm going to show you what i'm going to do a little differently when you get ready to install the cara links right here. Okay, so now here's my fourth row or section i should say - and you can see how i married the back to the very front of her hairline alright. So i went ahead and finished up this row still alternating. You can see all of the dimension going on and now what i'm going to do for this side section is, i actually cut these extensions into thirds, so you can see that i still am going to alternate the different colors but overall they're much more tinier, and These are going to live right through the front section now. The reason why i decided to cut these into thirds is, for a few reasons, number one i want to get a little closer than i normally would just using these full size, sections or pieces and then also typically, most people are a little bit more finer in Texture around the hairline, so you want to match the density up with the extension. Now i'm going to take another section very similar to what i have been but keep in mind. You want these to be even smaller than what we've been doing. You want it to be the width of the extension, so this is where that customization comes into play, so we can make these as tiny or as thick as we'd like them to be, and we're still going to do the same technique. By pulling this down a little bit heating that up just for a few seconds and then rolling it on and you can really see how much more seamless this looks even compared to these back sections. So you can even see just in this side by side how much more this one blends in so the tinier you make these cara lengths, the more seamless they become with each or with the hair. If you want to check out her hair color application on how i filled her hair from blonde into brunette, you can also check out that youtube video in the link in the description. So now i'm going to move on to my next section. You can see how tiny and narrow this section is. I'M going to insert it into my protective disk and when you put this in what i like to do, is put this straight in and then just pull it down just a little bit. So it's even that circular section is even with the bottom section. So that way we have a natural fall of the hair. Now i'm going to take my lighter brunette shade and then i'm just going to heat it up and roll it on, and i'm going to continue on until i probably get about a finger or two from her hairline. Like i said, i'm going to get pretty close here now, as i get ready to finish off my last few right here. I do want to finish off with the lighter pieces, just because i added a slightly lighter brunette money piece in the front, so i want that to blend a little bit more seamlessly and you can almost kind of see it right in here. You see that little bit of of lighter shade of brown highlight right here on this hairline, so i think i'm going to stop right about there, but you can see how much dimension we got and how close we got to her hairline and even when she starts To pull this back you're not going to be able to see the point of origin of where those extensions are at so i got my next section going on here. As you can see, i went a little right by her temple area now i am actually pretty up high here right under the apex now. Something to note is i did cut these particular ones that i'm installing right through the back in half, so i basically took my cara link and cut it down vertically. When you get ready to do the back, we are going to pick up a smaller section, the size and the width of the extension itself. Now. The reason why i decided to go with halves here, instead of like the folds that we did down below, is because these are a little bit more visible with how bigger they are, and since this is getting a little close to where her hair, naturally parts. I want it to be a little bit more seamless, so that's why we went in with something smaller now for the sides i'm still going to be taking the third sections. When i do my install, i always start from where i did that initial section, and this is where i start and end and then i go in and start to fill towards the face with the third section pieces that we're going to do so. Let me just go ahead and show you how tiny this back section is, and this is the same width as my selection here, so that's really really imperative. I personally love care links because you can customize them truly to the size that you're needing for specific areas and where you're working on the head. So i'm going to go ahead and finish this entire section right over here and then for this front piece. I'M gon na go pretty close to her hairline and i'm gon na finish them off exactly how we did these really tiny ones, which are a third of the size of your caroling extension and here's. The final result of this carelink hair extension install using all donabella hair. So, just to give you a little recap, i went in with two different colors of 22 inch cara link, extensions in color 1b and color 2, and i basically blended those all inside of the interior, alternating the different colors to create a really dimensional brunette shade that Truly matched her hair color, so i really hoped you liked this hair tutorial and if you did, please give this video a thumbs up and make sure to subscribe and comment down below what your favorite part of this entire tutorial was and i'll be sure to respond. You can find me on my other social channels like instagram, facebook and tick tock, all under mirella minnelli, and if you want free education right to your inbox, you can head to marillaminelli.com and sign up for my email list to learn more about donabella. Hair extensions. Be sure to check out the link in the description below and last but not least, be sure to check out my other hair tutorials right here on this channel and i hope to see you next time.

Comments
Hailey Fisher: How often do you take out and reinstall? I’m looking into these for my mom (I’m a hairstylist too!) she has super super fine thin hair and just wants some more density. She doesn’t like the feeling on beads on her scalp of things on her scalp so I thought this would be the best option! So about how long do you leave them in before removal, is there any kind of damage, etc!
robert björnesjö: Perfect, it Blends just Perfect how many keralinks where you using here ??
Zoe Hamilton: Thank you!
Jess: Can you go over removal?
Crystal Mitchell: Those looks wonderful do you use any type of really curly hair does a person have to have the exact type here of the extension they are using if not can you do a video on this
Tracy: Do you find these are damaging to hair? I wish you live next to me. I’m struggling to find a new stylist, again. These look amazing. I love the alternating colors.
Mexican Beauty Queen: How long does it take to install them,
Carla Taylor: On short hair will you need more than six packs and can it blend enough that she have a full head That you do not see how short hair and will she be able to pull it up
Chiarra Fiore: How much would something like this cost?
Forever Bella: so I have short thin see through hair. I ordered 200 total. will that be enough? I don't want think just fuller than what I have
labelle jojo: Dommage que vous n’êtes pas au Québec
Nikki Rojas: How many is in a pack?