Removing Fusion Bond Hair Extensions [Tips On How To Remove And Care For Keralink Hair Extensions]
- Posted on 27 January, 2022
- Fusion Hair Extensions
- By Anonymous
Check out this 6 month keralink hair extension grow out! Ok, well... maybe more like 5 1/2 months. But seriously, look how amazing her hair looks after we remove them.
In this video, I'm sharing my best tips on how to take care of your hair before, during, and after Keralink hair extensions.
Shop @donnabellahair extensions, keratin bond remover, Lux tool, Brush, silk pillowcase, and much more: https://donnabellahair.com/discount/Mi...
Use code MIRELLA to save 10% off your Hair Extension purchase.
Color Application:
KeraLink Hair Extension Install:
For more education visit my website
Follow me on Instagram
https://www.instagram.com/mirellamanel...
Follow my Facebook Page:
https://www.facebook.com/MirellaManell...
Join me on TIKTOK
https://www.tiktok.com/@mirellamanelli...?
Learn with me!
https://mirellamanelli.com/online-hair...
Listen to my podcast!
https://mirellamanelli.com/hairbnb/
Book an appointment or shop at my salon
Shop all my favorite foils and color tools
https://framar.com/?rfsn=5729303.eb090...
Hair painting board by Cooboard:
https://cooboardtools.com?aff=21
You know you want that extra big ass color brush
https://zerotimesystem-com.3dcartstore...
Malibu CPR, DDL and color correction tools
https://malibuc.com/shop/rebelfemme
Use code MIRELLA to save 10% off your Hair Extension purchase: https://donnabellahair.com/discount/Mi...
Buy me a taco! I love tacos!
https://www.paypal.com/biz/fund?id=57J...
#hairextensions #donnabellahair
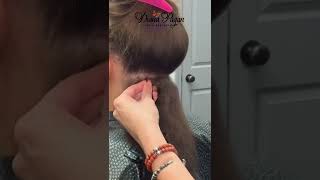
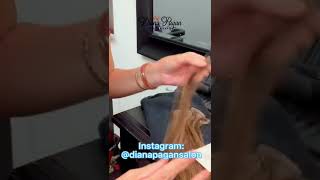
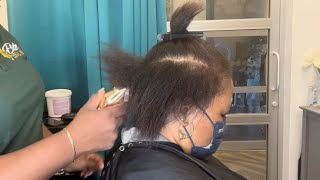
Hey it's marilla mannelly and welcome back to my youtube channel today, i'm going to show you how i did a six month, carolink removal and i'm also going to share my best tips and tricks on how to educate your client to maintain their care link extensions before The removal process, i'm also going to show you how my model's hair looks immediately after the removal process and how healthy and long and beautiful it looks. But before we get started, make sure you hit that subscribe button and turn on all notifications. So you don't miss a tutorial now, let's go ahead and get started, here's my model and it's been about five and a half months since she's been in so we're gon na bump this up to call it a six month grow out from when she did her Care link extension install, but, as you can see, her hair still looks really natural and super long and gorgeous. These are 22 inch, donabella carolink extensions and we're getting ready to remove these, but just kind of give you a little recap of what she started with she. Actually came in with kind of blonde hair and she wanted to make it darker to make it healthier and grow it a little longer, and this is immediately after we did her color service as well as that carolyn extension install. If you want to check out that video be sure to head to the link in the description of this video to see how we did this install and color process, and now six months later, she's come in, you can see her colors faded a little bit and Her extensions are super grown out, so we're gon na take a look under the hood of this, so you can see exactly what five and a half months looks like. So this is a pretty impressive grow out and overall she's done a decent job, but she could have done a little bit better with the brushing, especially on that root area. So we do have a slight bit of matting, but nothing that we can't handle for this removal. So this is immediately after her removal process, which i'm going to show you in just a second. But i just wanted to show you how healthy and long her hair is. We actually did not do a haircut on her. It'S honestly great condition and i'm going to explain to you exactly how we did this so that way: she's maintaining the integrity of her hair while wearing carolink extensions, so in general for carolyn extension removal process. You want your client to come in anywhere between eight to 12 weeks, it's kind of a good starting point. So when my client comes in, i like to assess her hair, just kind of look through the extension see where there's any matting. What i can do and before we get started whatsoever, i do like to use my donabella boar bristle brush to brush through any of the tangles, and this is going to make the process of the removal so much more easier. Once you're done brushing. I do like to go through one more time, just to kind of make sure i don't have any more areas to really focus on, and i was really concerned because of the amount of matting that she had right. Where that fusion bond is at on her natural hair, so now that i feel like we're at a good point, i'm gon na be using my luxe tool to do this. Entire removal, i'm gon na part, her hair starting from the bottom and working my way up. This is the easiest way to do it, especially if this is your first time. Working with these types of extensions always know that we're working from the bottom up, it's going to make your life so much easier. So this is where i'm just going to isolate that. First row and just carefully start pinning her hair up, so i have a nice clean working space. This is also really important to remember, too, when you're doing the initial install to have nice clean rows, because when you do the removal, it's also going to be super easy, not to mention also easy for your client to maintain and care for their extensions. Later on. To get started, you're going to use the donabella keratin fusion bond, remover and spray it on about two to three fusion bonds and let that sit on for just a few moments and then you're gon na take your luxe tool and use the part where it's able To break down and crush that keratin bond and the way i do this is i start off on one side and close that lux tool just a few times and then turn the extension over and crush the other side and you'll start to see and feel that Extension bond breaking apart and when it does, this is where you can hold the natural hair with one hand and pull on the extension hair with another and just gradually guide it out, keep in mind, there is natural shed, we lose hairs every single day and the Natural hair does get trapped inside this fusion bond, so some natural hair is gon na come with it. It doesn't mean that they're losing hair because of extensions or balding, or anything like that. It just means that there's natural shed that occurred between five and a half months or eight to twelve weeks that they were wearing these extensions and it's just simply trapped in there and there's no way for it to come out because it's bonded by that fusion bond. Now this section right here is a perfect example of matting. She has three extensions that are just intertwined together, so i do need to be a little careful in this area, but i am gradually just kind of using my fingers to help guide and pull apart. These extensions using some more keratin bond, remover, letting it soak in and working it in and then using that luxe tool to crush it. But as you can see, this one actually comes out really really easy and there's gon na be some that are a little bit more difficult than others. But overall, if you are using the bond remover in addition to working it in and then the lux tool, crushing it on all sides, so 360 of the entire keratin bond, it should remove rather seamlessly now keep in mind if it does get a little difficult to Remove these extensions there's a couple things you can do: number one is you're going to use a little bit more keratin bond remover, so simply spray and saturate thoroughly that bond and let it just sit in literally for two minutes. So if you need to spray like, i was mentioning two to three or even five, and just let it really soak in and then use this luxe tool, this lex tool specifically, is so versatile. It lets you do all sorts of extensions and because of this we're able to crush it properly. So sometimes you just got ta work, some keratin bonds, a little bit more than others and, as you can see, these extensions lasted her five and a half months. So that's pretty impressive and they're really well taken care of and nicely applied. So this is why they're not really going anywhere so once you have that first row done. This is just how i like to do. It is just remove all the extension first and then using a rat tail comb to start to break up exactly where that bond was at. Because what happens is there's a lot of scalp and residue from product and also a little bit of knots and tangles, and specifically with this model, she didn't do quite enough, brushing as she should have, especially on this underside. So i did have to spend a little extra time and give it a little bit of tlc on this underside just kind of breaking up those knots so that way we're not breaking any hair in general. You always want to detangle from the bottom and work your way up, but we kind of already did that earlier by brushing her hair before we even got started. So that's why it's really imperative that you start off with brushing it before you even get started and then remove them and then now you're just kind of detail detangling at this point. So, overall, some tools that you'll need is a rat tail comb along with a wet brush or detangling brush. I'M going to show you one last little detangle here, and this is the part where it was a little matted, and this is sped up quite a bit. But i just want to show you that when you do a removal like this, you need to have patience, because you don't want to break the natural hair and then also this is a great time for you to educate your client on how to properly brush their Extensions and how to wash them and care for them at home, so generally your clients going to want to brush their hair at least two, if not three times a day, to prevent any matting, as well as washing the extensions row by row. So typically, i educate my clients to lift up each section and really shampoo in there and then not be afraid to brush really close to that bond. So that way, we're preventing any of this matting going on. Another great tip is to educate them to wear their hair in a really loose ponytail or a loose braid when they go to bed and a silk pillowcase doesn't hurt either keep in mind that donabellahair.com has everything that you need in order to care for your extensions. At home, so i like to kind of create like a package deal if it's my client's very first time getting extensions ever i just go ahead and buy them the pillowcase and i buy them the brush. So that way they can take it home and i can ensure that they are caring for their extensions properly, along with a care instructions. Little sheet again, all of these tools are available on their website. So it's really easy to do that and just include it in their package again, if it's their first time, they're going to need all of the guidance possible because they don't know unless you tell them okay, so this entire first row is completely dead. We got really great density actually out of this first row. Her hair, like i said, is in great condition and i'm just going to continue to work row by row, but keep in mind that these are full bonded extensions on the underside and then, when i get towards the top they're, really tiny. And again. If you want to check out the full install video be sure to check out that link in the description of this video in general, you can expect to spend about an hour just on the removal and detangling process, depending on how well your client takes care of Their hair at home, i also include a clarifying shampoo and a light dusting with this type of service, giving me about two to max of three hours for this type of service, so i'm gon na give you a little sneak. Peek of the sides like i was mentioning their micro fusion, so they're cut down really tiny into thirds and even fifths on the sides, because i like to work in smaller sections, especially around the face, because it makes these types of keratin extensions, look really natural and Seamless overall carolyn extensions are great for anyone who has fine hair wants added density or length, they come in all sorts of colors and textures, and truly customizable even great for adding in just a few highlights, and you guys. This is exactly what seven packs of hair looks like removed from her head, and i like to show my client this. So that way, they have an understanding that they're leaving the salon with a lot less hair, but they still have the same amount of hair that they came in with. I like to show my client their before and the during and the after, and i like to be really transparent. So they have that understanding that they have the same amount of hair that they had when they first came in. For the initial extension install just to give you a recap, after we did the removal, i did two clarifying shampoos and then we finished her off with a 4b glaze at the bowl and did a really light dusting. She didn't want a haircut just a slight little dusting to take off those little split ends that she has, and you can see her hair is very healthy, super beautiful and added length and a little longer from when she got it done about five and a half Months ago and she's, just gon na give herself a little break for a few months and she hasn't decided she wants to try the carry links again or a weft extension. So let me know in the comments down below what you think she should try next. So i really hope you enjoyed this hair tutorial and if you did, please give this video a thumbs up and make sure to subscribe and comment down below what your favorite part of this entire tutorial was and i'll be sure to respond. You can also find me on my other social channels like instagram, facebook and tick tock, all under marilla minnelli, and if you love listening to podcasts, be sure to check out my podcast called hairbnb. It'S a podcast where i help hairstylists. Just like you, simplify color styling and their beauty, biz for more free education, be sure to check out mirellamanelli.com and sign up for my newsletter. So you can get education right to your inbox and finally be sure to check out my other hair tutorials right here on this channel, and i will see you next time.

Comments
Jaime Madison Hoschar: Do you do move ups with your clients with the keratin?? I started doing keratin about two months ago.. and I was told you can move them up just never seen it done before. And is 6months common for clients with the kera-link? Thank you
Anabel Garcia: How do you charge for a removal versus an adjustment move up?
Rin Tin: Where do you get the tool you used from? Thanks for the video!
Gina Ree: Color is stunning!!!! X
Gina Ree: Great channel ❤️