Full I-Tip Hair Extensions Installation Tutorial + Station Preparation Tips - Stacy From Hairlocs
- Posted on 13 July, 2021
- Fusion Hair Extensions
- By Anonymous
I-Tip is an individual extension system that does not use any heat glue sewing or braiding. It uses a small patented cylinder to crimp the extensions into the natural hair. Everything is reusable and the hair will last over a year with maintenance every 4-6 weeks.
Join Hairlocs for free: https://bit.ly/3jK0jPT
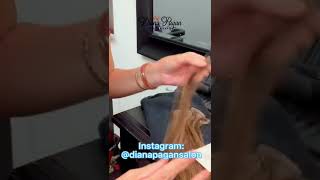
We offer amazing discounts without any compromise in the quality of the hair and the technology behind it. Full cuticle 100% Remy human hair, perfectly aligned strands with zero shedding or tangling! Silicone free. Minimally processed European hair. Extremely durable. Remains smooth and beautiful after washes and adjustments just the way it was on day one.
Join Hairlocs for free: https://bit.ly/3jK0jPT
See more videos: https://bit.ly/3hHSnfI
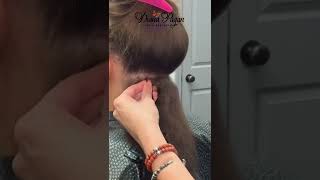
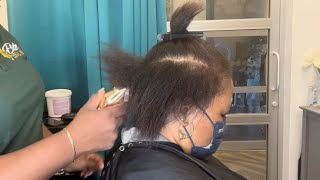
Hi, i'm stacey with hairlocks i'm here with my beautiful model diana today and we're going to be going over an itip installation prior to her coming in. We did do a consultation. I color matched her and we picked the best method of eye tips for her. We'Re going to blend in some colors to give her lightness through her ends without having to do a chemical process, but also she has a lot of length but wants more density, so we'll be adding length density and some lightness with color through her extensions. It'S always good to have your tray set up for your install prior to starting your client, so i'm going to go through the tools that are necessary for this install first, you have your velcro separators. These are going to be perfect for keeping those crosshairs and baby hairs out of the way you always want nice, clean sections and clean rows during your install you've got your razor for trimming her hair after your scissors, sectioning comb, your hair locks, crimpers sectioning clips you're. Also going to have your threader with your cylinders now the cylinders are eye tipped cylinders, so they are not silicone lined and they will be threaded onto your threader there's a wider part at the bottom, so you'll always want to make sure that wider part threads first Onto your threader, i'm going to go ahead and get my threader ready and prep my hair and get her sectioned and we'll get started. Okay, as you can see, i went ahead and got diana all sectioned, i'm starting her first row at the nape of her neck, and i just want you to be mindful that whenever you're doing your installs keep in mind a two finger guideline around all hairlines and Also, the nape and the crown, so this section is a horizontal line, but as we go up with each row, we will make those more u to the rounds of the head. She does have a few baby hairs and we want to keep these sections as clean as possible. So i'm going to use my hair locks, velcro separator and i'm going to place that right here at the section press up - and this is just going to give us nice clean lines throughout our install okay. Let'S get started on our first row. What i'm going to do is take my threader and my crimper and i like to start directly in the middle of the row, standing right behind your client you're, going to take a section of hair, the same size as your cylinder, making sure there's no cross hairs. No baby hairs getting in there you're going to thread that natural hair bringing your cylinder up threading that cylinder through the natural. You don't want to elevate that hair, insert your eye tip, making sure you don't expose the top of the tip and then you'll use your crimpers and clamp one. Two three: i'm going to do a couple more so take that small section of hair making sure there's no crosshairs they're the natural bring that cylinder. All the way up, insert your eye tip. Make sure that tip is not exposed and clamp three times with your crimpers. I'M gon na do these same motions when applying the eye tips throughout this first row, then we'll resection and continue on row by row throughout the rest of the install okay, guys just checking back in for a second i'm starting. My second row and as i told you earlier, that second row would start a u-shape and then each row as i go throughout the install will continue to have that same, u shape. So i'm going to install some more eye tips all right. I'Ve finished her last row, i'm going to go ahead and get her trimmed and styled and we'll be right back with her final look, so we're finished with diana's final look. She wanted to add length with some density and lightness to her ends and we were able to achieve all of that with her i-tip installation. This is stacy with hair locks.

Comments
Buy buy: Thank you so much you’re the only one who made full installation ❤️
Cindy Flores: Thanks for sharing this video I love your work !
Crystal Kelley: How long would you recommend the clients hair to be before installing i-tips
Jackie Vallesillo: Great job!!
Annette Nsoh: I enjoyed watching. Thank you !
Kelly Sao: Helpful
Angela Baylon: how many extension hair did you use