Nessa'S Hair Extensions Tutorial: How To Do A Quick Weave With An Invisible Part
- Posted on 17 September, 2014
- Microlink Hair Extensions
- By Anonymous
Nessa's Hair Extensions TUTORIAL: How to do a Quick weave with an invisible part
Things you will need:
- Hair 2 - 3 packs, depending on how thick you would like it
- Hair Bonding Glue
- Weave wrap (optional but recommended)
- Gel (if necessary)
- Stocking wig cap
-Hair Dryer
-Scissors
- Patience!
Nessa’s Hair Extensions
Website: www.nessashairextensions.com
Facebook: www.facebook.com/nessashairextensions
Twitter: www.twitter.com/Nessas_Hair
Instagram: www.instagram.com/nessas_hair_extensio...
Get 100% human hair extensions, products and services at an unbeatable low price!
• AAAAA Quality 100% unprocessed/Virgin Hair extensions
• Lengths from 8” – 30”
• Body Wave, Straight & Curly styles
• Top Pieces and closures
• Trending styles in Human & Synthetic Wigs
• Weaving & Braid service
• Custom made Clip-In Extension creation
• Hair Care products
• Friendly and professional advice with hair extensions types and care products
Nessa’s hair extensions, Nessas hair extensions, extensions, Nessa’s hair extensions, Nessas hair extensions, extensions, Nessa’s hair extensions, Nessas hair extensions, extensions, hair, hair weave, natural, natural hair, black hair, fusion, micro loop, micro link, braids, braiding, bonding glue, hair glue, wig, lace front, lacefront, wigs, full lace wig, full lace, Brazilian hair, Malaysian hair, Peruvian hair, indian hair, lace closures, weave closure, hair closure, how to, tutorial
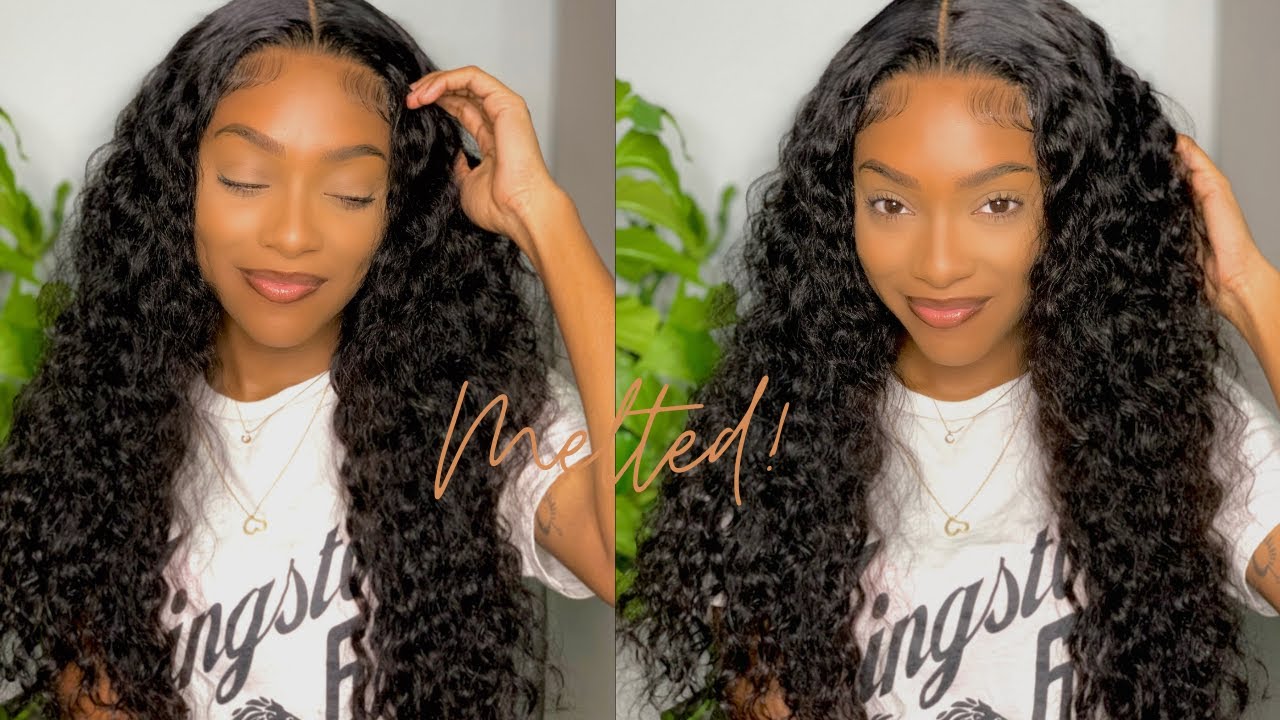
Hey everybody, its nesting here from necessary extensions down at 684 King Street West in Kitchener. Today'S video is how you can or how I do a quick weave. Please bear in mind. This is by the way, the quick week with the invisible part, and this is what it looks like from the back. Also. But sorry I don't know that. Probably that's what it looks like from the back uh right taupe, so with this video. Please please do bear in mind that I decided to do this quick weave at the very last second yesterday, because I've been feeling very, very melancholy, about my hair, my parents over the last week, whilst I've been in recovery from my nasal septal plasti, and for those Of you who didn't know prior, I could not smell a thing because one of the bubbles in my nose was like over lunch. So, instead of going straight, it was like you push like that um, and so I couldn't smell. So I had that corrected and now it's all straightened I can breathe, but anyway, during this time I've not been wearing any makeup. I'Ve not done anything with my hair, and yesterday I got really really antsy like yeah. I need to do something, so I decided to do this, this quick weave with a blue and purple undertone and then, of course, a 1b at the the top. This is all synthetic hair and I use synthetic hair this time. Normally I use human just because I honestly don't plan to keep this for very long. I, to be honest with you I'll, be damned if it lasts till the end of the week, not because I don't think it's pretty or anything like that. Just because I am still a fair amount of painkillers and so forth and having my hair, tucked in and under here is, is a little bit tighter. So sometimes it does give me a little bit of a headache, but that's just cuz I'm overly sensitive right now, but anyway, anyway onto the video. I did this at home, so I didn't actually have a lot of the equipment that I'd normally would use for a quick weave because it's all here down at the store so bear with me on the lighting and everything like that, and I will commentate over some Areas that they are just terrible, okay, all right enjoy it. I look like an absolute mess and I am about five days into my my nasal stop septoplasty or whatever operation on my nose. So I'm feeling a little bit rubbish and I'm just I'm of course, because I have to sit still so long. I'M feeling rubbish with my hair. So what I decided to do is I want to show you guys how I do my quick weaves, but this time I'm going to do it on the cheap, because I know I'm no doubt gon na get really fed up with this. But this weave really quickly. Just because of all the the meds I'm own right now, so I'm going to show you how I'm going to do this fitting and I'm going to be using all really inexpensive materials, so the hair I'm using is the climax synthetic hair. I do have these all in sport and what I'm going to be doing is a kind of a blue purple ombré within the box. So I'm going to be layering it with the blue at the bottom, then the purple and then the block. So it's going to look something like that in terms of color, I'm going to be using a regular wake up rock pickup. I am going to be using some leaf wrap glue. Now this is just some really cheap. So if this is the Roberts Diamond bond, we've we've wrapped, but I do sell the liquid gold in the store as well. We drop, which is really really good. I'M going to be using just a regular black hair glue and I've got a little square here of weaving net. If you can see that this is the tough stuff, so it's not like the regular hair net that you're going to find that it's gon na break. Apart in five minutes, this is a really tough stuff, because I'm going to be making a closure over this and I'll show you how I'm making that closure as well. So the first thing I want to do is I need to wash this mop of hair on my head. I just need to make sure it's nice and clean I'm going to be using the Nesta brand shampoo with the essential oils and bits and pieces in there and conditioner, and I will be right back okay, so first thing you're going to want to do is when Your hair is nice and clean you're going to want to part it if you have really difficult to manage hair you're going to want to get your hair saturated with gel first to hold it down, I'm going directly for the Wonder, wrap just because my hair is Really really easy to mold, so I'm just going to use a little bit of water and the Wonder, wrap but again, if it's, if you've got hard to hold hair use a lot of gel first and then do you under wrap afterwards. Okay, so you have just bring it down, making sure it's nice and easily plausible or manageable as well. Okay, now I am taking a brush and smoothing it down. You don't want to really smooth it down where it's too incredibly tight or where it's uncomfortable, because remember you've got to do this, which is put your cap on now. You don't have to do this. This is what I'm going to be doing, but I'm taking my cap and I'm putting it down below my forehead, because I'm really going to cut this cap and afterwards a coupler, a perimeter. Now I'm applying more wonder, wrap to the outside of the cap. Just because, like I said, I'm going to be taking this out fairly soon and it just makes taking it off not much easier. Okay pop my hair dryer on this is a little portable one that hooks onto my actual hair dryer and I'm going to stay under there for about 45 minutes. The things are really actually quite handy. I really like it okay, so 45 minutes later, my hair is completely dry and I'm going to be cutting around the wig cap, so just around the perimeter do be careful with this when you're doing it, because the last thing you want to do is pull up The wig cap and then cut your own hair, which sucks trust me um. Now what you want to do is you do want to have a little bit of your own natural hair line, showing you don't technically have to do this, but I like to have a little bit of my own hair line showing just so it doesn't look unnatural To me, I'm sure, to cut the wig cap where your part is also okay. Now that I'm finished I'm going to take a wet, I've got a baby wipe here. You can take a cloth or a rag or anything but just get it wet and make sure you're wiping off any sort of residue that the dried on weed bond has put on your skin. I know my knee the one that I'm using cuz it's cheap. It does leave a lot of residue, but other ones will anywho I'm all clean now. So yes, I get to see again so first thing I've done. Is I'm getting ready to apply my first track, so I'm measuring up really from the just below my ears. To my nape, I left a lot of my nape out just because I don't like that tight feeling. You want to apply a little bit of glue on your weft nice nice even coat long along the back and by all means if using mirrors helps you at this point. I'Ve just been doing this so long. I don't really need mirrors, grab your hair, dryer and just blow on a steady nice heat onto your weft, so that it's gon na it's going to cure and bond a lot faster when using a hairdryer. If you don't use a hairdryer, what you're tend to do is you'll. Stick it on there and then you'll realize that it moves. So yes, using a hairdryer, gets you a much more secure bond when you are using adhesives pound it down make sure you do get the edges or the corners really down there, because those are the parts that tend to want to come up a lot faster. A lot sooner as well and after this you're, basically repeating that step, going all the way up. So taking your left measuring it out applying the glue on there with a hairdryer, and I'm really just doing that until your whole head is up or until you get to the top now I tend to always go from right to left. You start at the corner. Sorry this is when I'm applying the weft with some glue on it. So I'm starting right at the edge of my of my hairline on my right and I'm going all the way around again using mirrors. If you're new to this really really does help, I can make it look a lot easier than it actually is sometimes, so I do definitely make sure you're using mirrors. If, if need be - and you can see there, I'm putting it right right to the tip of my hairline as well - I'm grabbing my hairdryer, because you know I'm all about that bass bout. That bass know. No, I'm all about that bass about that bass, alrighty. So we're basically at the halfway point. I finished my blue pack, I'm now going or halfway through popping the the purple in there as well to make that ombre effect. This is freakin long. I will cut this clearly put it's bloody long. So halfway there almost done. Okay, so now I did get to the top, and I am so sorry that this is halfway kind of done here, but my camera stopped - and I didn't realize, though, that I had to put it on okay, the invisible part. Now this is really important. Now you see how I've got just a really small piece, I'm applying this in a direct straight line. Okay, so I just had to like show you exactly what I meant here so here. Yes, each of my um yeah. Here we go. Can I get that even closer you can see when I come really really close that these these are those little one-inch, not even an inch tracks that I had going across and they're basically layered one on top of the other. Now, of course, what you need to do is when you have your part, you just brush some of those hairs forward on each side. The way I've got my hair style there, we go okay and that way that the part it doesn't. Actually, you don't see it, but that's basically what you're doing so. You get one little piece and you put it there and then you put it right next to the other one. You put it right next to it right next to right next to it right next to it, and so on. Alright, okay back to the video, now again, really important you're, putting it straight directly straight you're, not putting them at an angle of any sort they're following the exact line of the part that you have in question. If you put it at an angle, it's going to come out not so quite invisible. Okay, the hair does need to be straight for this right. This is coming together nicely and you do the same thing for the other side. Okay, so you're, probably thinking where is the rest of this video and in all honesty, my camera completely died on me. Apparently it can only record for 40 minutes at a time and then it ends anywho. So what I did was I I finished up my partner until about here and then I made a very, very quick glue, closure or a hold poacher, which is basically you take your weft like this. You only take about five centimeters, or so you put some glue on it and you fold it over now once you've folded it over. You part it down the middle and it looks much nicer than this, but any hope when you put it down the minute. It looks something like that and you get your flat iron, you squeeze it. I will be making another video, which is an actual video that doesn't cut off as to how to make this closure specifically. But again I just I got really lazy and this is what it ended up with. So this is what it looks like anyway. I can't see where it is here: okay, that's what we've got and now, when you are doing, your invisible part do make sure that you're taking your time with it, you are going to be applying anywhere from 30 to 50 of those little centimeter or inch long. Wefts on there and the more time you take the better it's going to turn out. I started out spending a lot of time and then I do get quite tired at the edge. So I went a little faster and that's why you can see a couple of little bumps and so forth in there, but I can do much better job, I'm just ill anywho. If you have any questions or queries, give me a shout or any kind of hints or tips, or you just thought, oh god that video is shockingly uninformative. Please give me a call and I'll, let you know much good. Thank you so much you guys. Bye,

Comments
sassykarmel: Great tutorial!! Just wanted you to know that I had success with invisible parts doing them straight and at an angle on myself and clients. With the angle they are basically done the same but at an angle and it gives a 3d look as if it's coming out the scalp.
Loveable Gray: Hi, omg that is some pretty hair loving the colors. I'm going to making my 1st quick weave maybe next week just looking around so I have a idea of how to make it. thanks again
Dog: This is amazing at first I thought it was ur natural hair but wow it's so cool I'm actually getting extensions in my hair next week Wednesday I'm super excited
Nessa's Hair Extensions: Hi Chantele Walker :-) yes you can :-) now it is synthetic hair, but if you get the hair damp with a spray bottle and curl with a flat iron while the hair is damp it will do an instant steam process :-) I am working on another video to show how you can alter synthetic hair like this :-)
babybettyboo96: I love this video I actually did this for my Cuzzin birthday as my hair style for this week
JJ: beautiful colors looks like real hair
April Carter: You're so pretty!! And your personality reminds me of myself!! *That's a good thing lol!* Thanks for the tutorial!
Aimee Cho: Your natural hair is beautiful.
kersha beaver: Love it those Colors are great
Nakeba Brown: It is so beautiful
Nonchalant: so can you use heat on this because I see it was straight but at the end it was curled
It's Unique Mone't: Next time it is best to show a slow motion video of the ending results including the invisible part and middle sealed part on ho you hid the actual track.
Sharelle: Your so pretty ...even with just the cap on
Blew Blue: too cute
kennedy Smith: How did u wrap this at night? Did u flat iron/curl it daily?
Tall Victoria The Goddess: This Wig is too Beautiful on u Sweetie xx
Get Fit With Tellie: What's the name of that extended to your blow drier to
Makayla Werman: I want to do a quick weave or something but I'm afraid of what to put in my hair because I shower every other day cuz my head itches.
Nessa's Hair Extensions: This is a response for Hali Robinson, which I got your comment via email but its doesnt seem to want to show up on youtube now :-P Hali wrote Q: " I loved the video I was following along to it and it skipped lol how did u do the actual part did u draw on the cap?" A: Thanks for your comment Hali :-) ok so I did cut my cap right down the center of my part. For how I applied the pieces forward the video to 10:20, however you do not have to cut your cap if you dont want to :-D. if you are doing that method use a beige colored wig cap and before adding your tracks use some makeup to make a line where you want your part to be so you know not to glue over that point :-)
shirley hartdige: I always enjoy your videos........Be Bless.
kennedy Smith: Where did u get the hair colors from???
Ladiia: this didn't show me how to do the invisible part !
shammier thornhill: you are so cute