*Detailed* How To Install Microlink Weft Extensions On Yourself At Home | Curls Queen Hair
- Posted on 08 March, 2022
- Microlink Hair Extensions
- By Anonymous
I installed microlinks on myself at home! I tried to make this very beginner-friendly so hopefully, this helps you guys!
Products Used :
Microlink Pliérs: https://amzn.to/3KskbRA
Flat Iron: https://amzn.to/3s2EZbY
Chi Heat Protectant: https://amzn.to/38DjAPK
Thank y’all so much for watching! Feel free to comment any content/videos you guys want to see from me down below! And remember, God is love. Whoever lives in love lives in God, and God in them. His love endures forever.
————————————————————
Use Code YTJH to save $$$ OFF
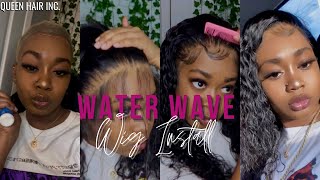
I am wearing 18 inches microlink beads weft in light yaki texture from CURLSQUEEN .
Shop the same #lightyaki #microlink #beadsweft #extensions for #naturalhair
https://www.curlsqueen.com/199-it007-1...
√Ultra Full Set-300 Pcs-300Grams
√ 100% High Grade Brazilian Virgin Human Hair
√ True To Length
√ Thick & Full From Top To End
Connect with Curlsqueen :
Instagram: https://www.instagram.com/curlsqueenof...
Tiktok: https://www.tiktok.com/@curlsqueen.com...
▬▬▬▬▬▬▬▬▬▬▬▬▬▬▬▬▬▬▬▬▬▬▬
Let’s get to 20,000 subs !
——————————————————
Business Inquiries
Subject: YOUTUBE
——————————————————
Keep up with me:
IG- janiaaliyah https://www.instagram.com/janiaaliyah
Tiktok: janiaaliyah
My Podcast: https://shepraysfirstpodcast.buzzsprou...
———————————————————
Subscriber Count (at the time of filming): 18,000
——————————————————————
FAQ about me:
Name: Jania
Age: 20
Birthday: December
Camera: Canon G7x Mark II/ Sony ZV-1
Editing Software: Final Cut Pro
————————————————————-
Thematic BG Music I Use:
Music by Clueless Kit - Rooftop - https://thmatc.co/?l=080E7A10
Music by Mark Generous - Luscious - https://thmatc.co/?l=82912ECC
Music by Mark Generous - Chase The Sun - https://thmatc.co/?l=059C2FE1
Cody G- Aight
Music by Mr. Jello - Wild Willow - https://thmatc.co/?l=7D989046
Music by Mr. Jello - Yes No Maybe - https://thmatc.co/?l=1E714891
Music by 8thDimensions - Cruisin - https://thmatc.co/?l=4493AD0D
Music by SkeetOnTheBeat - Nostalgia - https://thmatc.co/?l=FA1009E9
Music by Mr. Chase - Wild Cherry - https://thmatc.co/?l=9B36F039
Music by Mr. Thibs - Ayesha (Freestyle) [feat. Payton Bowdry] - https://thmatc.co/?l=FD969475
Music by Kabwasa - Boardwalk - https://thmatc.co/?l=C15148DA
Music by Kabwasa - Whole Lotta Love - https://thmatc.co/?l=8B78DB7F
Music by Ebony Loren - Mine - https://thmatc.co/?l=029E8CB6
Music by Mr. Jello - Slow Down - https://thmatc.co/?l=B7C5A17C
Music by Mark Generous - That One Morning - https://thmatc.co/?l=B48CCB08
Music by Mark Generous - Meganne - https://thmatc.co/?l=BE3A3D01
Music by Mark Generous - Orange And Pomegranate - https://thmatc.co/?l=7F2B5124
Music by frumhere, kevatta - warm feeling - https://thmatc.co/?l=1C55A855
Music by Goosetaf - Bumblebee - https://thmatc.co/?l=3E5AC0A5
Music by Mark Generous - As I Got Ready - https://thmatc.co/?l=AEFDDFAD
Music by Naomi - If Love is the Answer - https://thmatc.co/?l=58F69BF3
Music by Dylan Rockoff - Around You (O Christmas Tree) - https://thmatc.co/?l=B62D7098
Music by Eila - Lavender Dreams - https://thmatc.co/?l=49777D5A
Music by Mr. Jello - Passion Fruit - https://thmatc.co/?l=8D8CCBF4
Music by ninjoi. - Deck the Halls - https://thmatc.co/?l=F773B69B
Music by Mr. Jello - Christmas Morning - https://thmatc.co/?l=FA77142A
Music by Gil Wanders - It's Midnight - https://thmatc.co/?l=28B033F9
Music by Marc Wavy - Daydreaming - https://thmatc.co/?l=FB933D7E
Music by Beats by Egomi - Come Back to You - https://thmatc.co/?l=F92AA585
Music by Mr. Chase - Missed Call - https://thmatc.co/?l=DC62F061
Music by Mr. Thibs - Change (feat. Payton Bowdry) - https://thmatc.co/?l=94D64990
Music by Dylan Rockoff - firstavenue_bedroom - https://thmatc.co/?l=BE53067C
Music by Joey Howard - Autumn Leaves Fall (feat. B.C.Hill) - https://thmatc.co/?l=C4848EF3
Music by Mr. Chase - Breeze - https://thmatc.co/?l=5E0A36E8
Music by Gil Wanders - Poco Pico - https://thmatc.co/?l=6648289D
Music by Citrus Avenue - Girl from Manu Bay - https://thmatc.co/?l=142D0BBA
Music by Joey Howard - Racing Through My Mind - https://thmatc.co/?l=E40235C5
Is what's up beautiful people? It'S you guys and i alia and welcome back to my channel. So, as y'all can see by the title and the thumbnail today, i am going to be showing you guys how to install these micro beaded wefts. Essentially, like you know, micro links, i don't know the terminology for it, but they're supposed to be like micro links on the bundle and then you can install them into your hair like a braidless, um, needleless threadless sewing type thing, that's so wordy, but anyways. Yes. So if you guys are interested, keep watching, okay, you guys so to go ahead and get started with this video, i'm going to show you all the supplies you're going to be needing for this install, and so as y'all can see. I have three bundles that were sent to me by curls, queen hair, and so these are their micro link, beaded bundles, i believe, or beaded wefts. That'S what they're called, and so i'm going to be using these clips, the little pair of pliers, as well as the kind of big wire crochet loop, and so then, the next step after that, as y'all, can see. My hair is already like straightened and i had it like wrapped all day, and so i'm just going to go through and kind of comb. My hair down and from here we're going to go ahead and section and part off our leave out. Technically, all of your hairs leave out, but i'm really talking more so about the perimeter and where your parts are going to be and y'all are going to see. I kind of parted my hair slightly different, because i know that i like to go between middle part and side, part and kind of like a free part type thing. But if you know that you're just gon na stick with one part, then i definitely recommend just doing one part to make this whole process easier and faster and the way i checked to make sure that i left enough hair out on my perimeter to get like A nice ponytail and nice bun is when i section off the hair around the edges. I flip it back over to my rat tail comb and if that hair is covering the end of my comb, then that note that lets me know that it's definitely going to cover the track and cover any like microwave bead or anything that could possibly be showing. I'M still happy and if you guys watched my taping tutorial, then you saw how the way i see the back of my head is. I call my phone or my ipad and i kind of watch my parting through my ipad, but as we get um further in the style, i really didn't need to see myself like do this style on the phone that much you can kind of feel around and Once you get a little comfortable, it gets a lot easier, and so now that we've got the parting and everything out of the way, it's time to go ahead and start installing these micro link beaded webs and so first things. First, what i like to do is just kind of feel with my hand and just grab a tiny pinch of hair, literally that much and so from there i take my little wired, crochet hoop and put it through the micro bead and then use two fingers. My index finger and my thumb to pull my hair back through the loop and so then from there i pulled a loop through the micro bead hoop and then i tried to like, especially towards the back and whatnot. I didn't really lock the loop or tighten the loop too close to my scalp, maybe like just a little bit down so that way, um it's able to move up and down freely, as you put in a ponytail and take it down, and it's not really like It shouldn't feel tight at all is what i'm saying, and so, as you see on these bundles, it's probably like an inch in between each bead and so in between that inch, i literally just kind of skipped over here, so i only grabbed hair where there was A bead, basically on top of it, and so i'm just kind of going through my hair and as y'all, can see literally you guys it's so simple. Once you get the hang of it, i'm literally grabbing, it seems like i'm grabbing, like you know, when i say like a pinch of salt, i'm grabbing a pinch of hair, because the good thing about this process is that you can never grab too much hair because It won't fit through the bead anyways and so just try not to grab too little because you know but yeah, and so that's this process, and you guys, like literally when you go to the next bead, make sure it's actually spread out like to where the track Is laid flat, it shouldn't be like a little humpty dumpty or anything like that, and if you guys do it right, it literally looks so seamless and flat y'all, like amazing, and one of the main things when you're doing this style is make sure you do not Have it too, too close to your scalp, because you don't like you shouldn't it shouldn't, be tight or anything like that. I said that before, but i just want to kind of put extra emphasis on that and then also i don't know if you guys can tell, but i am cutting each like little bundle or section after i go across my head. So as y'all can see, when i get to the end of this row, i'm going to literally cut it immediately after that last bead, and so then, when i start the new one, i'm literally starting with a bead and ending with a bead. So it's almost like a quick weave but much more flexible, no glue and it's micro, beads, so yeah, and i promise you guys once y'all get the hang of it. Maybe after two or three rows this process is so freaking fast. It literally goes by so fast and i'm not trying to to my own horn or anything, but the way i did i feel like i did it so much easier than some of the other styles or some of the other methods i saw, but i also do Have an advantage because these wefts already come with the beads on them, but literally this one. You just grabbing pulling your hair through and tightening that little bead and so to remove them. You'Re, literally just going to kind of squeeze the bead the opposite way to loosen it up and it slides right out. But i'll do a video on that as well. If y'all want to see the removal process and everything, and so as we get closer towards my leave out and my parting sections and whatnot, i really want to make sure that everything is flat and secure and you guys will notice like i said i kind of Did a little thing so i can have like a double part, and so y'all will see how i kind of squeeze like a little track in between to make sure i had like a little seamless flip over and then my seamless side and seamless middle part. But the key here is to literally just make sure you maneuver and finesse that track the way you can and that's why i love that they actually sent extra beads. So if you need to place a bead somewhere or even just like, remove a bead and like start fresh with a new bead, they send a pack of extra beads. So that way, you're kind of able to you know really get your finesse on in there. So yeah waste, and so, as you guys can see here, i'm literally just going through and kind of filling in the blanks to make sure i'm really getting this fullness as well as like it blends with my hair, well lengthwise and texture wise, and so that's why. I always put one like really towards the front of my head, because i don't want to have that distinction between my length of my real hair and the length of the bundles noticeable, for when i go through and layer it, and so i want to caution you Guys if y'all, like um, have very sensitive edges - or you know like are worrying about kind of you know having tension on your edges. Maybe don't add this track right here and if you decide to do that because i needed it because i wanted it to you know: look more natural um. If you decide to do that, make sure you do not do it tight at all and also kind of you know, do it a little farther back towards like the thicker parts of your hair, but make sure you leave room on that route, because this is going To have to flip back and forth, for when you wear it down when you wear it up, when you put it in the bun, that's what i caution you guys, the most when doing this style is just make sure you have ample room around your roots, for It to flip up and flip down, and even if you install it tight, you can always go back through and use your pliers and like loosen them. I definitely have to do that a couple of times, as i was doing this style so yeah, and so last but not least, to literally put the icing on a cake for this style is layering, and i use this with my little. I don't know what this blade thingy is called, but it's like a little comb, looking blade thing that i get from baby supply store, and this is what i use to layer my hair every time, and this literally does it every time for me. So hope you guys enjoyed so that's all i have for y'all today. Thank you all so so much for tuning into this tutorial. If this helped y'all out. Let me know down in the comment section below and if you're going to try this style try this method. I use i tried to make it very easy because all the ones i watched was so hard y'all. So hopefully, this really helped y'all out and y'all able to save some money and achieve this style at home and do not forget if you're interested in purchasing this hair. Let me show you the bundles, if you're interested in purchasing this hair. This is how it looks, and this was by curls, queen hair, so i'll make sure i put all the information on the company and the hair the specific length and stuff that i have in this video i'm wearing a light. Yaki 18 inch, but as y'all can see, i kind of you know, layered it and cut it, and all that other stuff. So i'll put exactly like how the hair came in um, the description box and lastly, just because i know some people may ask. Hopefully i make it to this point in the video, but i used one and a half bundles. So, as y'all can see here, i still have one, but then right here, it's like a half, so it came with three and i used one and a half of them so that filled up my whole head and yeah. But you already know: click smash smack that subscribe button down below, and i will see y'all on my next video now.


Comments
Fabi Cruz: These will be my next extensions thank you for this tutorial it was awesome!!
Jebre H: Yess you did that and would love to see the removal process!
0tismadaline: This is absolutely gorgeous and it blended soo well
majorie hippolyte: Great advice and you did an amazing job❤
Veronica Ellis: I’ve been paying soooo much money for this when I could just have done this myself so glad I came across your video
Fari R.: Very nice!!! Would have been nice at the end to see you flip it and pull it up in a pony just to see the versatility. And loved how you talked through it with details!!! Keep them coming
angelique Allen: Thank you for the tutorial ❤️
Ashley Polk: Love it!!!! When you get to the end of the track and cut it what do you do with the extra track that’s hanging before the next bead? Do you just cut it so you can start the next row with a bead first n not extra weft?
_RooKie_: It looks so good!!
CurlsQueenofficial: You are so talented!!!!! Love your content.
kandis coleman: You did a great job
Liz B: Would you recommend these or tape in’s?
Thara Messeroux: How did you maintain it and how long did it last?
Kiki: I liked that! Good job!
clipinqueen: I wonder why more people don't do this type of extension? I have done this particular method with the bead attached to the weft, but I found it difficult to press the bead with the pliers. Hard to get around it with it attached to the weft already. Now, I just do the beads separately, so you're attaching the beads onto a little of your hair and the weft. Easier for me. Your hair looks wonderful; you did a great job. Thanks for showing us!
Brandy Lashay: Wow they look great on you! Do they send you enough beads for a full reinstall because the beads won’t last for more than one.
Takeyah Onje: i’m getting them next week and i’m ready
At this moment: U are Brilliant!!!
Ka-Otic Hair Banded : Where did you order the hair from
Calvin Russell: Beautiful all day and every day, I'm a hairstylist 2,,N the states, s,c,
Ka-Otic Hair Banded : And how was the hair after a while is it some good hair
callmec: she so pretty and cool! <33
medge romain: How many bundles did you end up using? Was it all 3?
DAVID.M: omgg it looks soo complicated
C h e l s e a: You are so pretty