Full Weft Extensions Installation Tutorial (2021) - By Stacy From Hairlocs
- Posted on 14 July, 2021
- Microlink Hair Extensions
- By Anonymous
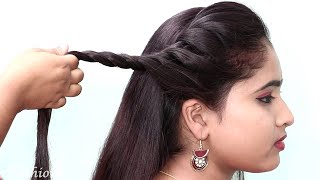
Try Wefts for revolutionary styles
Bought machine Wefts before?
Then you will know on average you have 140-160 grams of hair BUT ALL THE SAME COLOR.
Hairlocs has revolutionized the wefts by now offering 30-gram bundles and build to the weight you want or need which allows you to choose multiple colors. These 11” wide, 20” in length wefts have the same advantages of a hand-tied but are machine-tied allowing them to be cut and are flat to the scalp giving you a seamless installation.
Join Hairlocs for free: https://bit.ly/3dIy1S6
See more videos: https://bit.ly/3hghcQx
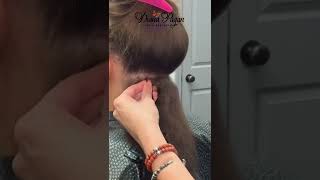
Hey guys, it's stacy with hair locks, i'm here with my beautiful model katie and we're going to be just showing you a full head installation of wes today, prior to her appointment, we did a consultation. We talked about what she was wanting out of her look and we decided wefts would be the best method. We also color matched her to the hairlock's color ring. We decided that she wanted a little more lightness in the ends and to keep it from a chemical process. We decided to add that lightness with the wefts, so we chose three colors that we will be mixing for a seamless blend today. You always want to make sure you have your tray completely set up for all the necessary tools. You'Ll need for your installation. Today we have your sectioning clips for her hair, your crimper, your hair locks razor. This will be to trim her hair after your hairlock scissors. For cutting thread or into the weft, your velcro separators for keeping any flyaways out of your sectioning, you need to match the silicone line, cylinders to her base color of her hair, and we have previously done that in the consultation and she's using light brown. Those will be threaded onto your hair locks. Threader you'll also have your nylon thread that is matched to her base color. You will have your c needle your double pronged clips to hold the weft to her hair. Now that my tray is all prepped for our installation. I'M going to take my cylinders thread, my threader, the rest of the way thread my needles, and we will jump right into her weft installation. Now that you see, i have katie all sectioned, as you can see, i did a u parting. That way we can go with the rounds of the head. You want everything to be super clean when you're sectioning, so i use the velcro separators to keep any little baby hairs or crosshairs out of our way when we start installing our cylinders. So i have my silicone lined cylinders on my threader and what i'm going to do first is take a nice clean section from right in the middle of the you parting, making sure there's no cross hairs. You can also use your sectioning rat tail comb to make sure there's no little hairs getting in the way of that section. What you'll do is taking your threader thread that natural hair through bring your silicone line, cylinder up thread it onto the natural, keep it keeping everything at a zero degree. No elevation you're going to take your crimpers and tighten that cylinder onto the hair. You will want to go side by side, leaving no natural hair in between keeping your sections very clean, standing directly behind your section, so you don't over direct it all, i'm going to continue with a few more cylinders threading through the natural keeping everything nice and clean. I will continue those same cylinders throughout the rest of her row. I'M going to continue to place these cylinders the exact same way throughout the rest of the row. So now that i've finished installing all the cylinders, i've went in her row and i have stayed with the perimeter of about an inch away from all the hairlines. A good guideline is two fingers away from hair lines at the nape and at the crown also next. What i'm going to do is take my weft and measure that on her row and also attach it with my double prong clips before i start sewing, my section is ready to start sewing, so what i've done is tripled the wefts and stacked them on top of Each other using the double prong clips doing two at the end and the rest all on top to hold that weft in place. As i sew that whole row, i'm going to start on. My second to last cylinder. The outside pocket only sewing through the pockets of the cylinders. My first stitch will be an open, lock, stitch that meaning it will go through the legs of the thread underneath the weft. My thread is extra long, so i don't run out on this row, so bear with me, okay, pulling that tight, i'm going to move on to my next pocket and that will be on the first cylinder left pocket going straight down under the weft. This will be an open, blanket stitch. You always want to stitch on top of the weft and pulling that tension tight now to anchor that outside pocket. You'Ll want to do three open blankets in a row into that right, pocket. So three open blankets in a row. So we've got one open blanket. Your second open blanket getting closer to the edge of those wefts and then your third open blanket on that outside pocket. Your third open blanket now we're going to start stitching the opposite way. You will stitch through each pocket twice. So your first stitch is going to go directly to the next pocket and that's going to be a closed blanket stitch, that's meaning the thread will close off that stitch. So closed, blanket will be next closed. Blanket hold your tension, so you don't get your thread tangled up so through that same pocket. After your closed blanket, you will do an open blanket through that same pocket, so open blanket after the clothes blanket keeping your tension holding your thread up, keep it on top of your weft, pulling that tension tight and going to the next pocket. So your next pocket you'll do the same thing. You will do a closed blanket and immediately after going through the same pocket, you'll do an open blanket. Each pocket will have two stitches. Holding your thread up will keep that thread on top of your weft, making a nice little tabletop. So we will continue on through each pocket doing a closed blanket and then an open blanket. As you can see, i've finished sewing most of my row and i've made it to my last cylinder. What i'm going to do is anchor this pocket the same way i did as the open anchor, but this will be the closed. So i'm gon na do three open blanket stitches right here at the corner of the weft. So that's gon na make one then our second open blanket making sure you pull that edge tight, we'll have one more open blanket anchoring that corner in so after your third open, blanket you're gon na go backwards to your next pocket and do an open blanket stitch. That'S still on your first cylinder inside pocket, so we're going backwards, open blanket another open blanket through the outside stitch of the second cylinder, and our next stitch will be our closed block stitch. Okay. So this last stitch is going to be my closed, lock stitch. What i'll do is go through the inside pocket under the weft looping the thread three times around the needle and pulling that through keeping the tension with the other hand, bringing that knot all the way in pulling it tight upwards. Keeping that tension, then i'm going to take my scissors cutting enough thread that i can make three bunny ears to secure the weft. So i'll make my bunny ear knot, one! Don'T let any of those cross hairs get in. So we've got one knot and now i'm going to tie off two more and trim that thread trimming the thread close to the knot, so it doesn't irritate your client's scalp. Now that we've finished row number one: we're gon na go on to row number two and do the exact same thing. So, okay, guys i've just finished row number two as you can see, and lastly, i'm going to trim and style and then i'll be back to show you her final look all right guys. This is katie's final look. Today we did a full head lengthening with wefts on her. We wanted a little bit of a lighter brighter look and adding extensions gave her just that. I used six bundles of the new hair locks, weft extensions and also three different colors to give her that seamless blend, i'm stacy with hair locks.

Comments
cris lay: By far the best video I've seen showing how to install this type of extensions
Katlyn Miskimmin: This is an amazing video! Thank you!
Jess: Can you diagram a map of where the parting is on the head?
Alina Tullius: how far up from the nape and between each row do you put the row
MichReWe: Can someone please explain what a blanket abs a pocket is???
J Official: Oh you sewing sewing. your work is very neat!
Tribe of Travis': Great but cant see the actual stitching behind your hand.
JayOwes: Is that the space between the beads?
Pamela Miller: i dont understand between open and closed?
Jennifer Allan: Where does it explain what the pocket is?
Dillon K: Lots of deep pulling of hair on stitches
JayOwes: What is a pocket
Alexandra V.: Closed blanket, open pocket what?? we need some terminology please
SistaDos Salon & Fine Grooming LLC: Can’t really see because her hands and nails!