How To: Right & Wrong Way To Install Micro-Loop I-Tip Extensions | Beginner To Expert | Ft. Ywigs
- Posted on 06 April, 2022
- Microlink Hair Extensions
- By Anonymous
Direct link to the kinky straight micro-loop hair extensions:
More micro-loop hair extensions:
https://www.ywigs.com/collections/i-ti...
Ywigs official website: https://www.ywigs.com
Ywigs Clip-ins Hair Extensions:
https://www.ywigs.com/collections/clip...
Ywigs U-Part Wigs:
https://www.ywigs.com/collections/u-pa...
Ywigs HD Clear Lace 13x6 Lace Front Wigs:
https://www.ywigs.com/collections/13x6...
Connect with Ywigs:
http://www.instagram.com/ywigs_officia...
https://www.facebook.com/Ywigstore/
Snapchat: Ywigs Hair
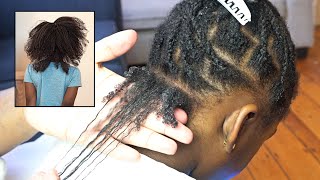
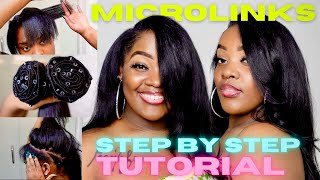
Hey dolls welcome back to my channel so today i'm installing some micro lube's eye tip extensions for the first time so y wig sent me three bundles of their kinky straight 18 inches, and let me tell you if you are a natural sister like you have to Get this texture because i feel like it will blend with so many textures once it's flowed out. Okay, so for my client here, my sister, she is not completely natural. She does perm her hair, but she doesn't do it like where it's super duper straight. So this does blend pretty well with her hair, even though she is not natural anymore, okay. So what i love about this extension or this if you've ever seen, microlinks installed guys it's a tedious process, so why wigs make it so much easier to install these eye tips because they give you the tool that you need um to make it easier. So you see those white loops. That is oh, my god. This is genius okay, but before we get to that, let's get into the leave out. So here i'm gon na be telling you guys what i did right and what i did wrong. So, first of all, what i'm doing wrong here is: i should have left out way more hair when you're doing sew-ins like this is good enough for sewing, but for eye tips you see, how do you have those little short hairs at the back like? I should have left out a little bit more to where she had a longer length so that it would cover the entire head. Nonetheless, the install was came out very well. However, i'm gon na be telling you guys what you should do and what you shouldn't do. So now the leave out that i'm doing around the ears - that is pretty good - that's a good decent leave out, so you guys can take notes from that part and as well as the front. Maybe i should have pushed back a little bit further, but i wanted to i'm just this is my first time y'all, i'm learning like y'all. I had to sit down and watch some youtube videos myself so that i can learn so sometimes the teacher is the student. You know i'm saying like listen, so i'm going around. You know i'm braiding the leave out out and i have to also pay attention to the little short hairs that she have at the front like you have to go flip it back, go through part. It that's what i'm taking out her edges now, so i can see. Okay is that gon na be enough hair to cover it? You know what i'm saying, but for this type of extension, you really can leave out a lot more than i did so if you're gon na be following this video i'll. One of my recommendations is to leave out a little bit more hair than i did so that it covers a little bit better. However, i am very proud of my first installation, so please watch till the end because, like i said, i'm i'm teaching i'm learning but yeah, just just listen to what i'm saying. Okay, i'm going to tell you the pros and the cons. Okay. So i got the leave out of the way. So now i'm doing the she's just going to get a center part, nothing fancy she's, very simple: she just want a ponytail or if she has it out, she wants a center part. So i went ahead and did that see that little leave out that i did uh uh. It gets bigger at the end, because that was not enough. So while i was doing it, i had to leave out a little bit more than that. So, like i said when you're doing eye tip extensions, i would highly recommend leaving out a lot more, especially if they have some length to their own hair and it will cover and, like i said, it's the kinky straight 18 inches. So it's not a big length. Different from her own hair, so really it's not gon na look bad. If i had left out a little bit more around the perimeter all right, so let's get to the installation guys so for this installation, you want to go in a smiling direction and you want to kind of make the parts really small, because if you have too Much hair going through that loop, it will not fit in which you guys are going to see soon for some of them. It just wouldn't fit so always part in a smile so from ear to ear. You want to go like uh. What do you call that? Concave type, smile, okay, you guys get it it's it, curves, okay, so for the first one. This is what i'm talking about guys. So i've i've watched it extensions and they have to put all the little tips or on some string or something and i'm sure it takes a long because this install took me about four and a half hours. So i'm sure, when they're doing it uh the original way it takes them way longer, but y wigs made it super easy, so they already come with the loops. All i have to do is stick the hair through that loop and pull it through and clamp it and that's it so if you've never seen how they do it originally, you can go ahead and look at that, but it's so much more tedious. You have to do a lot more work, and this just makes it so much easier. So one of my advice for eye tips what i've learned from watching my other youtube videos is to never put it too close to the scalp, because it will hurt your client when they try to uh pull it up. You see how i just flipped it up. Like that, okay, so if it was too close to her scalp, then i wouldn't be able to move it that easy and it would hurt her because remember you're clamping it onto her natural hair, so any little strand that is clamped on too tight or it's too Close to the scalp, it's going to hurt okay, so please, once you put it on there, you want to scoot it back some and don't feel bad. If it's, you feel like it's hanging off too much trust me, i mean, don't put it all the way down now, you just need it a little bit away from the scalp so that when you flip it, it doesn't hurt your client. So i'm not telling you to put it all the way to the end of the hair you're still trying to cover it. However, just go ahead and put it on there, push it down some and like just use some reasoning with it when you're doing it. Okay, so every now and then i'm gon na pause and let you guys watch you know and then i'll come in at any teaching moment to show you guys what i am doing to educate you guys on what i learned the pros and the cons of this Install like i said before it took me four and a half hours. I really thought it would have been faster, but again this is my first time. Secondly, i can't even imagine if i was to do it the original way, because this way uh the way they looped it um, provided the hair with those little loop helps so much right. So for this guys, when i say don't put too much hair in it, that's what i meant the thing just broke off so because i'm trying to stuff too much hair into that loop and what i should have did was just took it out. But me i don't give up so i'm gon na get that hair through the loop, and you also always want to ask your client like: does it hurt? Does it hurt so i didn't let the string get loose on me because i still needed a string to pull the hair through, but always ask your client like? Is it hurting? So if it is hurting you want to pull out, you want to quit and start over, because you do not want to put your client through pain when doing these, so i'm tugging on them a little bit to see like okay. Are they too loose? Are they gon na come down? They are not too loose and um, i'm using professional pliers for this type of extension, i heard there's a different type of pliers to use. However, this pliers work just the same so i did get the pliers from the hair store not from like lowe's or home depot, but i got it from the hair store. It is for eye tip extension, so go ahead and get the proper tools that you need to for this install. So as i'm going, i'm just gon na keep doing the same thing over and over and each line that i get. I continue to make that curving smiling apart and i try to make it as thin as possible and i try not to put too much hair into the loop so that um it will like go through the loop. Also, you don't want to have too little hair in the loop, because then it's just going to slide off. So it's there's. This perfect amount that you need to get so once you get started on doing this guys like you'll, see you'll, feel it just use great judgment on how to install these. There are some lessons i learned further in the video, so i do recommend you continue to watch if you want to know like the pros and cons of this install, because there are some bumps in the road that i come across, that i'm going to correct and Let you guys know what i did to correct it so here i am attempting to make it a faster process by just putting the loops through and then going back later and clamping them on. So this is what i'm doing, and i did end up doing it. A few times throughout this install because i do feel like it was faster, but you just have to make sure you have enough hair in the loop so that, while you leave it behind without clamping it, it doesn't just fall off. So, for the first one that i did in this line of row, you're gon na see that it just fell off there like i just i didn't even notice it until i saw it on the ground until i went back to clamp it on. I saw that it was missing, so i just throughout the install like it just felt. I just ended up putting one more on there so, like i said you can do that it does make it a little bit faster, but just make sure you have enough hair in that loop so that, while you're going through the process, they're not like falling off. Okay, guys so here, i'm gon na show you guys how to unclamp it. So this one loosen some because, like i said not enough hair in it, however um i can't take hair from anywhere else because, like that was the final that was in between everything i've already continued on. So it started to slide off because i didn't clamp it down further enough. So the pliers that i have does come to where i can place it into the pliers and on loosen it, and then i pushed it back up and clamped it on a little bit harder. So this is an example of not having enough hair in the loop and it's sliding down throughout the process. So you just want to make sure when you do do that, that you go back in and you make sure you clamp it on as tight as you can, so the pliers does help with taking it apart and putting it back on so for here. The lesson that i learned throughout this process was that it's uh, it's tedious when the hair is natural and that's why i see most stylists, they do flat iron, the hair before doing eye tips. So i did go in midway through and i kind of straightened her roots some, because this made it so much easier for the hair to fit in the loop, as well as a smoother process, when i'm like pushing it up towards her scalp they're, not like bungling Up because you know her natural hair is curly, so they were doing too much. So when i straightened it, i got so much better results than when i just had her natural roots outside. Do recommend uh straightening the hair prior to especially, if you know, you're, going to straighten the extensions themselves which i ended up doing at the end. So i went in and i kind of took my um hot comb and i just sprayed some heat protectant on her hair and i went in and i straightened her roots for her and now they're going through so much smoother. I can fit a lot more hair through that loop, because now it's straighter and i guess, feels less dense when it's straight so that helped tremendously so there's one lesson that you guys can take, and this guys is just one bundle like i'm so like they sent Me three bundles, they told me. Usually you only need two bundles and i'm already like more than halfway through, and that is one bundle that i use. So i had two bundles left, though. At the end of this install, i ended up using almost a full two bundles, so i did not use three so if you guys decide to order this to use it, i highly recommend just buying two bundles, because, especially if you have nice thick hair yourself or The client that you're doing it on has nice thick hair. I do just recommend just getting two bundles. You don't have to stretch it to um three bundles so because it was really full. It was really thick and once i completed a style, i unraveled her um perimeter and, as you can see, i don't know if you can see, but i did not um. I did make the middle part section a little bit bigger. So it was enough hair out to cover, but i would have left a little bit more out because it sometimes it shows the eye tips a little bit like she. You can definitely get away with it. However, i just wish i did leave out a little bit more and the way to correct that is just taking out a roll like honestly, like we couldn't be bothered to take it out, because i know she's not gon na wear this for a long time. However, like if you feel like you, didn't leave out enough just take out a row like it's super easy to take out just unclamp, it pull it out and take it out. So now i'm straightening the hair and, like i said this extension, is from y wig extension, so it straightens very well like if she had natural hair and she just wanted to throw it up without straightening it. That would have looked awesome too, because it gives a nice blowout effect for this kinky straight hair. However, when i did flat iron it, it looks really good and then, when i did curl it, it kept the curls really well. So i did really love this and i always be jealous of my clients, because i wish somebody would do my hair, like i really like this extension, and you know, i've always wanted eye tips, and you know i got ta be the one to do it because I either can't find people or, like i don't know, i just don't be having time for my own hair, so i just make other people look pretty. Let'S just say that, okay, so when i'm trying to flip it up, i did you know it did. Does look good, but i didn't end up putting in the ponytail, like everybody be doing and showing out and all that stuff. So here is the final results guys my sister looks absolutely gorgeous. Hair looks absolutely beautiful, like she definitely loved it. She was surprised. You know it looks so good it matches so well with her natural hair and yeah. Thank you guys so much for watching. I hope you love the results. Please give me your tips about this install. Thank you.
Comments
Crystal Major: This is why I love this channel . You always explain what you are doing and keep it ALL THE WAY REAL
Rhoda Dowell: Absolutely Beautiful!!! I Love It ❤️
Stacy Doyle: Yessss it came out so lovely
Renee Mosley: It looks fantastic for your 1st try!!!!
Laura Eustate: Hey!! You did great ! Thank you for taking out the time to record and edit in order to teach us. We appreciate it
A Taurus Woman: Duchess you are an awesome teacher Thank for sharing your gift and Stay Blessed
Julia Santanna: Muito lindo o resultado final ❤️
Godsfavor: Her hair looks gorgeous my main concern is how safe are tips on the hair? Will it depend on the type of hair? Is it safer for some types than others?
Renay Chapman: This turned out so beautiful for your first try.. Love it.
Geminigirl: You did an amazing job! It’s turned out beautiful
Jackie Randolph: Hey Duchess thanks for the lesson I learn something new. Your sister hair looks beautiful long and shiny.
Mary B. Deans: ALL HAIL THE QUEEN AGAIN ❤️ You never cease to amaze me ! Gorgeous absolutely Gorgeous Great job as always Queen
Christine Williams: An amazing results for your first install . Thanks for all the tips
Elise Laughlin: Stunning!!! I absolutely love it. She looks amazing.
Kat Noe: Thank you for sharing your experience! The honest and transparent way you review makes me feel like I can try it! Also boss technique on the flat iron, I work primarily in a discount cuttery, and I dream of that casual perfection with the flat iron! ❤️
Laqueita Bailey: Omg I absolutely love this. Thank you so much for sharing. I will try to do this on a family member head soon
Cassandra Turman: Beautiful
Jackie Correira: End result was very beautiful like your organization pattern of placements really looks clean and natural
Choco Mi: I love your humility the teacher is the student ❣❣❣
Keeping It Vertical Ministries: Very well done. I Haven't done these in a some years.
LULA YUP 80z BaBy: Gorgeous job well done on 1st try
Jackie Correira: Thanks for this free informative and useful technique appreciate your input
Styles By Lovey: I've always wanted to try this
Оксана Локмарина: Очень красиво, тяжёлый труд!
monica johnson: Beautiful job!! Looks Amazing❤
Sandra Eggleston: That's neat. I need mines done,,beautiful
p.o.p: Great job Boo, I'm learning too hunni
LaQuisha Benjamin: I definitely wanna try this, I'm a little hesitant of the take down process. Regardless the end results was gorgeous
Butterfly H. Marinez: Great job done I really like it I give 100+ love it . I wish I had some I could do my hair . My hair is so thin and short needs a good trust hair care stylist .
Diane Burnett: Just Beautiful Duchess!!! GOD BLESS you and your love ones! My hair looks horribly so your Video's encourage me. Thanks Duchess!
Kendra Jackson: So pretty
Bre: You slayed this ❤️❤️❤️❤️
Mary White: Very well tutorial and I will be wearing this hair for every style. I can order the hair from here? Thank you
Michelle Simpson: Hi Dutchess Beautiful hair and customer!! You are so Amazing
Иван Иванович: Классная работа мастера!!!!!!!!!!!!Просто Молодец!!!!!!!!!!
Carmen De Long: Stunning!
D Reid: Wow, its beautiful but the clamps make it look like a lot of pressure on the roots
Heart of2: I would love to k how long it takes to take down or out
Perfectlii iimperfect: You did that!!!
cheryl alleyne: Wow She looks really beautiful You seem to have a great relationship with your family ,that's really great I can tell your a wonderful person Such a great personality I always enjoy your videos Wish you were in NYC Another great hairstyle God bless you
Gyna Paul: Love, love, love ❤️❤️ I’m speechless!!
Natalia Yakovleva: Зачем портить свои и без того густые волосы. Ветер подует, и все " прищепки" навиду. Лучше бы придумали что- нибудь для " жиденьких" волос.
Карина Маринина: Легко теперь быть красавицей,были бы деньги!
clipinqueen: Microloops aren't new, just in case people think they are. LOL. The only problem I have found with this type of extension is that when the bead is getting old and has been closed and reopened several times, the only way to reuse them (for me anyway) is by re-tipping them as I-tips. Then you might as well just buy them as I-tips, which last way longer.
Rita De Cassia Pereira: Deveria ter legenda
chatasia buchanan: How much you charge to them kind of installs
Joanna Wofford: Absolutely
IAMANGELHEART46: @Duchess Braids I wish I was near you, because I would definitely do yours if you would do mine. See if you can work with another stylist that way, and then it doesn't cost you nothing, and you all can do the same when you ready to remove it.
Julia Kimmons: WOW U R AMAZING
Joann Reese: I LOVE IT AND HER IS BEAUTIFUL
Zakia Cyuzuzo: Thank you
Масяня Куваева:
Paricia Jones: ♥️♥️♥️♥️
Gracie Griffiths: Looking nice
SHAN Reacts: Do your own no more clients Until you take time have your own experience,
SARAH peace: Where can I get extension?
Keondra Wildin’ N Stylin’: What kinda flat irons are those
لطيفه لطيفه: waw Beytefoll.
Carolyn Stokes:
Sharon Payne: And you wonder why your hair is so thin. Next you need a weave because you let someone make you bald. Watch the other women on Youtube and see what has happen to them. What's so wrong with your own beaitiful hair???
VK VK: А потом свои родные волосы отлетят на хер!!!
Kyrah Stubbs16th: Hello how are y'all doing
Фава1971 Франк: И к чему такие жертвы,все клипсы видно, а как спать то...
Queen Earth🐂👠♉️💄: We you do mines ?I will pay
My Dolls World Studios: First
Trà Đặng: Monday