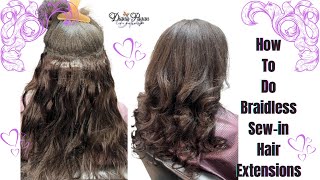
Braidless Sew-In Tutorial / Microlinks It’S Giving Natural #Braidless#Sewin#Microlinks
- Posted on 20 February, 2022
- Microlink Hair Extensions
- By Anonymous
**** Don’t forget to like, comment and subscribe ****
In this video we will be doing a braidless sewin/ microlinks super easy install.
She’s relaxed btw so if you’re natural just make sure you get a good silkpress and keep in mind that this is a not a protective style because all your hair is basically out. Hope you enjoy this video.
Thread
https://www.amazon.com/Bonded-Sewing-E...
Kit
https://www.amazon.com/Orgrimmar-Exten...
Connect with me
Instagram: https://instagram.com/_vanessa509?utm_...
Hair page: https://instagram.com/dauphineffect?ut...
Email: [email protected]
#braidless#sewin#microlinks#tutorial#sewinonrelaxedhair#leaveout#itipextentions#tapeinextention#install#microlinksextensions
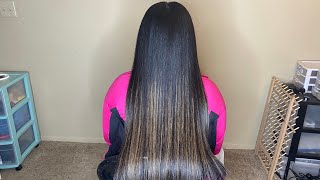
Hi guys welcome welcome back to my channel and today's video we're gon na be doing a braidless sewin, no braids, just using beads, so we're going to be using nylon thread this little needle thing. I don't know what it's called, but i put the link in the description box and does i don't know what this is called either? So i did the first track off camera because it was my first time doing it. So i had to get the hang of it first, so i'm gon na try to like show, step by step what i did so basically, i part some hair out. You don't want to leave too much or not too little either, and then you like part it in little boxes like i'm doing right here, and then you pull it through. What do you call this thing? Is it a needle? I don't know you pull it through. This and then you get the beads on the hair like so and by the way, my nails look crazy. So don't do me please and thank you and then you make it flat with this thing and when you put the beads in, you have to make sure it's not too tight on the client's head, because if it's too tight, they won't be able to put in A ponytail and it's gon na cause tension, which is what's gon na break the hair. So you have to make sure it's not too tight, it's not too loose so that you can sew the bundles on it and for this whole install. I use only like two bundles because she doesn't like her hair too full, so i had to like skip a roll and then add more, but if somebody wanted fuller, i would use three bundles. If i was to do this on myself, i would use three bundles because i like my hair, full, which i'll be doing on myself soon so yeah. So you basically put them through low boxes when you're parting, the hair, and then you put the the beads throughout that whole row. So after we have the whole row, we're gon na take the bundle and then you're gon na measure it to see how far and how, where it stops and then you're gon na double it. You don't have to double it if you don't want to, but i like to double it only because i think that's how you get a fuller install, even though she doesn't like her hair too full, but we still need it full. So it don't look crazy. You know, and then after you double it, you just cut where it stops at and then you make sure they actually fit on the head. So then, those two pieces that you cut off you're going to make sure you sew it together, so that when you put it on the head, it's not coming loose, so that one part is not sliding. It was hard for me to show a clip of me sewing the whole thing on, because my hand went in the way, but you basically just sew it like you would do a regular sewing like you. Do it through the beads make sure it's not falling down and then through the beads into the bundle, at the same time, basically like a regular sewn? So this is a better close-up of the needle going through it. So you make sure your install is flat. It should be as flat as possible. That'S the point of no braids, you know so after you sew it all together. You want to make sure you tie the thread together, so it doesn't come on loose and then, after you tie it and you just cut it cut it off. So after i do that, i like to lift it up to make sure that none of the threads again are loose or anything. So we make sure that the install lasts a long time and if it is loose, i just go in with the little red tool. What do you call that thing, and then i just tie in them see easy very easy. This is how flat your install should be very flat period, and then i basically do the same thing throughout the whole video, like literally part, it put the beads measure, the the tracks cut, it sew it on yeah and when you part it, this is how seamless It should be you see how, like you, can't even tell there's sharks, because i put it so close together, beautiful and then now i'm just taking her leave out out and then brushing it. You know combing. It actually then try to pull the on ponytail. That was like the easiest install i've ever done. I know i say that for everything, but they literally be easy, like that was my first time doing it. If you put your mind to something you can get it done like easy, breezy, beautiful covergirl period, and now i'm just gon na start styling. She wanted it straight. So i'm gon na flat iron it and you wan na see it's not as shirt as it could get, because i didn't blow dry it before. I strained it, because i was being lazy but yeah y'all see that blind beautiful. I was just dusting the ends to like make it look neater because it was even crazy to me and then i just find the end make it look all nice, because why not you see this right here, the smile? This is what keeps me going. I love when people look like this after i do the hair, like you, see how happy she is like. I love that that's my best friend's mom, so she was letting me try on her, and i appreciate her for that so yeah. This is the end of the video guys if you guys enjoyed. Let me know what you guys think don't forget to like comment and subscribe and if you guys try it tag me. Okay, let me know:
Comments
Stherlie: Love your videos you explain the work so nicely so far this is one of my favorites ❤️ will definitely consider booking with you soon