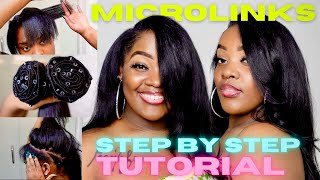
Versatile Braidless Sewin Microlink Install On Natural Hair- Talk Through!
- Posted on 05 February, 2022
- Microlink Hair Extensions
- By Anonymous
Braidless sewin microlink extensions install on natural hair.
Charlotte NC based
FOLLOW ME
My Instagram: https://www.instagram.com/lovekeyara.1...
Hair Instagram: https://www.instagram.com/alluremuse/?...
Booking site: https://alluremuse.as.me/schedule.php
Raw hair http://itsdreamhair.com/
Braidless sewin fine hair, Braidless sewin curly hair, Braidless sewin short hair, Braidless sewin natural hair, Microlinks, Microlinks install, Microlinks on natural hair, Microlinks extensions on black hair, microlink extensions on short hair itip extensions, itip extensions natural hair, tip extensions short hair, itip install, itip microlinks
Hey everyone welcome back to my channel, so today i'm going to show you how i got this look. This is a braidless sewing install and i did it on my client who has natural hair. So the first thing i did was leave out um about an inch around her perimeter and it cut the video where i left a middle part and she wanted two side parts. So i was trying to figure out something new and trying to figure out like how i could get two side parts of her hair. It was a decent lift. We did figure it out. So the first thing that i am doing is applying the back section and, starting to add the micro link beads to her hair. I don't do it this way. Often um, usually i take it and put it around the entire perimeter um, but i'm going to start by taking the track hair and i am going to start sewing that in the top just like so and then once you get to the end, you just want To make sure the track is nice and secure and in place, and that's all i'm doing is just um tying it down and making sure that it is super secure and then after we do that, i'm just going to cut it and then i'm going to lift It up to make sure when she puts her hair up in the ponytail that that track covers that's very important. So the next thing that i'm going to do is sandwich the um, the first track, and i am going to lift the hair up and clip it and then i'm going to start to sew the hair on the bottom of the bead as well. I suggest if you are sandwiching the tracks to start with the bottom track, because it um it's a little bit easier to do it this way. The bottom track is harder to sew. So once you get that one out the way and then it'll be easier to go over top, and i just wanted to do a little side note to ask you guys to either click into the ads on the video or to watch the ads completely. Don'T press skip that is a free way to help support this channel and to get more videos and content like this out and i'll put another reminder later on in the video. So after i get that first track in i'm going to take this fine toothed comb or this rat tail comb and just comb through everything - and i am going to oh, i need to understand a little bit, but i am going to flat iron, her hair. She wanted it silky straight, so that is what i am doing. The flat iron i am using is babyliss, so next i've already done all of the tracks in between the back up to the middle. I just wanted to fast forward to like a bigger section of hair. So that's why i'm starting here and you can see that i am placing the micro link beads um across her hair and they are on the bottom part line, even though it doesn't look like it in the angle. But you want to make sure you place the moment on that bottom part line and then i'm going to go in and start to sew the bottom track. First, this time i don't know what in the world possessed me to sandwich every single track, but i sandwiched every single track. It does hide all of the beads, but it's unnecessary because you're not going to see the beads in the middle of the person's head anyway. So um as of right now i don't do that, but in this video i did take hours and hours and hours to sew um sandwich every single track in my head. So once i'm done with the bottom, i'm going to go ahead and sew the tracks across the top, and you just want to make sure when you are sewing this, that you're making um the thread. What am i trying to say not make it tight, but you just want to make sure you're like going back through. I guess like double times just because this specific method is not as secure as a sew-in, and you want to try to make your tracks as secure as you can and always always always when you get to that end piece to tie it down a few times. I try now not to pre-cut my wife. I try to like keep the whole track and then sew the whole track through and then cut it because a lot of times you'll end up with like a shorter piece. So once i'm done with that, i'm just going to go through and flat iron, her hair um again with the baby lips. I like to flat iron between each row is just easier for me. Okay, so now we're moving on to the side, part um. She wanted a deeper part, so i have started off by doing one track, as you can see in the blonde and um it wasn't enough hair or blonde track hair. It didn't look full enough on that. One side when i did the part, so i did go in and add i think, two tracks to the side. Um and i think i put like two tracks on the bottom and two tracks on the top just to make it fuller. If she wanted to make it a side part - and you can see - i left some hair out in the middle and then added a track right on top so um as i'm parting. It that's where she would do her deep side, part and then the hair. Over top covers it, and whatever you do to one side, you have to do to the other side just to make it balanced and full. So i'm gon na go ahead and start adding tracks over here on the other side of her hair and doing basically the same exact thing that i did with the blonde spots with the natural color hair. So she in total was able to do um, a middle part and two deep side parts like an actual part, and she was also able to do a slip part. This took forever to do, and i do not do this anymore. I only leave out a big. U section of hair if your hair is full enough and long enough to allow. If you want a deep part, i suggest getting the middle part and then flipping your hair to the side for a side part like a no part side, part um. This was just too much too much too much too much and too intricate, and i don't even think she used the deep side parts. I think she ended up flipping it anyway, so um once i'm done doing that, i'm just going to go ahead and start to flat iron all around her hair. The edges obviously turned into a bantu knot after i um knotted it and clipped it up out the way, so i'm just going to make star flat ironing and getting everything together all right, moving right along moving right along we are actually, i think i think we Was done - and i was just um at this point flat ironing her leave out her hair is very high density. She has like high density average hair strands, but because she has so many of like the average sized hair strands, her hair um, her roots were sticking up when i was doing it. So i had to really go in and take super tiny pieces and make sure her roots were straight because it was looking a little puffy. But after i flat ironed everything out, i liked um. I went and took this comb right here and kind of started to mold it out with my hands, and you see that i'm trying to make that middle part middle part, because all of my middle parts are always like off center side parts. Um i'm taking this hairspray. I think this is the camera hairspray. You can use the camera spray. I like to use the sebastian spray too and um i'm just taking this comb, and you see i'm just molding her hair down at the top just to make it a little flat. A tip is um a scarf. That'S the easiest way to make your hair flat. After you get your hair done, put a scarf on it, but now i'm just going to show you me um, basically just putting it up in a ponytail into buns and doing all that fun stuff. So i'm going to let you watch it and i'm not going to narrate it, because it's not much to be narrated. So now i'm going to take down her pin curls um i like to take the pin curls down and i like to finger twist each curl and comb each curl as i take it out. So you can see. I got my comb in my hand, um this video, i combed it all together and finger curled it together. I personally think it's a little bit easier when you just kind of like first finger curl and comb each curl out, because sometimes the curls be like um, tangled, which is weird, but it does and imma. Let you watch how i play in it just to mold. It and get it to fall exactly the way that you would want it. So it can look picture perfect. So after i'm done with the comb, i'm just going to go through and finger curl just to make it picture perfect and then to make the curls fuller i'll, just comb out the bottom with the comb, and this was the results, as you can see super pretty. She was able to do half up half down ponytails um. She was able to put her hair into a bun and she was able to wear a middle part and, of course, the deep side part if you're interested all of the information is in the description box. My instagram is alloremuse a-l-l-u-r-e-m-u-s-e on instagram. If you have any comments or questions, please leave me a comment. Please, like this video thumbs up this video share it and again try to watch the ads. If you can um. Thank you for watching, and i will see you in my next tutorial.
Comments
clipinqueen: You did a great job! You are one of the few who mentions that it is unnecessary to do the invisible weft method (sandwiching tracks) in the middle. You can't see the beads there anyway. A lot of stylists seem to choose that technique now, but it seems like it's only useful for the bottom track. Thanks for sharing your expertise.
Barbara Taylor: How long does this last?
ashlynnicole76: Do you still prefer the Microlink install vs. I tips? And why?
Jamirah nafr: How much do u generally charge for these styles? I’m tryna make this my new side hustle
Sophia D P: Are you sewing in each bead?
Shivonna Thomas: I'm starting out doing microlinks but I am not in a salon, do you work out of your home? and if so do clients care about you washing their hair in the sink or do you request that they come already washed?
Mia j: Omg are you back? I hope we get sew in videos!
Donisa808:
Chase Bennett: can u please do a slick straight low ponytail tutorial with a ton of got2be glued hairspray?
AllureEsthetics: Love the hair and played 2 ads