Updo 101: Clip-In Extensions With Stephanie Brinkerhoff | Kenra Professional
- Posted on 11 May, 2022
- Microlink Hair Extensions
- By Anonymous
In this video,@Hair and Makeup by Stephteaches us lots of great insights when working with clip-in extensions to achieve various formal styles. Learn how to create three different looks when additional hair is needed for the perfect amount of length and thickness! Watch until the end to learn all of her tips and tricks on how to make these styles stand out at your next event.
00:00 Introduction
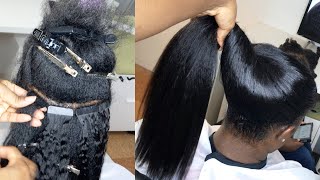
00:18 Extension Install
06:45 Half-Up Style
08:11 Braided Style
11:52 Up Style
Products Used:
Kenra Dry Volume Burst 3
https://www.kenraprofessional.com/prod...
Kenra Volume Spray 25
https://www.kenraprofessional.com/prod...
If you enjoyed this video tutorial, make sure to give it a thumbs up and tell us in the comments below what you'd like to learn next!
SUBSCRIBE NOW: http://bit.ly/KenraProfessionalSubscri...
VISIT OUR WEBSITE: https://www.kenraprofessional.com
Visit Stephanie's website: hairandmakeupbysteph.com
Follow her on Instagram: https://www.instagram.com/hairandmakeu...
About Kenra Professional
We are a purely professional brand dedicated to understanding and serving today’s stylists. Our passion is developing best-in-class innovations, delivering superior and reliable results. Kenra Professional strives to elevate the stylists’ artistry and craft.
CONNECT with Us!
FACEBOOK: https://www.facebook.com/KenraProfessi...
INSTAGRAM: https://www.instagram.com/kenraprofess...
TIKTOK: https://www.tiktok.com/@kenraprofessio...
TWITTER: https://twitter.com/kenrapro
Updo 101: Clip-In Extensions with Stephanie Brinkerhoff | Kenra Professional
#hair #howto # #hairstyle #bridalstyles #diyhairstyle #formalhair #bridalhair #weddinghair #wedding #bride #bridalhair #clipinextensiontutorial
Hi everyone, I'm Stephanie Brinkerhoff with Hair and Makeup by Steph, and I'm here with Kenra Professional, to show you guys how I would approach a bridal style using clip-in extensions. So I'm going to be going through three different looks a half-up style, a braid and an all-up style. So let's go ahead and get started. Okay, so her hair is more on the fine side. So I'm going to add some texture in there to start. So i'm going to go in with the Kenra Dry Volume Burst 3 and i'm just going to get this sprayed at her roots all throughout her hair. So this will help the extension so that they stay a little bit better as well, and it's also going to give her some nice volume. Okay, so the first style i'm going to demonstrate on her is going to be a half up style. So when i'm applying extensions for a half up style, it's very similar to just doing the hair all down in the sense that you just want to evenly disperse the clippings all throughout the hair. So i'm going to start down here at the nape and i want to get a thin row of hair back home, pretty condensed right at the roots. So i'm just coming in with my back comb and really getting that packed in there. And this is what i'm going to anchor my clip-ins into okay and notice that i'm not going all the way to the hairline. I'M leaving some space on the sides just to make sure that those are hidden. Okay and then i'm just going to lock that in place with the Kenra Volume Spray 25. So now I have a nice solid base in here to anchor my clip-ins into and then i am going to be curling this as well. So I'm just lightly misting. Some of the camera hot spray 20, which is a really good thermal protectant and also a curling spray all right and then i'm going to grab an extension piece. That'S going to be wide enough that it sits about an inch to a half-inch away from each side and i'm just going to clip that right in the center back. So these extensions have been pre-curled. You don't have to pre-curl your extensions, but either way make sure that you curl their real hair and the extension hair together. Okay, so i don't have to curl these extensions all the way through to the bottom, since they've already been curled, but i'm just going in and adding in her natural hair with that. Okay, now i'm going to repeat this process, i'm going to move up about an inch or two, it kind of depends on how many extensions you're wanting to add how thick their hair is if they have really thick hair. With really blunt ends, i usually do the extensions a little bit closer together because you want to be able to pack more in there to blend with those blunt layers. Okay, once you get high enough that you're going to go in front of the ears, you do want to put some extensions in this area. You just want to be really careful not to go too close to the face, especially right around the middle portion. Here, where you know you're going to be pulling the hair back, so i'm mostly going to stay at her ear, maybe a tiny bit in front of that and then, if i want to towards the end, i can always go back in with some of my single Pieces and fill in some spots that need it if necessary. Okay at this point, i'm getting a little bit closer to the top, so i'm only going to do probably one more row, especially since her hair is so fine. You really want to make sure that you're not putting any clip-ins in the area that you want volume. So i want to stay just below that. So i'll probably do one more row going around and then i might possibly add one more just on her heavy side. But i generally like to leave the top portion extension free just so that you can use it to create a nice shape and not have any extensions in there weighing that down. Okay, now i'm just going to get some backcombing through her crown and then just get the rest of these layers curled. So if you're ever working with shorter hair and you're adding extensions for thickness and length once you get to these top layers, they're most likely going to be pretty short, so you want to make sure that you don't curl them too much, i'm mostly just curling the Ends a lot of times if the top layers are too curly and they're shorter, it can create like a disconnect, and you can see the difference between the shorter layers and the longer ones. So i like to keep these top ones pretty loose so that they blend a little bit better. Okay, at this point, i'm going to start detailing the curls, i'm going to run my fingers through these to make them a little bit softer okay. So when it comes to getting this pinned up, i'm going to want to keep it very minimal. Since we have the extensions in for her length as well as thickness. If i pin too much of the extensions up, it's going to end up looking a little bit. Stringy down here, so i want to leave down as much as possible. So usually what i end up doing is just softly getting the top layers pinned okay, so on the sides, i'm just going to softly. Get these top layers pinned back. You can see. I have an extension here and then one right there, so i want to make sure that these are laying on top of that. Okay. Now, i'm going to show you guys a braided hairstyle, so i still have all of her extensions clipped in from before so they're. Just evenly dispersed throughout her hair, if i were doing a braid, it depends on how many extensions you want to add, usually with braids the more hair the better so with her i'm going to leave these in, but i'm also going to add a bunch more right Here on the side, so i have a ton of bulk right here, which is where my braid is going to go. If you only have one bag of extensions, i would do almost your entire bag in this area. If you have enough, you can disperse them throughout the hair and then do extras over here like i'm going to do, but the most important area is right here, so you want to concentrate your extensions where you want the bulk of your braid. So i'm going to start down really low, i'm going all the way to the nape. This is one of the only times i would apply these all the way to the nape is down here in this corner, because i know it's going to be hidden by the braid okay, so i'm just going to go in with two single pieces: okay and then I'M letting down another very thin row. So when it comes to braids, i really like to pack it in there, sometimes i'll, even layer, the extensions right on top of each other. Sometimes, what i'll do if i have a large piece, rather than laying it flat i'll fold it on top of itself, so i'm going to clip that in there and then i'm going to fold it and then get that clipped fold it again and get that clip. So you don't have to worry about how it's bunching, because you have so much hair, that's going to lay on top of it. Sometimes if it is bunching a little bit too much i'll just go in with a bobby pin and lay that flat. Okay, once i have that in there now, i can go ahead and start my braid, whatever kind of braid. You want to do usually what i like to do to make sure my extensions stay hidden is get the top pinned so that it's nice and secure and then go in and start my braid. So i'm just going to get everything pinned over and the crown pinned that way. Once i start doing my braid, it won't mess this up or move anything around, and my extensions won't start showing okay. Now i can go ahead and go in and start my braid. Whatever kind of braid you want to do, i'm just going to do a normal, elastic, braid, okay, so the last look. We'Re going to do is just an updo, so this is going to be the same in the sense that you want to concentrate most of your extensions, where you want your bulk. I took out my single pieces on the sides here just because once you get the hair pulled back around the face, when you're doing all of the hair up, it can be really tricky to hide those if their hair is a little bit thicker you're. More than welcome to leave some on the sides, but i mostly just do them all in the back. If i'm doing an updo, so i'm going to do the same thing that i was doing with the braid, where i go in and kind of sneak in a couple more pieces just for some added thickness here in the back and same thing, i'm getting these just Bunched here in the center, so i'm not too worried about this okay. So once i have those in - and i already have all my backcombing and my prep and my curling and everything i can go ahead and start my updo. So i'm going to start with the bottom portion of this, so i'm clipping out the top portion for later, mostly just the crown and the sides. Okay, i want hers to be a little bit more of like a knotted bun type of an updo, so i'm going to get this in a low ponytail and then i'm going to get this twisted, i'm not doing the whole strand at once. I'M just focusing on the top half i'll get that twisted and pinned, and then i can go in and add in the ends. So this is twisted and then i'm just deconstructing this twist. Okay, so just super basic and simple and then i can go ahead and let down the top and get that incorporated.

Comments
Dedee Milnes: Wonderful organic feel yet perfectly polished. Your amazing
AnnelisR: This is the best extensions blend I’ve ever seen.
Deetangled ByNaj: Amazing Tutorial!
ramon vila: Thanks for your explain
Aura Buliga:
MRH Salon: Soo sweet ❤