How To: Balayage Messy Updo On A Wig | Ft. Hurela Hair
- Posted on 05 May, 2022
- Microlink Hair Extensions
- By Anonymous
Hey loves❤️
In todays video I show you guys how I got this messy updo using this highlighted wig. It was super simple & easy! I hope you guys enjoyed. All the hair deets will be linked below. Be sure to hit that SUBSCRIBE BUTTON & follow my socials for more wig looks & tutorials. Also, be sure to check out my website to purchase all my wigs Go shop wigs at theglambytai.com.
#wig #wigs #balayage #highlight #highlights #messy #messybun #messyupdo #updo #updohairstyle
HAIR DEETS:
►Use discount code“hurelaytb10” order Get $10 OFF
►Don’t Miss Flash Deal Every Friday On Website!
●▬▬▬▬ #HurelaHair- Make Every Girl Afford Beautiful Hair ▬▬▬▬●
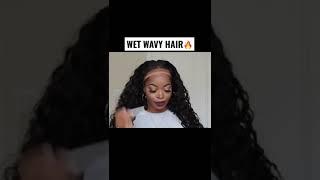
I'm using 150% density 13x4 Lace Front #FB30 Body Wave Wig 24": https://st.hurela.com/9ilcq
►https://www.hurela.com/ Top Selling Series☛New Fashion V-Part wig: https://st.hurela.com/9ilcv
►Hot Sale 13*4 Lace Frontal Wigs: https://st.hurela.com/9ild2
►Most Invisible 5*5 HD Lace wigs: https://st.hurela.com/9ild3
►Affordable Lace Part Series: https://st.hurela.com/9ild5
☛Highlight wigs: https://st.hurela.com/9ild6
☛Bundles & Closure: https://st.hurela.com/9ild8
☛New products arrival: https://st.hurela.com/9ildb
2021 Autumn Fashionable #HeadbandWigs: https://st.hurela.com/9ildd
✿Msnaturally Mary Hot Selling Curly Headband: https://bit.ly/3uGudr3
★ Follow #Hurela Hair Social ★
Instagram@hurela_hair: https://bit.ly/2DWtBZa
Youtube@Hurela Hair: https://bit.ly/2DVAmue
Facebook@Hurela Hair: https://bit.ly/3hq1zCX
Twitter@Hurela Hair: https://bit.ly/3kfLgdT
TikTok@Hurela Hair: https://bit.ly/31ZeRB3
Wholesale Provided: [email protected]
WANNA COLLAB? BUSINESS INQUIRES?!
-----------------------------------------------------------------------
KEEP UP W TAI:
IG: @ItsGlamByTai
TikTok: @GlamByTai
Shop Wigs: theglambytai.com
Hey youtube: welcome back to my channel, so today's video is on this cute little updo that i did with this balayage wig. It'S super cute. But honestly, if you're gon na do a updo, it should be on a full lace wig, because i need to hold your bag, probably look great, but anyway, that's not. Why we're here? Okay, let's get into this video, i'm gon na show you guys how i get this updo and these cute little curls. So, if you're interested then just keep watching okay, so jumping right into the video, this wig is from hirella hair. I believe that's how you say it: i'm not good with neem, so i really don't know, but anyway um, i'm just showing you guys the little goodies that they gave me. Of course they gave me a wig head. That'S what i'm using on my head today, but as far as the wig, this is what it looks like it is, i believe it's 24 inches if i'm not mistaken i'll make sure i have everything in the description for y'all, but it's 24 inches. It'S a balayage like highlighted wig and it's a 13x4 lace, so here i'm just showing y'all, i'm pretty sure. I'Ve had plenty of highlighted wigs that look like this on my channel, but i haven't styled it in the updo so um here i am just showing y'all how i'm you know, flattening the wig making sure everything is nice and flat with my hot comb. I did go ahead and bleach the knots and pluck it off camera, as i usually do. It'S completely optional up to y'all. I do believe this comes pre-plucked, like i said i'll have everything in the description, but i do i do believe it comes pre-plus, but me pre-plucked or not. I'M gon na go back in and do my own thing because i just feel like that makes the wig look more natural, so yeah, i'm just showing you guys how to get everything nice and flat before i show you how i start blending the wig okay. So off camera i did go ahead and cut my ear tabs just to make sure that the wig is gon na fit on my head. I measured everything um and i'm just flat ironing it not even flat ironing it. Oh, my god, i'm using my hot comb child and getting everything nice and flat. This is what it looks like with nothing on the lace. This is how the lace came simple. I did bleach and i um and everything like that, but this is just regular. Now i'm going to use my lace, tint spray from evan and it's in the color light warm medium. I think yeah. I think something like that i'll have it in the description for y'all, but i'm spraying it all over the lace. Now i probably did go a little od, because the more that you spray, the darker it's going to get obviously so just make sure you find a shade that is matching your skin and then be mindful of how much you're spraying. Because the more you spray, the darker it's going to get so obviously it's going to change the color of the lace, but this is what it looks like just when i sprayed it. I priced it like two three times and then i went on ahead and cut the lace off camera. This is just how i've been like doing my installs lately with me: cutting the lace prior to putting the wig on my head just because i feel like it's so much easier for me to go on ahead and put it on my head and actually measure out Where i'm going to lay the leash, rather than just putting the wig on my head and trying to cut the lace, the excess like off later, i feel like just just, makes it 10 times easier. Okay, so for all my installs lately, i've been using my boho active lace glue and i'm just putting that all over the front of my head and then i'm smoothing it out. With the back of my comb, um yeah comment below some lace: glues that y'all, like honestly boho, has just been having a good mommy, the boho, the regular one, the active all that, like i just love their products um and i actually do have the hair diagram On instagram and she recommends very much not to use a blow dryer um or like any heating styling tool. So i don't use no like i let it just let it air dry, but i believe i go in with three layers of that and i smooth it out making sure everything is nice and thin. You don't want to put the lace on just how it is right now, because if you see it, it's like white, almost you want to let it completely get clear and tacky before you go ahead and apply it. So it could look like that and then i'm gon na pull my lace all the way forward and lay it right on. My head is okay, so the same thing that i just did to the front of my head, i'm doing to the right side, i'm just putting a few dots of my lace, glue, smoothing it out with the back of my comb and now. This is why i like to cut my lace prior to putting on a wig just because, when i'm laying my lace glue down and i'm applying my wig, i know exactly where the wig is going to lay um. You can go ahead and like use like a white pencil or like a little light pencil to mark out exactly where your wig is going to like stay, but i've been playing on wigs for a while now child. I think i know exactly where my wig is gon na lay ladies the same way every time so yeah. I think i did four layers on the sides and then a three on the top, if i'm not mistaken um, but i do go in and use my spray. I forget what the this is called. I got a pregnancy brain, i forget what the spray is called, but i'll make sure i put it in the description for you guys it's the um, the red can that i use. I know they have a yellow hand and they have a black hand, but i use the red one and i'm actually running the out. Look at me embarrassing anyway. I'Ll use the wrecking - and i put that only like at the edges, because that's what tends to lift um if you wear wigs, you know, like our sides, tend to look faster than anything else on a wig. So here i am just letting that get completely clear and then i'm laying my wig down now. Some parts do lift so i always do have to like not always have to, but i do go back in and make sure that any parts that have lifted i just take a little bit of glue on the back of my comb and i'll um like lift The lace up a little bit and apply the glue and then let it get clear, of course, and then i'll lay it right back down foreign, no crazy, okay, so nana, our wig is completely on y'all are seeing me uh, pull out some baby hairs. They don't like baby hairs right now, but they will in a minute y'all i'm pulling out. What'S going to be our baby hairs like our hairline hairs, um and lately i just been doing four - i haven't been doing like a middle baby hair. Nothing like that. Just the two on the sides and then the two little right by my ear tabs and pulling the rest of the hair out to separate it, and i believe i'm going to wrap it from that one is see, is okay, so, while our lace is melting, i'm Going to part out like what's gon na, be like our front bang area, i'm taking like a c shape right at the top of the lace um. The side depends on you, like whatever size you want to do. I think i believe i did my left side because i think the last time i did my right side. So i'm doing my left side this time and i'm just taking out like a horseshoe shape, not too much hair. You don't want to take out too much, but i'm just taking that out and then um that's going to be like what's in our front area, face not necessarily like a bang, because i didn't cut it or anything like that. But that's just going to be our like frumpy piece and then the rest of the hair. I'M going to show you guys how i curl it in a minute. Okay. So now, i'm about to show you guys how i do my baby hairs. I am about to have a a better video on like a detail, more video on how i do my baby hairs, because i've been finding new ways and methods like on how to do them just watching videos. You know instagram and like that, but um yeah. This is just simply how i'm doing it for this specific, install, i'm taking the hairs, and then i'm going to comb them out. Make sure that they're not stuck to my head. Okay, make sure that there's no base glue on them and i'm just cutting them at a diagonal angle. Now the way i go down is i go down my eyebrow to cut them and then i take like a little itty bitty flat iron. I don't know. Did i do it for this video yeah? I did. I took like a little itty bitty flat iron and i curled them upwards. Like away from my face um, i honestly think i need to get a smaller flat iron like one with like smaller panel bars, because sometimes this one doesn't curl as good as i wanted to. Okay, it was cheap. I got a flight 10 supply store, so we just will use that and make sure all the other hairs don't get in our way. I'M doing the same thing that i did for the top to the bottom: i'm taking it, cutting it curling it, and then i believe i use my yeah my foam wrapping lotion. Now you can use whatever one you prefer, but this is just what i have on hand and i'm taking it and just creating that c-shape, following the exact way that i curled the hair when i had the flat iron now all right. So once i'm playing my baby hairs - and i actually got them to lay exactly how i want i'm going to take this um head wrap that i have to lay my edges down, i'm going to tie that to the back and now it's time to curl my Hair i already started curling off camera because, honestly, it was simple one curls, i'm using this big wine curler. I don't know the inch the size. Nothing like that. Please do not ask me. Actually, i got this from sierra, so i still never gave it back to her, but listen it'd be coming in handy, i'm curling away from my face and i'm not like being very neat because, like i said this is going up in the updo. This is just to create the curls that i want, i'm not being neat, i'm not um like taking like specific sections, i'm just grabbing and curling away from my face now. Okay, so now that i have everything curled, i'm taking my hot comb and i'm actually laying the hair in the direction that i want it because, like i said this is the updos to the front. Obviously i want it to be going back. This is the hard part child trying to get all this hair into a nice sleek pony not even like sleek, because it's like more of like a messy updo but trying to get all this hair into the updo um. Like i said i did mention, this is not a full lace wig, so the back of it obviously is not laced um but yeah. I probably had to play with it a couple times and create the ponytail that i want, and then i made like a bun and i put another hair tie around it, and i bobby pinned the curls around that hair tie. If that makes sense, i bought the curls to basically cover that hair tie and give us like a messy look. You know with the rust, like the back. I just bobby pinned it down just to make sure like i don't have no lifting or anything like that, and i played with it a couple of times. I probably did the ponytail like two or three times before i actually got it to look exactly how i wanted to go. Okay, so moving on to our little bang area, i use my hot comb and i'm flipping it up because i didn't want it to be. Like completely flat on my head, obviously um and yeah, i didn't curl it or anything like that until i did, i actually put some layers into it, but i didn't curl it completely until i knew that it was gon na stay. How i wanted it to stay. I'M fixing my baby hairs first, but um yeah. I made sure that the top kind of like goes up as y'all can see like i wanted it to like, have like a fluff up look and then i'm curling it away from my face, just like i did with the rest of the hair. So if that makes sense, it's more like a wand like going back, but i wanted the top to go up. If that makes sense see, i could tell i could show you better than i can tell you child, because you just got ta watch it but yeah once i am completely done and i feel like i got the bang exactly to look how i wanted it to This is the finished product, so yeah, you guys make sure y'all check out here. The hair i'll have everything in the description below, but thank you guys so much for watching, and i will see you guys in my next video bye just

Comments
T's World: This is so cute definitely gonna try for my birthday