How To Do Flat Track Hair Extensions - Sewn Weft Hair Extension Tutorial
- Posted on 05 January, 2021
- Microlink Hair Extensions
- By Anonymous
Hello and welcome to Sophia Hair Australia’s YouTube Channel!
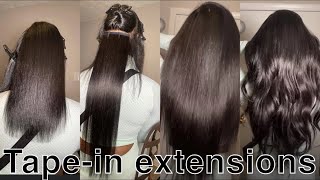
In this video we will be showing you how to create a flat track as a base for the sewn in weft method. We explain the tools and materials needed to create the track and provide a step by step application guide.
TOOLS used in this video can be purchased at - https://www.sophiahair.com.au/collecti...
BEADS can be purchased at - https://www.sophiahair.com.au/collecti...
SUBSCRIBE to stay tuned for our next video teaching how to sew the weft to this particular track.
GET SOCIAL:
Instagram - https://www.instagram.com/sophiahairau...
Facebook - https://www.facebook.com/sophiahairaus...
Twitter - https://twitter.com/SophiaHairAus
Website - https://www.sophiahair.com.au/
We created this channel to share our knowledge about all things hair extensions! We hope that we can inspire like minded hair extension enthusiasts on the latest industry techniques, tips and trends.
Hey guys and welcome to sofia here australia's youtube channel. Today'S video is on how to create a flat track for your sewn weft hair extension clients for today's tutorial you're going to need some pliers, your rat tail comb, your bead threader, your sectioning clips, some silicon line. Beads and your hair grippers to put away those fly aways starting a couple of centimeters away from the hairline. You want to start your application in the crown of your client's head, making sure that there is enough of her natural hair to cover that highest row. Once you've created your section, you want to pick up your first piece of hair to create your track now. Each piece of hair will need to be about one and a half centimeters wide start by looping on your first micro bead and you're, pulling the hair back horizontally along the client's scalp. Once your bead is on it's time to fasten it. When fastening your bead make sure that it is nice and close to the scalp, but doesn't cause your client discomfort to fasten your second bead. You want to pick up another one and a half centimeter piece and only put half of the piece from the last bead into that bead, and this will start to create that flat track. Each piece of hair is looped into the next bead along your track. This will make sure that that track is nice and strong and that it won't slip or fall out. Picking up your next piece of hair, you continue to grab half of the hair from the last bead and reinforce it into the next bead. As i clamp the third bead, you can see now that it's beginning to look like a flat track. Now you keep doing this until you reach the middle of the back of your client's scalp. Once you reach the middle, you want to do the same thing on the other side working your way back once you get to the back, leave a little gap between each row and you want to take half from the right side, half on the left side, and This time fasten it into the same micro bead. Now this is the final bead for your track. This is the one that links your right and left side together. So when you do clamp, it make sure that there is a little bit of tension on the right and left side there. You have it guys. So that is how you do a flat track. Now, that's just your first row, usually for a full head of extensions. It'S applied in two to three rows. If you would like to see how to sew a weft to this type of track, please stay tuned for the next video. I hope that you found value in this tutorial, though, and it'll help you with your future clients.


Comments
Ian Cullen: Fantastic Tutorial Sophia Hair , thankyou so much !