How To Install Microlinks By Yourself On Short Natural Hair |Time Saving New Microlinks Ft Ywigs
- Posted on 20 May, 2022
- Microlink Hair Extensions
- By Anonymous
Upgraded Time-Saving Microlinks
No More Loop Tools. No needled no thread. Our microlinks are pre-attached with beads and micro loop, which are ready to be applied. With our upgraded microlinks, you won't have to spend all that time going back and forth to load beads onto the hair.
Link to order the same hair:
https://www.ywigs.com/products/kinky-s...
Ywigs microlinks collection:
https://www.ywigs.com/collections/i-ti...
#microlinks #itips #hairextension
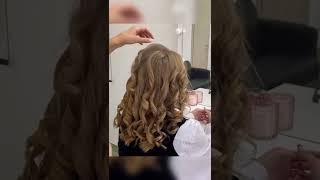
Today'S video i'm going to be showing you how i install these beautiful natural, looking micro, loop extensions, you can wear these up or down, and my gosh, i am in love with the results, hello, everyone welcome back today. I am going to be starting off with my hair, freshly washed and trimmed, and we're going for this deep middle part. The hair that i'll be using today is by white wigs, the texture is kinky straight and the length is 18 inches and just in case you wanted to know a little bit more about caring for these types of extensions. I have made a whole entire series and i'll leave the link in the description box below so these are called micro loops. And, if you remember from one of my last videos, we have to use a loop tool and we have to use these miniature beads. That are lined with silicone to help install the hair, but with micro, loop extensions. You do not need that. They come with a loop tool already attached and the b2 so no need to purchase them separately. The center of the extension is hollow which allows you to pull your own hair through, so to install them just pinch, your own hair and then you'll, pull on the little tab below which will put your own hair inside of the micro loop extension once you're happy With the placement of the bead use your pliers to secure it, and that is how you install these extensions. I started off by braiding my leave out. I think i mentioned before that i'm going for a deep side part - and i also braided my edges for leave out too, and installing these guys is so so simple. It took me about an hour and a half which is way quicker than last time. I tried eye tip extensions, and that is because these are loops and you already have the loop and the bead ready to go, which saves so much more time. I know that the installation looks a bit daunting, but it's very, very simple. For the front of my head, i'm just using a regular mirror, but when i go on to the back, i use two. So i have one mirror in front of me and one behind and i'm going in small, even sections to install the hair. You also want to make sure that you haven't got any hair caught on your beads, so once you've fitted one extension, you want to lift it up and down just to make sure you haven't got any hair, that's latched on altogether. I have three buns of hair, but i only ended up using one and a half, so i basically have a whole load of hair that i can use in the future, and i'm really happy about that, because this hair is gorgeous for the installation. I'M going row by row and i'm not missing out any hair, and that's because my own hair is quite short, whereas if you have longer hair, you can go ahead and skip out some rows. Also because my hair is cut quite bluntly. I wanted to make sure that the blend was seamless. If you really take care of this hair, it can last anywhere from six to eight months. In some of my other videos, i go through how to tighten the beads, how to wash this hair and how to uninstall it so just in case you're interested i'll leave the links to those videos in the description box below when i first started installing them. I started off a little bit slow but, as time goes on, you get faster and faster and you'll see that the installation is literally a walk in the park, even though it looks quite complicated. When i reach the part around the leave out, i decided to miss a few, so i would go one loop extension next to it. I would skip a little bit and then next to it i'll, do another loop extension. This is to make sure that you cannot see the beads when i took down my leave out and that method worked really really well, because my hair so blonde. I didn't want it to look like the extensions. Were there and then my own hair just suddenly starts, but by doing it that way, it made it look very, very natural and made the loop extensions, basically undetectable. Next, i just went in to flat iron the hair, and i only did one pass guys. One pass and this hair came out so silky and so smooth i was shocked. Usually i go for two passes, but with this hair it was, it was definitely not needed when flat ironing the hair. You do want to be careful of the roots of the eye tip. They are held together by a keratin bond, and if this warms up it could make the extensions a little bit sticky so make sure that your flat iron is just below the beads. This will also make it very easy to uninstall and minimize breakage when it comes time to take them out so and to blend my leave out. All i have is a little bit of heat protector, that is it my hair is currently relaxed and i'm trying to stretch the sixth month. I did take out my other eye tips because it was getting a little bit too much, but i decided to actually go for six months, so i'm probably going to be wearing these extensions for about a month's time. Another thing to remember is that this is not a protective style. Your hair is out in the middle, so you do want to make sure you are washing your hair regularly using heat, protectant and moisturizing and hydrating your hair, just as you usually would to maintain the health of your hair. Mostly, i do what i always do just go in with some nice natural layers to frame the face here is the finished. Look guys i am in love with this hair. Never ever have i had hair that flies so beautifully with one purse. My own hair matched really really well and because this hair is kinky straight once it starts reverting. My own hair is going to revert to and it's gon na blend. Still all together. The installation took me about an hour and a half. I remember the first time i tried it. My arms were killing me, but i've gotten so good at it. Now that my arms are even hurt, and also on top of that, the loops help me save time. If you like to check out this hair, all the information will be in the description box down below. This is no joke. Look at all that movement, the hair is silky shiny and can't nobody tell me that this is not my hair.


Comments
Tub: Hi luv the look, you look beautiful. Is the hair thick,I don't like kinky straight that is shiny, does it really look like natural hair?