Get Thicker Hair Instantly | Partial Microlink Sew-In #Microlinks #Thickerhair #Snellvillega
- Posted on 15 February, 2019
- Microlink Hair Extensions
- By Anonymous
Follow me on Instagram
http://www.instagram.com/glamherhairst...
Follow my Virgin Hair page
http://www.instagram.com/glamhervirgin...
If you would like to purchase hair or ”GlamHer Growth Potion”
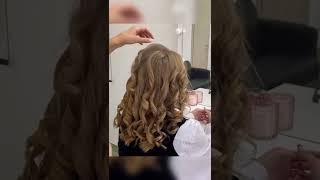
Hey Glenn fam welcome back to my channel in today's video I'll, be showing you how to instantly add volume to thin hair using a micro link, sewing method so right here, I'm pressing out the edges of the hair and I'm going through and silk pressing the hair Until I get up to the point where I'm going to treat the micro link base, so then I part out the section that I'm gon na use for the micro link base and once I'm done hurting that out I'll go ahead and start adding the micro links To it now the micro, mink beads are silicon lined which helps grip. The hair better, you know, insert a picture of those right there. Yes, yes and I put mines on a string with a needle and I use like the the little girl B method. But if you want, you can use the latch hook, which I showed the picture of there. I just find it easier and quicker to go ahead and loop, the string around the hair and then push the beads up onto the piece of hair like we used to do back in the day with little girls beads on braids. So I'm gon na go ahead and do that all the way around to create a base for the micro link for the track. So I'm gon na take the pliers, which is the tool that I just show picture and I'm going to slide the bead up and I'm going to squeeze it close. When I get to a comfortable place on the hair, you don't want to push it all the way up too tight, because you don't want to put so much tension on the hair and right there. You can see where you are able to adjust the bead. I mistakenly closed it too close too far from the scalp, so I opened it up and I went ahead and slid it up and reclosed it. So I flattened out the hair that is connected to the bees and then I started to sew the tracks on. It'S really quite simple: all you have to do is watch and learn. So once I get to the end of the track, I go ahead and cut it, and then I triple knot it and then I sew backwards and the reason I do that is because I don't want the knot. The thread that I cut on top of the knot to be hanging out on the edge, so I go ahead and I sew backwards and then I'm not it back. You know a few stitches back so that way it isn't detectable so right here I slow it down for you just a bit little bit, so you can see what I'm doing so. I wrapped the thread around the needle three times and then pull it, and that creates a knot so that I caught that a triple knot, because i wrap it around three times so anyway. Now I'll go ahead and just flat earn the hair over that track and I'll do that for a couple rolls and then I'll go ahead and part out the next row for the next micro link base. So here I'll, just simply repeat the same steps for that. I did on the last row I'll go ahead and put the links on and then I'll close them up with the pliers and then I'll go ahead and flat iron. The hair right before sewing the track on. At this point. I just wanted to make sure that there was enough fog in the face, so I went ahead and combed it down just to see, and there was so I just continued, so I'm just making sure everything falls right and now I'm sewing backwards, like I showed you Before but because this track is on top, I'm gon na show you how I hide the nut. So I went ahead and stuck the needle through the track going down to the bottom of the track and then I'll just touch the needle under a piece of thread and then I'll do my triple. You know my triple knot and then I'll go ahead and pull that tight and cut that thread, and now it is under the track versus on top of the track. So here you see me cutting the hair just kind of trying to make sure that it I'm not cutting her length that you know everything matches up, but she did tell me that if I wanted to go ahead and cut it a little bit shorter, I could She is down with it so later on. You'Ll see me cut it just a little bit more as I clean it up with the trimmers, but right now, I'm just using my scissors, and these are some regular shears that I brought from Sally's a couple years back. I use these shears for weave and I have some other shears that I use my real shears that I use for cutting natural hair. But you see that she has a bob so a longer bob. So I'm just following kind of following the length of her hair and just trimming it up to make sure that the length matches up, because our main goal and focus here was to give her thickness. So that's basically what I was doing now, because the natural hair fall naturally layered, I'm going ahead and pulling that hair out at a 90 degree angle and just doing a little slight cutting to give it some of that natural layering effect. Our goal with this hairstyle was just a natural bob, so a natural fog, nothing dramatic, so I just went ahead and took some larger sections and just add it a little slight bump to the hair, just to give it that you know cute natural bob look. So I just spray some s3 spray, it's a serum that gives the hair a shine but doesn't weigh it down like oil and that is made by influenced hair care. One of my all-time favorite shiny sprays right now so for the bang, I'm gon na give it a little extra bump. I'M gon na flick that wrist a little bit more because I want the front to have like a feather effect. You see that! Yes, yes, yes! So I'm gon na do that for the entire bang area and give her that that sexy so you're looking at up her head, you see a lot of flyaways little broken pieces and that's because when she came to me this is on her second visit. When she came to me, her hair was very badly damaged and we are working on getting her hair back to a healthier state. So I encouraged her to go ahead and wrap her hair once she gets home and those will naturally lay down from the natural oils that your scalp creates. I don't like to put extra product on it so to hold it down, because then that ways the hair down and I'm all about, naturally flowy hair. Let me just be the first to say: I know I am not perfect, but I am a perfectionist when it comes to the hair. So you see where I have to like. Take the scissors and snip a little, you know a couple pieces or take the trimmer and line it up. I just like for my client to really get off the chair, loving their hair. Just as much as I do so I go ahead and go the extra mile to make sure things are in place. So now I am manicuring her edges or what we are cost licking her edges with influenced hair cares edge, control, very, very good edge control, love, love, love. It is another one of my favorites by fire. I really love a lot of influence, hair care products and you'll, see me using those products and shouting them out in other videos. But I love love, love the products and obviously she love love, loves her hair and let me also say I have no idea why. I had a scarf on in this video. My hair was done, so I apologize for that. I didn't realize it until I was editing, but yes, look at how the hair, bounces and flows in the hair that I used was V so by bobby boss. I hope that you enjoyed the video, please don't forget to rate comment and subscribe, and let me know in the comments what you would like to see. More of

Comments
MrsKankyCurly: NEW SUBBY Love this video.
Te'Aonia: Finally!!!