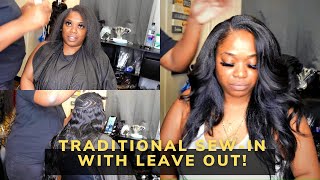
Detailed Versatile Sew In | How To Do Your Own Sew In Like A Pro!
- Posted on 19 June, 2022
- Microlink Hair Extensions
- By Anonymous
Hey beautiful, lets learn the tips and tricks to a gorgeous versatile sew in. Your hair will for sure be the main character with this install! Comment below what else you want to see.
Chicago Hair appointment: https://www.styleseat.com/skylarmorton...
For collabs email: [email protected]
Ig: sky.onjahnae
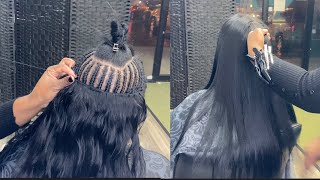
Hello, beautiful welcome back to my channel i'm sky on janae, if you're new here and on this channel, we talk about all things, beauty and a little bit of lifestyle. I don't want to keep you all too long, so we just gon na jump right into the video, because you already saw what it's about. Okay, let's just jump right into it. I section down my leave out already i'll show you that once we get further into the video and we're doing a deep side, part baby, because that's what i do it's, what i do, that's what i do so what i do. Let me stop all right. Anyway. That'S my leave out a good rule of thumb when it comes to your leave out. If you're going to be doing a natural install to know that you actually have enough leave out because, first of all, how awful would it be? If you did your whole sew-in or whatever install and you didn't, leave enough hair out, you'd have to start yourself over, but anyway use a metal tip tail comb and with the metal tip part hold it on the actual part and flip your hair over it. And if you can still see the metal, the metal tip, that means you don't have enough hair left out, so you should probably readjust your life and section that back out. Okay, now listen up like play. Close attention play, pay close attention for the rest of this video because i'm about to drop the gems, that's going to help you, sis, okay! So when you're doing your perimeter braids, i don't i don't care what the rest of your braids look like that perimeter. Braid needs to be your best braid, your strongest braid, the best braid, because it's gon na it's literally gon na, be the foundation for the rest of your sewing and that's because we're using a net so the rest of the braids, don't necessarily matter, but the perimeter Braid, that needs to be the best braid. So if you don't even know how to braid find somebody else to at least braid your perimeter and figure out the rest but yeah that puma braid, please make sure that's the best one and also make sure that it's thin, because we are trying to do a Natural sewing we want to be able to flip our hair, pull in a ponytail play behind our ears, so that braid needs to be thinner than the rest, so it can be as flat as possible. So i have to use, got to be because my hair is fine and it's slip and it's silky and slippery, so i need to be able to grip it. So i just put a little bit on my index finger on both my index fingers and my thumbs, and that helps me grip a lot better. I'M not the best at teaching how to do braids, because i just don't know how to explain it but yeah. That'S why i tried to make sure i got good shots for y'all, so y'all could see what i'm doing and just in case my explanations, don't make sense, but the biggest key to having a good, strong braid is don't grip. What was that? What was i doing? All right there we go um, you have to make sure you're grabbing small amounts of hair. Like you see me doing that way, you your braid, your words that way the loops of your braids they're all even and it's smooth. It'S sturdy. You don't feel like your braid is literally gon na fall out your head. You can check to see how strong your braid is by doing what i just did was rubbing your finger across the braid and if it feels solid and sturdy, that's how you know you have to really celebrate. You'Ll know be if it's not solid, because it'll feel literally feel loose like we know what braids feel like well, if you're watching this video, i'm assuming you should know what braids feel like um but yeah. So you know if it's a good braid or not, and just in case you didn't catch it from the other braid. On the other side, i'm going to show you this side as well. Just so i can make sure you know you have all angles. You can see my finger positioning. You can see how much hair i'm grabbing every time like the further i go down the braid yeah i'm. I was really trying to give you all the angles because, like i said, y'all need to learn how to start doing your hair, because these hair stylists out here have been whiling. So i know if you hear noises that sounds like bracelets dangling or something sweeping across something, that's literally my hair over the speaker, because i'm recording, obviously i'm recording my voice over, but i'm using my headphones so and i'm a very animated person. So i use my hands and i move when i talk so that's where it's coming from now, i'm about to try to explain this as best i could like this is also counts, as your perimeter braids, the perimeter around your leave out. So this as well has to be thin and to make it as flat as possible. I don't know, i don't know how many sew-ins y'all have done or if y'all have done any, but it's i find that as you continue to braid. Obviously the braid starts to get a little larger, so to avoid that this is a method that i have started doing and it really helps me a lot um yeah. I think i can just i don't know. I don't think i can explain how to do this. You just have to look and see, let's see well obviously, you're going to part at where the perimeter i mean where your leave out is but you're not going to part around the whole. U shape once you get like towards the back you're going to take that braid and go down and then do the opposite on the opposite side. If that makes sense, i mean, if it doesn't it's a video, you can just see what i'm doing. Okay. So the best way to part is what i'm signing is what i've been doing. Is i literally use my index finger? I hold it at the part that i just previously did, and then i just part from behind from the other side of my finger. If that makes sense, i mean you saw what i just did but yeah that helps me get the perfect part almost every time so now you're gon na this is still gon na, be the same braid you're gon na go on the other side of the braid. You previously did and part down from there and that way it's gon na give you like a little crisscross at the back of your leave out and it's going to make sure your lead out is super flat. Okay, so as i'm braiding down to avoid having a bunch of lumpy looking braids, what you want to do is you want to take the end of the braid you're going to see me do it? So i just you know, you're going to take the end of the previous braid and pull it up into your next strand of hair for this for your next braid wow. Why can't i talk you, pull it up and attach it to the braid that you were already doing, and you just continue to braid now and it that braid becomes a part of one of the three strands of your new braid ciao. I hope that makes sense, because i'm trying over here i got the angles. I got the angles, so this is how your hair should look once it's all braided up. Obviously, my hair is short because i just did a big chop a couple months ago, so i needed to use ponytail holders to secure the ends of my hair. Never use a rubber band, always ponytail holders. Yes, i'm talking to you, stop buying the rubber bands. Um yeah now i'm going in with my scalp calming lotion from lasagna. This is the best alternative over oil. You should not be oiling your scalp and if you don't know why go watch one of my other videos when i explain why - and this is the brand of um stocking cap neck - that i use - which i usually never really get this one - i mean, if that's All i have i get it, but i thought it would be easier to show on camera. Oh girl, what song was you singing? What song was playing? I was just some music. While i was doing my hair, you know just vibing. I think it was no bs from my girl janae anyway, it's stretchy and it kind of looks like those gloves that all girls wore when they went through that i don't know what type of phase it was. Let me stop doing stuff with my hands all right. So i need to do is just put that bad boy on and make sure it's lined up with the braid. That way, you don't catch any of your hair left for your leave out because baby i've done that before it hurts okay, it hurts so make sure you line it up exactly and then we're just gon na sew down it's best to go. I go through the band that way it it's completely secure because it is stretchy and the loops of this net are quite large. It helps if you sew through the actual band on it because, like i said, it'll help secure it better. Now we're done braided and knitted. If you still here with me, i appreciate you so much make sure you leave a comment. Tell me how how i can improve on my tutorials but yeah. Let'S get let's, let's get into the easy part that looked delicious watching and it was actually delicious. When i drank it now, you're only going to use a single weft for the perimeter track and you're going to put the needle through the actual weft itself. That'S going to give you the flat seamless, look that we're going for because we're giving it's our hair. Okay. Now, when we're doing this braid, not not this braid wow, why am i so stuck on braids we're doing this track? You want to make sure you're putting. Why can't i talk today? Um, you want to make sure that you are sewing underneath that first braid, if that makes sense, you're not going to sew directly on top you're going to sew underneath that way, when you flip it over, it will flip it up or. However, you want to wear your hair. It'S going to give seamless it's going to get flat. It'S going to give it's my hair. Another part i did not show because i don't know what happened to the clip y'all, but what i did do after i finished sewing this track all the way around, because we're sewing it all the way around back to the front. On the other side, i flipped it all up and i sewed under it that also helps with the flatness. So i want to make sure i got that in there because i didn't have the clip for it. So yeah so see how i have the track. Lined up, like i told you, i got them angles. If i'm not explaining it properly, i'm definitely showing you the angles for it so yeah and just continue sewing and when you're sewing you want to make sure like i'm hoping you've been paying attention um but yeah. You want to make sure you're looping it as you go so one loop when you're just sewing regularly, but once you get to those end pieces, you want to double loop, the thread around the needle, because that's going to create that knot and that way you don't Have to worry about your sewing falling out. You have to worry about if you're the knot, you try to tie your own messing up or not being tight enough. This is this is how you do it knot it and cut. So now that we have this sewed around my head, i'm going to just check to make sure it's flat like we want it to be, and baby already already ain't even pulled my hair over it and it's giving this is my hair period period? Okay. So when you get to your second track, that's when you can start double wearing for fullness and if you don't know what i mean by double wefting when thinking when you get your bundle and it's folded in half it's folded in half already, that's double with opposed To if you were to separate it and it's one long track, that's single left, so that's what i mean um, so yeah. Also you don't want to make sure you do not stack your bundles. I mean your tracks wefts, whatever you want to call them, you don't want to stack them so close on top of each other, because that's going to be you know it's just it's going to be pointless because your sewing is going to end up looking bulky and You did all that leave out for no reason you might as well have just braided all your hair upsets my wife's are already cut, because this is just old hair from my micro link install, but you want to make sure you're sewing the hair around the head. So you'll see in this next clip boom. I was right on time with these voiceovers baby. Okay, anyway, you see in this. You see how i'm curving the hair around, because that's i want more hair towards my face. So that's going to give us that beautiful banyan moment and you want to make sure you get as close as possible to oh stop get as close as possible to that perimeter track without actually sewing on today, because remember it has to be able to move. So this is another reason i said that perimeter braid needs to be the smallest and the strongest is because we want to make sure we can get as close as possible to our leave out. It just makes the sew in like age, gracefully like fine wine in black women, but yeah and baby, it's gon na be flat flat fat like so y'all. I was so tired, recording this, like i literally took all day to get this video recorded because, like i said, i was trying to give you all the angles, so i was real tired. I didn't even finish my hair. That night, i decided to style it later. So here's the finished look. I hope you all like it. Yes, ma'am, okay, let's, let's get into let's get into the flawlessness of this sew in smooth. No, i don't have a lump. That'S from where my hair was in a ponytail baby. Don'T even don't even come for her huh, but thanks guys thanks for watching this video, i hope you made it all the way to the end. Like comment share, subscribe rock with your girl and i'll see, y'all

Comments
Paula Smith: im just loving the content!
Paula Smith: Your voice over makes me feel like we are literally chit chatting in your salon chair lolol
Paula Smith: this glove hahaha