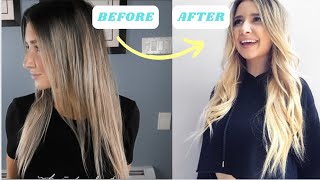
The Easiest Way To Diy Install Weft Hair Extensions. Beginner Friendly
- Posted on 25 May, 2022
- Microlink Hair Extensions
- By Anonymous
Ever want to learn how to install your own weft hair extensions? Sharee Anonuevo shows us the easiest way ever to install your own hand-tied hair extensions. Install in 1.5 hours and wear for 6-8 weeks with no maintenance. Take out and reinstall once they have grown out. You can reuse the hair over and over again for years on end.
For this DIY Hair Tutorial, all you need are:
Ouielle Hair Extensions Wefts
https://ouielle.com/collections/volume...
Pliers
Micro Beads
https://ouielle.com/collections/micro-...
Thread
https://ouielle.com/collections/sew-in...
-------
#hairtutorial #hair #hairstyles #hairstyle #haircolor #haircut #hairgoals #hairstylist #hairtransformation #hairfashion #hairvideos #hairvideo #hairideas #haircare #hairdresser #hairtrends #hairlove #hairdo #hairextensions #hairoftheday #curlyhair #behindthechair #balayage #hairinspo #naturalhair #beauty #longhair #hairinspiration #makeup #explorepage
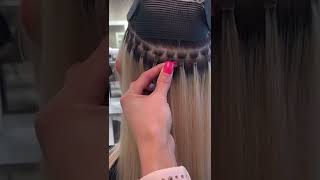
Guys it's sheri, so i just wanted to come on here today and share with you guys on my new hair. So i recently just had some new extensions put into my hair and i'm absolutely loving it, especially for this fall scene so that i will be using. I'M using the hand-tied wefts in the shade dark chocolate and i believe that these are 18 inch in length and 150 grams altogether. So that's about three bundles in the box. I also got these silicone micro link beads in the color dark brown, and i will be using these for the installation process. So this is what the wefts look like unraveled, the width of it is perfect and it fits around my head just great other items that i'll be using for the installation is a needle and thread some alligator clips a loop tool for the beads, a pair of Pliers i couldn't find my hair extension pliers, so i'm using these craft ones that i have, which will still work just great and some scissors that i forgot to put in this video. The first thing that i'm going to do is sew the first row of wefts. Together, i'm going to be sewing two wefts together for the bottom row. Now for the sewing method, i will be doing a lock stitch to do this, i'm going to pass the needle through both wefts and pull it through the loop to lock it into place. So i'm going to do that again, so you can see so i made a loop, then i'm going to pass the needle through both wefts pulling the thread through the middle and pull it to secure the stitch. So i'm basically going to repeat this method till i reach the end at the end of the stitch, i'm going to do a double lock stitch to make sure that the thread is nice and secure. The next thing i'm going to do is place the micro beads onto the loop tool and have it all ready to when i actually do the installation, if you guys want to know where i got all of my tools from, i will have it all down. In my description box, so i went ahead and i pre-sectioned my hair into a deep horse shoe section. I left about a two finger section behind the ears so that when i have the extensions on, i have enough hair to hide it. When i put my hair up in a ponytail now, i'm going to take the weft that i just sewed together and i'm going to fit that onto the horseshoe shape and measure where i'm going to start the replacement and end the bead placement. Once i determine the position, i'm going to use a clip to act as my starting and ending point guide. So this is where i'm going to place the first bead using my tail comb, i'm going to grab about a one inch thin section of hair for the first bead, i'm going to add a piece of thread to use for later. So with that section, i'm going to grab that loop tool and pull my hair through that loop once i have it up to where i want i'm going to take that first bead and pull that onto my hair. Once i have that bead onto the section of hair, i'm going to pull it up onto the base and then take the pliers to pull it up even tighter, then i'm going to turn down slightly with the pliers and squeeze it shut and now moving on to The next section i'm going to take the same amount about a 1 inch, thin section and with the previous section i just did i'm going to take half of that section and add it on to the new section. So this method that i'm going to be doing is called a waterfall technique. I believe so, instead of looping thread onto each beaded section, i will be taking half of the hair from the previous section and adding it on to the new section. I hope that this makes sense. Okay, so, as you see, i have the two sections combined together. So now i'm going to take the loop tool and pull my hair through that loop then take the bead and slide it onto my hair, bring the bead all the way up to the base and then take the pliers to squeeze it down. So this is what it should look like for the next section, i'm going to repeat the same thing: i'm going to take a one inch section of hair and then grab half the hair from the previous section and add that onto the new one then take the Loop tool and pull the hair through that loop and slide the bead onto the hair and then take the pliers and turn it slightly under and then squeeze to shut. Now, i'm just going to repeat this process until i reach the other end of my head. So this is what it should look like once it is all complete. Now we have a base to use to sew the extension weft onto now. It'S time to place the extension wefts on to make sure i have it placed on properly and evenly i'm going to use these alligator clips to hold it down. Once i have everything clipped into place, it's time to stitch this together, i'm placing the needle behind the beaded section and bringing it through the weft, as i pull the thread all the way through i'm going to pull the needle through the loop of the thread to Create a lock stitch, i'm going to pull on that until the extension feels nice and secure onto my head. So i'm going to use the same, lock, stitch method when sewing this together, holding the thread up, i'm going to place the needle again behind the beaded section and through the weft, and as i pull the thread through, i will take the needle and bring it through That loop thread to create that lock stitch and i'm basically going to pull it until it feels nice and tight onto my head. So here i am again placing the needle behind the bead and then pulling it through the weft and just before i pull the thread. All the way, through i'm going to place it through the loop to lock stitch it, then i can pull it to tighten doing these installations. Yourself can be super tricky, so it's definitely normal to come across errors like this. You just got to be patient, so i'm going to repeat the same method till i reach the other end of my head. Once i reach the end, i'm going to do a double, lock stitch. To make sure the extensions are nice and secure. So remember that thread that we added on to the very first bead. This is where it comes into play, so i'm going to take that thread from the bead and then the thread that i used to sew the weft on and just make a knot with it. This will make sure the extension sits, nice and taut onto the head. So now this is what it looks like all installed, i'm going to go ahead and do the next track off camera and come back when it's all installed alright. So this is what the extensions looks like all installed. I only did two rows of extensions this time, because i feel that my hair is long enough to blend so now, i'm just gon na go ahead and trim the hair and shape it up and i'll be back with the finished results. Is the finished results right here? I only did two rolls of the extensions normally i would do three, but i felt like my natural hair was long enough to kind of blend in with the extensions and kind of give it that layered look. So i only stuck with the two which is perfect and i am so loving being this dark brunette shade, so i'm probably going to keep this for a while, definitely do miss having the blondes and the fun colors. But i think that it's time for me to just embrace the natural look, so what do you guys think? I know you guys probably want to see the back. So let me just share with you guys what the back of these extensions look like. Okay, i hope you guys can see that that's what the extensions look like there come up a little bit here, but, yes, you can see how my natural hair kind of gives a little bit of a layered look so looks like my own hair. Doesn'T it alright? So that is it again, thank you so much for
![Invisible Weft Hair Extensions With Kera-Links [Custom Hair Extensions For Fine & Thin Hair]](https://static.hairurl.com/p/2022/04-22/70d0395b363947a05e283d0373471ba1.jpg)

Comments
Sarah Salazar: and what size bead did u use
Kitschmygrits: Seems too close to the scalp. Ouch!
Sarah Salazar: wait do you put the thread under the water fall or inside the bead?