Sew-In Weave On Myself- Filipino Curly Hair
- Posted on 25 June, 2019
- Sew-In Hair Extensions
- By Anonymous
*******************************************************
LET'S STAY CONNECTED:
Instagram: http://www.Instagram.com/ItsMeMissRuby...
Twitter: http://www.Twitter.com/ItsMeMissRuby
Health and Wellness Products I sell: http://www.Linktr.ee/ItsMeMissRuby
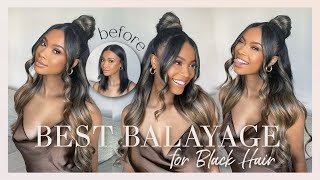
Hey gal, what's up its me mr. Ruby, thank you for stopping by thank you for subscribing to my channel and especially for those of you who hit that Bell, so you can be notified about all of my future uploads today I am going to do a full Length, video we are doing, and so in weed, I'm gon na be doing the trim, the style everything. So I hope you guys are excited the hair that I'm using is from weave pronet. This is two bundles of sixteen inch hair and it's actually her virgin Filipino hair, and I know it looks really crazy right now, but it has been through a whole lot ever since she gave it to me. But it's okay, because I'm gon na revive it and show you guys how well it colors and how well it styles in a natural curly style, so I'm actually using the high color blonds by L'Oreal, so that I can lift the color of these bundles without using Bleach, I used a 30 volume developer and I really wanted it to get lighter than this, because my hair is lighter than this, but I didn't realize I should have used a 40 volume developer anyway, since the color came out. This way I figured I'd. Do a reverse ombre, instead of doing it all the same color and that's how I make the best out of this situation. So I filmed myself doing these first few braids, but I accidentally deleted the footage. So I am going to show you guys what I do. Moving forward, but first I just want to let you guys know that I did cut the hair off the weft of the bundles that I had, and this is an example from a video that I had created a couple years ago, where I did a sewing weave On myself, except on this video, it was a straight hair weave where I straightened my hair out, and I did do a middle part and in the video I'm doing today, I'm actually doing a curly hair weave so either way. The braid pattern is pretty much the same, so I figured I would to show you guys this. Basically, the first couple of braids that you put on top like just beneath the hair, that's being left out, are the most important braids. These are what I call anchor braids. They need to be small, they need to be neat, they need to be even because the top two tracks that are going to sit there are going to be what cover the entire rest of the weave. So they need to be flat, they need to be neat. Like I said, my hair is pretty thin, so I can get away with the top two braids enough, but if your hair is really really thick and you're doing this on yourself make sure you give yourself like four braids on top before I move on with the Breakdown, I'm going to show you guys when I'm putting on my scalp. This is actually by design essentials. It'S the scalp tonic. I love it because the first ingredient is water and then it's a variety of oils and other ingredients. It'S designed to hydrate the scalp without clogging it by being extremely oily, and it actually can stay in your hair or you can just use it as kind of like a detox and wash it out. So I really love how refreshed it makes. My scalp feel - and I highly recommend this product. So this is what my hair looks like after I've rated the anchor braids, which are basically the perimeter braids all around the sides where the weave is going to be sewn onto and the top and I'm just taking. This piece down right now, because I need to create one braid on the bottom to go all the way across now. In my previous video, I did like a beehive breakdown, which was very challenging for me to do on myself. This time I decided to just do a lot of straight back braids. I see girls do this all the time and I never really thought that it would work for me until I saw it up close and personal from one of my clients, and I realized that this braid pattern actually does work. If you do it right. So for me, I had to do the first braids on top as my anchor braids, and that made it easier for me to proceed with doing these braids straight back. Another thing is making sure that I'm adding hair to each individual braid that I'm doing down, because that way that basically like the knots that are at the starting point. If each of these braids are actually gon na serve as like another layer. For me to lay a track onto and then all of the tracks that are beneath that top track are going to be able to be stitched on to the braids. Whereas, if I didn't add hair, then there wouldn't be a knot right there, and it would be like a big leap between where the braids are fat enough for me to actually stitch on to and where that horizontal braid is just above the vertical braids. Hopefully that makes sense, so I'm showing you guys basically like what I'm doing I'm criss-crossing D braids like the two vertical braids that are sitting on top the anchor braids, the perimeter braid, I'm criss crossing them because that's gon na help make them stay all together and Lay it down firm and it makes up for the gap that would otherwise be there if I didn't crisscross them, and I need that gap to be filled in so essentially, I can lay one track across that entire top and it can connect. Now, if your hair is thicker than mine, you may not be able to do what I just did, which was grab the tail end of those braids and braid them into the braid going down. You may have to just like let the tail ends hang and just stitch them down later, but my goal is always to have as little to stitch down in the end as possible, while maintaining flatness. The most important thing about doing a sewing weave is making sure that your foundation is secure and it's flat now. The exception to that is, if you're doing your own weave and if you're doing a curly weave like me, for instance, since I'm doing my own hair. If it's not perfectly perfectly flat, I'm not really tripping as long as it's functional, especially since I'm doing a curly weave, nobody's gon na be seeing anything because the hair is gon na, be so fluffy. On top of it, however, if I were doing a client's hair, whether I was doing a curly weave or not, I would still make sure to always make their foundation flat, just because altogether it makes the style lay better and it's just more comfortable for them. It takes better care of their hair. Everything is just better about a flat foundation, so I'm taking the tail ends of these bottom braids and I'm stitching them together. This is just like a slo-mo part, so I can show you guys basically how I'm sticking the needle through one of the loose braids and then through the actual cornrow, that I want to connect those loose braids to and then making sure I loop the thread around The needle and then pull it because that's what creates a knot. You can't just go through with the thread and just stick the needle in your kind of way, don't make any loops or knots and expect your braids to be held down securely. You have to create loops and knots, otherwise your braids will come and under that week and it'll be a hot nappy mess. When you go to take your hair down now, I'm not using a net on my hair this time around, but a lot of times. I do use a net. I just really didn't feel like doing it this time to be completely honest and again since I'm doing my own hair, I know what that means, and I'm okay with accepting it. So after I stitch that piece down, then I'm making sure to tie a knot by double looping it and then cutting off the excess thread. And then I'm just going to proceed with the tail ends of each individual, braid and stitch it onto a braid. That is currently laid down flat in a corner. Oh so looking at this, you may not think that it looks like it's flat, but when I run my hands across it in the end, it's flat enough, like I said so, why you guys watch me finish. This go ahead and enjoy this song. The artist name and a link to their music will be listed. In my description below I didn't know you were, I couldn't even tell it's color your district and the color. Now I'm gon na get started with sewing the tracks in now. The way that these bundles come with this Filipino hair, the track is so thin that doubling it up almost makes it the same size as like a standard track would be so you can actually quadruple it to get it the same size as what it would be To double it now for this very bottom piece, I'm only going to double it, because essentially I want it to be as thin as it would be if it were a single track. This is the track. That'S going to need to be tucked underneath this braid seamlessly enough to where, if I lift my hair up into a high ponytail that leave out that I had just underneath, the braid should be enough to cover it and you shouldn't be able to tell that. I'M wearing a weave, which is why it needs to be pretty thin and it needs to lay snugly underneath. So, as you notice, I'm actually doing the loops in the thread going underneath the track and underneath the braid stitching it like. This, should allow for that track. To lay underneath the braid seamlessly like I said, and that's why it's also important to use a very thin track to make this process easier. So now I'm going to bring all of those tracks together, almost as if they are quadrupled, and I'm gon na move forward with installing the rest of this first bundle, which is still pretty long as you can see, and those tracks are quadrupled you guys, then I'm Gon na proceed with sewing this into the bottom of my head and I'm gon na be flipping the tracks from side to side. So I'm trying my best not to cut these tracks, especially since it's curly hair, like I really don't want it shedding, because I feel like curly, hair already sheds a little bit more than straight. Hair typically does just like when you are naturally curly girl. You tend to shed, because naturally, your hair is a little bit drier than girls with straighter hair. I did a whole video called flipping and stitching tracks, and it gives you great detail about how to seamlessly flip your tracks from side to side without creating a whole bunch of lumps and bumps. And I give detail about why I'm stitching in certain directions and using certain types of thread all of the details of that I'll list that video in the description below - and you can definitely check my channel for that as well. So, as you guys can see, I'm actually pulling these weft up, basically to like just above my ear and kind of dipping as I get to the back and coming back up just above my ear each time, because I want the tracks to lay in this way. In my situation, I'm using the same length hair for both bundles, but a lot of times. We use two or three different lengths of hair and if you allow the longest bundle to only take up space in the back of your head - and you don't drag it up to the side of your face at all, it's going to create an uneven, unrealistic transition Because if you look at the way that your natural hair grows, even if you go get a haircut, the stylist is going to make sure to cut the bottom layer of your hair evenly along like this. The hair that aligns to the side of your face, as well as the hair that falls down your back. So you don't want to create a weave situation where the only length that you're getting is in the back and none of it's coming up to the side of your face at all, and it took me a little while to realize that. So that's why I've adjusted my sewing pattern, just so after stitching in that first bundle and quadrupling it, then I made sure to only double the second bundle because, like I said doubling these webs for this particular brand of hair is almost like singling them out and Since I'm flipping my tracks from side to side, I want to make sure that the hair along the side of my face is as flat as possible and that's. Why sometimes like. If I were doing a straight weave - and I was up this high on my head - I probably would just start cutting the tracks at this point, because it's more important to me to have a flat weave than to maintain one full length bundle. However, when I get all the way to the top of this, I am gon na cut the weft for those top a couple of tracks. All of the details about the specifics about what I'm doing and how I'm stitching this in. Why I'm sticking the needle through the weft, sometimes and other times, I'm not all of those details are in my video flipping and stitching tracks very successful video, because it goes into great detail talks about something that a lot of people don't talk about openly. Man tell me why it took me forever to do this. Hairstyle y'all for those of you who join me on my live video, shout outs to y'all. I had some great conversation and I'm looking forward to doing more of those. You guys know how long this took me. Okay, so I ended up losing the footage for these top two tracks as well. So I'm just gon na show you based on my other video, and essentially you want to make sure that, with the second to top track that you connect it to the top braid. And then you bring it down to the second braid to finish stitching it on. But by connecting the end piece to the top braid, then it basically creates some coverage to help just cover up all the rest of the tracks. And if you don't you don't really have to. But I like to do it because it just helps the hair to fall in my face just a little bit more and create a fuller effect around my hairline. So after that's done and the hair is completely covering everything that I want to, then I'm gon na go in and add the very last track, and you just want to make sure like rule of thumb when attaching the top track. If you don't already know, you want to make sure to do these loops pretty close together, so you undo each stitch pretty close together, even if you weren't doing them super close together throughout the rest of the weave, because this track is basically going to be getting Handled the most it's just beneath your natural hair. So if you go to comb brush your hair and manipulate it in any way, then this track is going to be moved around and touched a lot because it's right there on top. So you want to make sure it's extremely secure, also the more secure that you install it by making your stitches closer together, then the longer it's going to last and again, this is the track that needs to be the flattest, the neatest. So, as you can see, I'm sticking the need around in a frame and then around the needle to create small nuts, and this is what it looks like after everything is installed. I have braided my hair, so it actually kind of like blends, like I'm, actually looking forward to doing like a braid out with this hair, but the colors don't look so great and definitely the lengths need to be touched up. So I figured once I go in and I actually trimmed the hair and make the lengths blend. Then the color won't look so off now. It took me a couple days to get to this jaw. Honestly, I just was so busy, so I had braided my hair up and that's why it looks so janky right now, but it's okay, because we about to get to it. Yes, so basically, what I'm doing is like, as you guys can see the length difference is drastic, so I'm starting in the back and I'm actually pulling my hair up. So I'm like directing all of the hair up and I'm pretty much just like pulling it with my hand. I realized this isn't straight hair. It doesn't need to be a perfectly straight cut. It just needs to blend so starting in the back. I'M taking off about 2 to 3 inches of those top layers of hair and then I'm gon na proceed to the side of my face and I'm gon na do the same thing, dragging the hair upward, making sure that it's combed out a bit. But I definitely don't need this to be like perfectly straight and at first I was like point cutting it, but then I realized this is curly hair. So once I wet it and curl it, it's not gon na be super straight anyway, so I don't really need to point cut it to create, like a feathered trim, because it's gon na be feathered just because it's curly hair. So after I cut the first couple of layers, then I'm gon na go through and I'm almost just gon na, like glide the shears down at an angle, so I can create some shorter layers toward the bottom. I want to kind of shape this hair out. I recommend, if you're following me, that you do this cut while your hair is dry and combed out, and then you can just go in and kind of like clean it up a little bit after you wet your hair down and get your curls all together. Now me I'm pretty familiar with how my hair is - and I know that my hair is pretty similar to this hair. So I'm pretty sure it's gon na curl up the same, but if you're doing a curly weave and the curl patterns do not match, then you don't want to do this type of cut. First you're gon na want to wet your hair down style. It see how your hair, curls and tightens up in comparison to how your weave tightens up and then just go through curl by curl and trim it. It'S probably them taking a little bit longer, but you just that would be the better bet, because if you do it this way and your curl patterns don't match, then it's gon na sit a whole lot differently and uneven. When you go to style it does that make sense. So already I feel, like those colors are blending better, just because I did the trim, so I'm pretty happy with it. I did cut off some inches on the bottom, but I wanted to wear short curly hair. I wanted this to look fuller than my natural hair and I want it to be easier to maintain than my natural hair, but I don't want it to be too much longer because this summer time y'all is hot and ain't. Nobody got time for that. Okay, she ready she ready. I have at because I stick my tongue out: huh mm-hmm, okay, so styling, like I said I am wearing this hair, I'm basically about to do to this leave out weave what I would do to my natural curly hair very similar to a wash and go I'm Starting out with the hair really wet, and I want to point something out to you guys as far as porosity goes, you guys see a difference between how wet the weave hair got compared to how wet my natural hair on top got and then look at how Wet my very very bottom pieces of hair got that's basically to point out to you guys the porosity differences in my hair. I realize that the hair on top for me, like my leave out on top, is lower in porosity. Then the weave hair that I've attached, which means it takes a lot more water to saturate that hair and it's going to take a little bit more effort to really get that hair hydrated. However, my hair that hangs at the very very back of my neck area, it pretty much - gets drenched with water really easy. So it's like the highest porosity area of my hair right now, so I'm going in with some leave-in conditioning spray by hair Lavie. It'S like my absolute favorite leave-in conditioning spray right now, because it does not contain humectants. Humectants are very powerful with helping your hair to attract moisture from the air around it. But the downside to it is that if you're in dry climates or you live in a place where it's really hot and there isn't any moisture in the air, then humectants can actually further dry your hair out. So I like using products that don't contain humectants because I don't live in a humid area at all and it's summertime. That'S what I like about this leave-in conditioning spray. So, starting out, I started with water and now I'm doing a leave-in conditioning spray, which is helping to soften up my hair, get rid of some of these tangles. Since my hair is very, very high porosity at the bottom, then it gets tangled very, very easily. That'S why next I'm going in with the pure oils hair oil to basically add a layer now what oil does is? It typically helps to seal the moisture into your hair, and then, after that, I'm using a serum serum is like the ultimate. It'S the ultimate shiny slippery product that just adds so much beauty to the look of the hair, but it also blocks out all moisture and it really does require that you wash your hair before you add any more moisture to it. So I'm okay with that, because this hair in the back needs as much sealant as possible in order to retain the moisture from the water and the conditioner added, especially because it's about to be hid and underneath a whole bunch of hair. Moving on, I'm also gon na spray down my tracks with this leave-in conditioning spray. Now this hair is curling up so beautifully. It doesn't really need much help, so I'm not gon na add a whole bunch of product to it, because it's gon na weigh it down, and I want to make sure that I get some volume out of it. So after I do this, I'm just gon na go in with a little bit of wave Nuvo, which is a very light. Moisturizing curly cream and, as you can see, I didn't add too much. I'M pretty much. It'S gon na focus on the ends for the most part, because the Institut tend to be the driest part of curly hair. Now, if I wanted to wear the wet look which is going around right now, then I would be layering the products on really heavy so that when the hair dries, it maintains looking like it has a lot of weight to it and a lot of moisture to It now, as you can see, the texture in my hair on top is completely different than the weave hair. It requires a little bit more work. I actually have to go in with a comb to get out some of the knots and tangles now. Typically, when I do my curly hair routine, I just use my fingers to detangle, but in this case, because it's very small sections and I've already previously finger detangle them, and I really want this hair to blend with the hair. Underneath it, then I'm okay with using a comb and I'm just using it as gently as I can now after I added that leave-in conditioner, I'm actually gon na go in with this gel for the hair. On top, like I said, this hair is lower in porosity on top, so it needs a product. That'S a little bit heavier to really help to lock it together and seal it all together, because it resists moisture a lot. Now. I actually received this eco styler gel from weave Pro when I got the hair from weave Pro. It was a complimentary product and so far I've been wearing it for a couple days, and I really like it now, as you can see. After I add the product to my hair that I'm going through and I'm combing it through, so that those hair strands can blend together, my hair, along with the weave hair, underneath it that's, what's gon na help to give it like the ultimate seamless look and just Make it flow and just make it look super natural? Yes. Now, because my hair in the front is like really low in porosity and just starts to look really dry it out really quickly, then I have to help to add definition to it by finger coiling. These strands, which is awesome because it's gon na look beautiful when it dries, and I just love how to find it looks asking the questions you guys have below about like just like natural curly, hair care. I get that my hair tends to blend well with this weave hair, but I've worn different types of curly hair weave before and my hair doesn't blend with it all together. So I'm super excited to finally have found a weave style that I feel blends perfectly with my natural hair, because if it's too curly or too wavy, then you can tell that I'm wearing, and I hate that and I'm pretty sure you guys have run into that Before, which is why I highly recommend that you, if you're gon na, do a leave out, curly weave, find curls that match your natural hair texture or something that you at least know how to blend together. Otherwise, it's gon na look a mess. So then I went in with my diffuser and I diffused the heck out of this hair took me about 20 minutes, but in the end I was super super satisfied as you can see by the smile on my face, because I really believe that this looks natural. It'S the length, I want it's, the texture, it's the volume that I want. It'S fluffy it bounces, it's not super weighed down by product and altogether. I think it just looks like my hair, like I'm not gon na, have any insecurities walking around wearing this weave and that's super dope. We'Ve Pro dot net sells this hair along with so many other styles of virgin, Indian virgin Brazilian eyelashes hair products. It'S dope so make sure you stop by the website to check out their full list of products. Let me know what you guys think about my hair in the comments below seriously like you're, not gon na hurt. My feelings tell me the truth. I know that my colors are off, but what do you guys think you think I can get away with it? Let me know, and for those of you who are wondering, why would put a weave in my hair when my hair is naturally very similar to this? Here'S? Why? Because, when you look at these two pictures side by side, you see, I have a lot more volume and a lot more weight at the bottom of my hair. With this we've added, then I have with my natural hair but hey. Let me know what you think in the comments below I appreciate you checking out my video rocking with me all this time. God bless you guys and I'll see you on the next video


Comments
PBB x Trainer Mona: It looks so cute! I’ve been doing these sew ins for a while & I love this protective style, it helps me not damage my curls. It’s so manageable ❤️❤️ #newsubbie
Rio Bryant: Not only are you so talented, but you have information on EVERYTHING! You literally answer every question I didn’t even know I had!! You’re awesome boo, thank you!
Shaniece: Beautiful job! I watched part 1&2 of the live(so fun and real) and the results you have are definitely worth all that you had to go through. It blends perfectly!
Fernanda Cardoso: Gostei da técnica!!! Parabéns!!!!
M Perry: So beautiful and so natural!! Yessss it looks like it’s your own hair.. fabulous
Arkeito White: I love the braid pattern. Just beautiful
Llah: Your own hair looks really healthy and soft.
C. W.: It came out gorgeous
Sekyia Namiko: I've been trying to find the right type of weave to put in my hair because I always would get the wrong kind to blend, I don't know what to define my hair type because its straight but can be curly if I make it curl like you did...this is is lol I have found it lol thank you. You look good too!
Sharewitme: The colors look great. I love it!
Ronni j: Looks really natural for REAL
Rahab Jericho: Looks so good ❤❤❤
Curlyhead Rain: Great video the hair looks amazing
TheeBraidGoddess: turned out lovely
Coco Gabby: Girl that hair look good don’t let nobody tell u different
SoExtra83: Honestly , your real hair is gorgeous . I understand you probably wanted the fuller look. Just saying your real hair looks awesome
Kera Nichole: your natural hair is pretty n the weave is going 2 blendd in really well...
Akaizi Jay: Seriously ....THANK YOU
Kimberly Love: Too be honest the colors are great together can't tell.
shawty 😻.: Hi, what’s the name of the weave you used in this video? I really want to try it out!
Winta M: U did an amazing job with it. Is there anything else that replaces the diffuser?
Lovely Lenish: I love their oils!
diamondsandlipgloss: the color variation makes it look more natural...
Allianna Brooke: Hey girlie <3 I just saw your past video from 2017 and i believe you mentioned that they're the same hair from weavepro.net . "The Bermuda kinky curl" . Just commenting because I noticed that the hair in this video has a more looser curl pattern than before (idk if its because your hair is a different color now?) . but , I was also wondering what lengths you had in this video. thx for ur time.
Patricia Darby: Beautiful omg ❤️❤️❤️
Curly 3C: hello how many packages was used ?? I'm brazilian and I don't understand what you did
Kimberly Love: And you are Beautiful away Miss Ruby.
MISS WENDY JACINTHA EDWARDS VICTOR: Great Job
Learning adventures with Chayanne Gilead: Well done
Yerose: Question what if you hair is not as long as the weave in the front and back
Ameera Azeem: Do they still sell this on the website
Sabrina Koodabachus: What lengths did you use?
shawty 😻.: Does it come off easily?
Gianna Guthrie: So were you able to put it up in a pony tail ? At the end of the video it looked kinda bumpy
Jolly Gurl's World: Looks good
Daniel Ruiz: Dope!!!
Danait Habete: Did you dye the hair, or you put it on as the colour it came ????
lolo: I can this for summer
lolo: Thx
Enitan H: Does someone know where she is she needs to do my hair
Miss WOG Daily: Looks great. I've lived in a Filipino neighborhood 20 years and have never seen them with hair like that! They all have straight hair. Maybe she's referring to the Negritos who reside in the hillsides of the Philippines.
Miley Thomas: I love you
Marshall Ck: Hello beautiful it's still look nappy baby.. 2019.. Yeah..✌
Vanou Sisi: Filipino With a big african nose
Taylar Saliga: Why she look so angry when she started trimming her hair lmao