Rubber Band Ombre Method- Chimerenicole
- Posted on 12 November, 2014
- Sew-In Hair Extensions
- By Anonymous
Please Subscribe + Like + Fav + Share :)
Previous Videos:
Pronto Quick Weave: http://bit.ly/ZvdqaS
Vexin Sew In Tutorial: http://bit.ly/1wL8iKx
Crochet Braids Tutorial: http://bit.ly/ZOONGo
How to REPAIR hair extensions: http://bit.ly/ZFo2UX
My Foundation Routine: http://bit.ly/11HISnO
How I Contour & Highlight: http://bit.ly/1weYQz2
My Eyebrow routine: http://bit.ly/12iCDan
Beginner Friendly Makeup Tutorial : http://youtu.be/vWN3fZk_HO4
My Fashion Blog:
Discount codes:
My Favorite Flatiron: http://bit.ly/IM_Hair470 10% off with code IrresistibleChimere
My Favorite MAKEUP Brushes
My Favorite Hair Extensions:
MY OFFICIAL Facebook Page
MY TWITTER:
My Instagram:
BUSINESS INQUIRIES ONLY: [email protected]
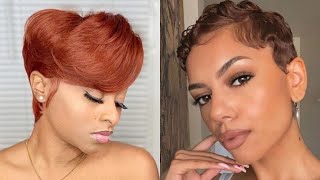
Hey guys so in this video I'm going to show you my rubberband ombre technique and I'm going to show you how I achieve this look. So if you want to see how I did it stay tuned, so we're going to start off with the products I'm going to be using I'm going to be starting with some pre lightning, which I'm going to be using some bleach. I'M personally going to be using Kendra hair color. However, if you can't get the kenra, I do have some other options for you. You can get the colada colors, which is right next to it. They have this in so many different colors. I just personally had the purple one on hand: if you don't have this one, you can get the blue one, but any of these breeches work. I'M also going to be using 40 volume developer, and I also have some red and gold corrector, which I like to add to the bleach. All that does is help to eliminate the brassy tones and my secret weapon, as always olive oil. I mix it with every bleach that I have I love it. It makes the hair soft and silky. I'M also going to be using toner to tone the hair back down to the reddish color that I'm looking for I'm going to be using two colors, I'm going to be using for our our and 6rr they're, basically, the same red one. It'S just lighter than the other, I'm going to also be applying the clear and all that is going to do is give the hair some shine. So I'm going to bleach the hair first and then I'm going to add the toner after that. So now you guys know all the products I'm going to be using we're going to jump right into the tutorial, I'm going to be taking some hair. I made a custom unit with this hair and I'm going to be sectioning the hair and for sections it's going to be split down the middle, and I'm also going to take two small subsections and part right behind the ear. I am then going to smooth all the hair out and I'm going to take some rubber bands for the tutorial I'm going to be using eight rubber bands. Now. The reason I'm going to be using rubber bands is basically it's going to help with my placement of color, it's going to create a level of color where I wanted to start and stop. It'S basically going to be my guideline. I know how far to take my ombre up and where the ombre is going to start and stop. So I'm going to be taking all the sections and the first rubber band is basically going to tell me where I'm going to stop the ombre, then that second rubber band I'm going to be using, is basically going to tell me where I want the operator start To fade this can be up to your liking. It can start and start wherever you like, but I am going to be using the verb advance as a guy and help me place my color. So now you can see where all the rubber bands are and where the operate is going to start and stop, and now we're going to mix our color I'm going to using two scoops of kenra color. I'M also going to be using two scoops of the 40 volume developer. As always, I am messy and then I'm going to mix all of that together. Now I'm going to take my olive oil and I'm also going to be taking some of those corrected, drops I'm going to mix all of that together and then I'm going to apply that directly to the hair. So we're going to start this ombre we're going to use that first, rubber band that we apply and basically all I'm doing, is showing you the spacing in between the two rubber bands, which is about five to six inches apart now, to start this ombre, I'm going To be starting with my back two sections and again, this whole method is about color placement and timing. So I want my I'm ready to be lighter in the back and gradually fade darker to the front. So I want to apply the bleach to the back first, which by default, because it's not going to have as much time to process the back will be lighter and the front will be darker. So I'm going to start my ombre at the bottom and then again all about color placement, making sure that I don't apply my bleep tea mixture above that rubber band. Now, at this point, you don't really have to be too neat with this you're just going to be applying the bleach, making sure again that you don't go above, that rubber band you're going to start with those back two sections and then you're going to gradually move On to the front two sections, so we're going to apply the rest of our bleaching mixture and let that process for five minutes. As you can see, our hair has started to process. It is starting to get a little bit lighter, but we're going to continue on to the next part of this process. So now I'm just going to take some general scissors and I'm going to cut that rubber band out. Now I'm going to move up in my armory process. This is the section where it's not going to be as light, but you will start to see a graduation and hair coloring. I'M going to be starting with that first section again and making sure that I don't go above that last rubber band now. One key to doing this ombre is making sure that you don't have a line of demarcation, so you have to turn your applicator brush and then paint the bleach on to make sure you don't have any harsh lines now, depending on how bright you want your hair Or your I'm ready to be, you can leave it on for another five to seven minutes. I'M only going to leave it on for additional two to three minutes and then I'm going to apply my toner so here just showing you the products I'm going to be using I'm going to be using the clear in the for RR as well as 9 volume Developer, I'm going to apply this to all of the hair. That'S been ombre and we're going to leave this one for an additional 10 to 15 minutes. Now here in the bowl you see, the clear is white and the actual toner is red. I'M just going to mix that up and then show you how the hair looks after it's been pre lighten the hair is still wet at this process, but we're just going to apply that color on all of the hair. That was pretty light and before using the bleach. Now, because I don't have a plastic cap that can fit all of my hair, I'm going to be using a shopping bag, it works just as well. I'M going to tie it in a knot and let this process for about 15 minutes, then I'm going to rinse it with cold water and then I'm going to style. So that's basically it for this tutorial. I hope you guys enjoyed this video. As always, don't forget to Like comment rate and subscribe to my channel for more hair tutorials until the next video I'll see you guys soon.


Comments
Kimmay Slays: Beautiful, great video, I cant wait to try this.
Antionette Williams: Best method I've seen love the color
Pfveee: Nicely explained! Thank you!
Nicole C: Exactly what I was looking for
Shevuan Sereday: I couldn't see a change in the final look I know and seen the bleached lightened but final look I seen no red lightness or anything
Daniëlla,s: The video is verry dark can see