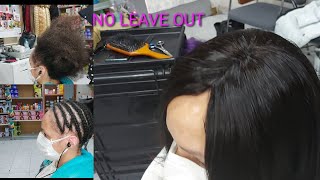
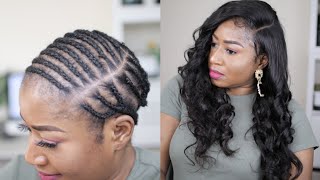
How To| Sew In Weave| No Leave Out| No Closure| Detailed Tutorial For Beginners | Part. 2
- Posted on 06 January, 2019
- Sew-In Hair Extensions
- By Anonymous
HEY REVAMPED DOLLS: TOLAREVAMPS|| HOW TO : CROCHET METHOD ON SEW IN WEAVE WITH NO LEAVE OUT TUTORIAL FOR BEGINNERS PART. 2 SEWING IN BUNDLES Don't forget to Subscribe ⊹LIKE + SHARE + FAVORITE THIS VIDEO!⊹
EXPAND FOR DETAILS!
In this video I show you how I Sew-In my bundles for the crochet parting and illusion hairline. To see more videos like this make sure you thumbs up, like, share & comment.
________________________________________________________________________________________
Part.1 Braid-Down
Part.3 Crochet Parting & Crochet Illusion Hairline
________________________________________________________________________________________
Install inspired by 2 Youtubers:
Chide lovesyou https://www.youtube.com/watch?time_con...
Seun https://www.youtube.com/watch?v=lLSfZV...
________________________________________________________________________________________
PRODUCTS USED:
-Braiding Hair
-Nylon Thread & Needle
-Closed Top Stocking Cap
________________________________________________________________________________________
HAIR DETAILS:
Luxury Tresses By Fab
Texture- Kinky Curly (4a curls)
Lengths- (2)16"
Link- https://bit.ly/2Vy5uUM
________________________________________________________________________________________
SOCIALS:
INSTAGRAM➜ @RevampedByTola
SNAPCHAT➜ @TolaIsShe
FaceBook ➜ @RevampedStudioSalon
________________________________________________________________________________________
F A Q:
Race: Nigerian + Born in the U.K + Raised in the U.S
Camera: Canon EOS T5i
Editing Software: iMovie
------------------------------------------------------------------------------------------------------------------------------------------------
*FTC: This video is not sponsored.
________________________________________________________________________________________
BUSINESS - for all business Inquiries and Hair/Products Reviews Email - [email protected]
What'S up guys, let's get right into it. This is part 2 of our knotless crochet sew-in, where i show you the second step of this series, which is sewing in the bundles and right here, I'm just showing you how flawless our illusion, crochet hairline looks loving it loving it, loving it alright. So let's get into hair details, so I am using luxury tresses by spats hair. So her hair is amazing and the curl pattern is poppin. She had a sale going on, and so I purchased two 16 inch bundles and the kinky curly, which is for a curls. So this is what the hair looks right at the package. I did not wet it. I haven't washed it or anything. I normally call wash my hair, but I didn't have time. This is the the left's are 16 inches and there's two bundles of those. I recommend that you do Co, wash your hair before installing and don't be like me and be lazy. So what I'm gon na do is go ahead and just wet it, because when you have to remember the bundles to unravel them, you need it to be wet. So doesn't get all tangled and matted up, so I'm just spraying pure water onto the bundles. So I can't unravel and start sewing. So here I am unraveling the bundles and, as you see it's pretty easy, nothing gets done or tangled because the hair is damp. So this is the width of the 16 inch and it's a lot of hair for a 16 inch bundle. You might even get away. We just use a 1 bundle and a little bit of a second. So what I'm trying here is a technique I had in my mind that might actually work. So I wanted to see if I could flip the B tracks upward to see if it would cover like that, so that the tracks wouldn't show, but it didn't work out, but either way I'm still sewing in these trucks up top that's at least gifted steps because It didn't work so, but you know I didn't want to leave anything out. This is what I tried to do and kind of failed, so yeah. So, as you see, I did a u-shape formation and the trucks are going, the opposite direction. So when I lay it back down, I was hoping that the actual weft will be concealed, so I'm just cutting it off here and tucking. The end part down to show you what it looks like and that's y'all see it kind of worked, but didn't really work, because you can still kind of see the weft up top and I'm even so far up enough, like it's not even close to the parting. That I need so yeah we're moving on to the bundles. That was an epic fail, but who cares? I tried? You know you got to try anything see if it works for next time like I might be able to use that techniques on another cover install, but for this one it was totally irrelevant. So I'm showing my first bundle at the back and you got to make sure you go under the braid all the way across you. So once I got around to here, I kept on sewing and what I use is these little clips to help to position. My hair in place, so that way, my line or how I lay my tracks stays at his good point because I wouldn't want it to be all janky and you know too far apart. So this keeps my parting exactly where I want them to be without them. Slipping down and becoming too close or too far apart, you know I want consistency, so here I'm just showing you out that your brain should not show, if he's so under your braid, it's quite challenging for me to sew my own hair and get those tracks to Go under the braid, so you know as you'll see later on in the video on my side. My whole braid show because I just couldn't get my arms to lay right and they were tired at that time. So that's another challenge of doing your own hair. Your arms do get a bit tired, but you know I'm making it happen. So I'm going to go ahead and use my clip again to make sure that my hair is positioned in the right location and continue to sell okay, so we're at the top portion on the side. And so I'm showing you that this is how I flip the truck and my brakes aren't showing here. But I'm gon na start slacking off and these braids are gon na start, showing, as I pull my truck back, and I just make sure that it lays really nice and flat on my sides at the corner and tack it down Bill's good, at least like two To three times before, I start sewing all the way around the head and, of course you know, I use my clips to position the tracks in place all right. So before I flip my track, I always make sure I saw under the braid before flipping over this. Just helps my install look, a lot more seamless and it lays a lot more flatter. So now I'm folding it over and I begin to sew over the track once again. So, as you see here, I'm sewing over the track and I'm going to stitch about three time in that same area. So it's locked in place so twelve hours later, my first bundle is sewn and I'm just playing. It wasn't didn't, take me 12 hours, but it felt like forever threads on the Sonnen and the hair is pretty full. So, like I said, if you don't like full hair, I recommend you space out these tracks. That way, you can only have at least one and a little bit of a second, but I like full hair, I'm here for big hair, so I'm gon na go ahead for everything in - and Here I am up top - did the same old thing and I'm gon Na lay a few, I'm gon na lay the last two trucks right here, just to fill in my gaps, where I aimlessly sewed that tracks on the opposite direction for no reason but yeah. So I'm just trying to fill in this space up here. So I filled in the space. I just want to go ahead and take care of this craziness like that up here. If it wasn't like, I said well, I do my own hair. I really struggle and have a hard time and that's the reason why this portion of the part is so far down, because I really just could not see what I was doing and I just I can't I don't stitch where I want to stitch at times on. My own head, so I'm just filling in the space here and laying these tracks laying flat. So there's no need for this for that other one out something about because it was just pointless because I'm laying the tracks flat anyways right on top of it. So I'm just trying to fill in this space until I get to the parting area. So what I'm doing your braids going straight down? Maybe you should do two braids going straight back like in the picture I'm showing y'all here, so that way, you're not putting so much tension on your scalp itself. I normally do this for my sons to make this so enlace super super flat. It doesn't hurt my felt, but I figured if I did the two braids going straight back. I will be able to make my part a lot smaller, so I'm gon na definitely try that technique on my next install, and I think I advised each other ahead and do so too because you might be able to you know, create a smaller part with that. Braid down, that's about it, for this part, just showing y'all how to do so in the last track and we're done with it so part two I mean so part three will be on the actual crochet technique. I'M excited to show that that's what y'all have been waiting for, go ahead and watch the next video thank y'all for watching peace.


Comments
Megs: Gems being dropped in every vid!
Cecil Cooper: Do you recommended hair I'm thinking about purchasing it today