Caramel Blonde Balayage Ombre With Money Piece Tutorial Ft. Xoxo Virgin Hair | Gbemi Abiola
- Posted on 22 December, 2019
- Sew-In Hair Extensions
- By Anonymous
Please LIKE, COMMENT, and SUBSCRIBE!!! :D
--
Connect with me! ♡
♡ INSTAGRAM ♡: https://www.instagram.com/gbemsabiola/...
♡ TWITTER ♡: https://twitter.com/gbemsabiola
♡ SNAPCHAT ♡: ilovetopurplefy
⇢ For business inquiries ONLY, please feel free to email me at:
--
COUPON CODES:
Makeup For Melanin Girls
http://makeupformelaningirls.com/#_a_g... - code GBEMSABIOLA for 10% off
XOXO Virgin Hair - code GXOXO for 15% percent off
►▷ PRODUCTS USED:
XOXO Virgin Hair Vietnamese Straight Hair (24,26, 3x 28) and 20 inch HD lace frontal
Revlon ColorSilk Hair color- Medium Golden Chestnut Brown and Light Golden Brown
Wella Color Charm Painting Balayage Lightener and Developer
Wella Color Charm Liquid Haircolor in Light Beige Blonde and Honey Beige Blonde
Wella 20 Volume cream developer
Framar Power Paint Brushes
Kitchen Scale
ColorTrak Balayage Board
Color Bowl
Whisk
--
My Foundation Matches:
Fenty Beauty- 450
Uoma Beauty- Brown Sugar T4N
MAC- NW50
Too Faced Born This Way- Cocoa
NYX Can't Stop Won't Stop- Cocoa
NYX Born to Glow- Cocoa
NYX Total Drop- Cocoa
NARS Radiant Longwear- New Caledonia
Estée Lauder - 6N2 Truffle
Anastasia Beverly Hills Stick Foundation - Truffle
L'Oreal True Match- N9 and N10 mixed
L'Oreal Fresh Wear 530 Deep Amber
Becca- Sienna/Mahogany
Makeup Revolution- F14
Covergirl True Blend Matte- D70
Bare Minerals Bare Pro- 29 Truffle
Urban Decay Stay Naked- 80NN/81NN
Anastasia Beverly Hills Luminous Foundation-520W
Dose of Colors Meet Your Hue- 137
Pat McGrath Skin Fetish- Deep 31/32
Juvia’s Place I Am Magic foundation-150 Kenya
Juvia’s Place Stick Foundation - Sokoto/Zambia
Cover FX Power Play- N110
Cover FX Natural Radiant- N110
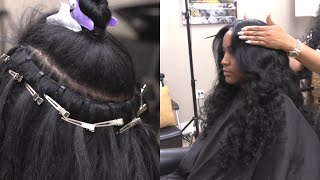
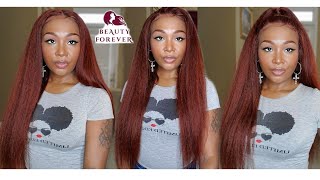
Hey guys welcome back to my channel and if you're new hi, my name is Benny Abiola. Welcome. So today I'm gon na be showing you guys how I took this natural black wig that I made and turned it into this gorgeous caramel blonde, a balayage. So, if you're interested please keep on watching and if you're not please stop right here, it's not worth your time and effort, so let's get into the color. So this is the unit I'm gon na be working on today. This hair is from xoxo virgin hair and I made the wig using five bundles of the raw Vietnamese straight hair and a HD lace. Frontal. The specs are three: twenty eight inches one, twenty six one: twenty four and a 20 inch HD lace frontal. When you're going to do this, you need to pre, make your wig before you start coloring. It'S gon na make everything a lot easier than if you were to color everything on a flat surface. So now I'm gon na do the base color, slash, pre, lighten the hair, I'm gon na take six boxes of Revlon light golden brown and six boxes of medium golden chestnut brown mix them together in the bowl and apply that color mixture to the hair. The reason why I'm doing this is so that I have an even base to work on when I'm bleaching. Each Bundle is not the same. If I was to bleach it straight out the gate without pre coloring it. So it's even I'm gon na have variations of blonde in the hair. It'S not gon na be one consistent blonde. I'M gon na have various shades of blonde and you do not want that or it's gon na look very weird. It'S gon na look very patchy. So, like pre coloring it first with a box dye, it's just gon na give you one even base to work on, and it's gon na make everything consistent. The color is gon na remain consistent when you bleach it also pre color beforehand. It opens up the cuticles in preparation for the bleach, so when you bleach, the bleach is gon na take faster and it's going to take quicker. Then, if you were to start on the regular natural 1b base, also when you're applying this mixed mixture to your frontal or your closure feel free to get messy with it, Revlon color silk does not stain your lace. It washes right out, so you don't have to worry after I finished applying that color, I'm going to leave it on the hair to process for two hours, so this is the day after the morning after I did the color process. So this is what the brown looks like. It looks almost identical to the natural 1b, but I can assure you up close it's a really deep, dark, chocolatey chestnut brown, okay time for the bleach. So you need to measure out your bleach, because this mixture needs to be precise, so I'm measuring out 25 grams of my Lightner. You need to have this in a 1 to 2 ratio, guys for the specific Lightner that I'm using, which is the Wella color charm, painting Lightner. So I'm measuring out 25 grams of the bleach and then I'm going to take my Lightner and measure out 275 grams of the lightener it's easier to measure in grams than in bleach in ounces, because ounces, it's not completely precise grams, are precise. So if you're going to do this, use your scale and measure in grams 1 to 2 ratio, so the bleach and developer I'm using are from voila and they are the color charm, painting, balayage, Lightner and developer. You can find these at Sally's and then the brushes. I am using are the frame our power paint brushes so the month that I'm going to be using to balayage the hair is the bricklaying method. So for the first row I am splitting them into three sections and I'm balayage in each section and then the second row I'm going to split that role of hair in half into two sections. And Bali is that so I'm just alternating between three sections to two sections for each row, so it's gon na be three two three two going all the way up to the top. At the back. When your bali aging, you want to hold your section, nice and taut, because if you don't you're going to get a lot of patchiness, you might have some bleeding, which you do not want um. Also, this is going to be surface painting only so you're not saturating. The hair for balayage, unless you want it to go into an hombre at the end which i wanted to which for the ends, that's when I actually saturated it through. So it goes from the brown to the highlights in this in the middle mid sections and then the ends were actually blonde. That'S what you want so for the balayage um, I'm working on the sides of the panel. First, that's what you want to do and then you fill in the mid section and I'm using downward strokes to blend the bleach down and then to actually get a proper blend in the middle at the top. I'M just using upward strokes just to blend that bleach up, so it all blends nicely together and I'm using my balayage board now just to ice out the ends and to saturate the ends. Just let you guys know don't be afraid to go slow while you're doing this, when I was teaching myself how to do balayage, I went very slow. I didn't know was doing so. I was basically teaching myself how to do this. I had to super old wigs that were getting ready to be thrown out. So that's what I used to practice on, like I said I fried them very badly like I couldn't resuscitate them like. I said they were getting ready to be thrown out um, but yet practice is perfect. Learning is key and you'll get it. Take your time go slow if it does not work out the first time wait a little bit and then try again go slow. The key is to go very, very slow, so I finished the back of the wig so now, I'm at the frontal and I'm parting off in the front a little Halfmoon. This is going to be my little money, bang piece in the front. The little highlighted bank piece in the front so yeah just partying a half circle using my rat tail comb and this bank piece. This is the piece that you want to really really saturate your, not balayage in this piece, you're going to really really really really saturate. It as much as possible, so that's what I'm doing and I'm really working that bleach in with the balayage board and my fingers I'm leaving maybe about half an inch of route to that, because I don't want to take it all the way to the actual lace And then I'm going to balayage the frontal the way I did the back of the wig. However, I'm not doing the three to Brickley method, I'm just parting sections of the wig, just maybe like four or five big sections of the frontal on each side and I'm just buying that and icing out the ends. So this is what the hair looks like after the first bleach session. I wasn't happy with it. I could still see some patchiness in the wig as you can see on camera, so I decided that I was going to do a second bleach session on the hair. Just to lighten it up a bit more and to get rid of that patchiness. So I did the second bleach session and wash the bleach all out. So now I'm going to tone I'm actually not using toners, I'm using hair dyes, and these are the Wella color charm, liquid, hair color in honey, beige blonde and light beige blonde um. The last week I did, I use pale ash blonde and light ash blonde. Since I used a darker base color for this one, I wanted it to be more beijing, more neutral II, borderlining on a honey golden kind of color. That'S why my last week the base was lighter, so I wanted it to be more ash shihr' to balance it out and yeah. So I'm just taking that toner that hair color as a toner and I'm just massaging it into the hair. This hair actually really held up well after a double bleach session, and one day like it held up really really well like no breakage. No, nothing held up super well. So I'm just sorry that in to the hair and then I'm also gon na, let it sit and process for 30 minutes after that toner has processed for 30 minutes. I'M gon na take my eye on cool blonde shampoo and I'm just washing that toner out, as well as using the purple shampoo to get rid of any brassiness that may have been left over that I missed, while toning like anywhere toner, didn't get so I'm just Making sure I'm washing that toner out really well with that shampoo, I'm basically like scrubbing, like honestly, when I wash my hair, what, when I wash my legs, I am NOT gentle at all, except on the frontal part, like I'm gentle with my frontals, but usually I Am NOT gentle like I'm like really scrubbing it like really really scrubbing it and I'm making sure all that toner is coming out. I want to make sure you want to make sure your water is running clear, borderline, basically clear, like clear, clear yeah. So this is the day after I did this bleach sessions. As you can see, the hair held up really really well and you could see the dimension in the hair straight. But if you really want to really see the dimension in a balayage, you need to curl the hair. So that's what I'm gon na do to curl. My hair, I'm using a one-inch curling wand from irresistible me this is their eighth and one curling wand set I'm using the 1 inch barrel, depending on what I want. My hair to look like. Sometimes I'll use the tapered one or I'll use the one and a half inch barrel just depends I want, but this is the one that I usually use for everyday and then now I'm just hot, coming the frontal for the bang, so they kind of stay lifted. At the top and to just lay down any flyaways I might have or any weirdness going on at the top of the frontal. This hot comb is from Sally's it's the golden hot hot comb that everybody uses there. I got it Sally's and the heat protector I'm using is from Eva NYC and same with the hair spray yeah. So I'm just making sure the hair is sprayed and so my curls set and then I'm just going to brush the curls out, make sure they're properly set. I don't like my hair and like tight ringlet curls. I like them, brushed out so yeah. Now we're gon na see it what it looks like on. So here's the wig installed on my head. Sorry, I didn't do it on camera, but I suck at doing it on camera and I did in the bathroom. But if you would like to see how I am saw my wigs, I will leave the video using the navy blue bob in the description bar down below, as well as in the eye in the upper right hand, corner, and I'm just doing my makeup. Using the Jackie ina palette and Miss Pat McGrath iconic illumination palette - and this is the final look, I hope you guys enjoyed this yo, don't forget to Like comment and subscribe to my channel. Let me know down below what you guys think about the hair. The entire look don't forget to follow me on my social media, Instagram and Twitter. I'Ve been zapped Yola snapchat is I love to purple Phi? I hope you all have a wonderful day wherever you are guys and I'll see you all in my next video bye, guys

Comments
Dumebi N: This is literally 10/10 I know I can’t pull it off like you
Missy Grando: The dye job is awesome. So much technique and it paid off. Wow.
Variety Chips: Very detailed! Came out wonderfully! Great job.
Behind The Camara: Awesome! I never thought of pre-coloring my hair before bleaching
SnoFall: This dye job is AMAZING Inspiring me to go back to this color
Michelle: Beautiful! You slayed this! Makeup, the hair, the color! Everything!
haylie courtney: I really really love this. so satisfying and calming to watch and you did a really great job!
Nikki O: Wow this turned out perfect! The color is absolutely stunning on you
Winner Winner: You did that sis Absolutely beautiful and makeup on point
Britt T: Girl! You did soooo good!
Quezia Mendes: I lovee this, I have been so scared of color in hair as a black girl, but so beautiful you gave me hope ❤️❤️
mimi j: U did a PHENOMENAL job so VERY TALENTED!
Kelendria Roberts: If you’re ever selling this ! I’m down to buy it . I’ve been hunting down wigs already colored for sale and none have the specific blonde/brown like this! You did awesome, ❤️❤️.
Sarah Opeoluwa: This so beautiful hair and makeup you killed it
Lola anibaba: WOW AMAZING LOVE IT AND THANKS THIS HELPED ME A LOT
Lauryne Amanda: Sis you slayed this!
Timelessxbeautyy: First of all your face beat is everything and I am loving it 1000% and the hair is to [dye] ;))))) for !!!!! I love it soooo muchh, you did an amazing job on it
CallmePhoenix: Amazing job
Beauty: Beautiful! Thanks for sharing!
Gia Blonde: yes girl!! u killed the look!!!
elise b: I am in love! You’re so talented- am attempting this next week. I’m nervous! If it’s not a wig and just bundles and closure is the process similar? Should I open up the bundles?
Tanice McIntosh: Beautiful
Kristyle117: Hey. Did you use purple shampoo after each bleach session? And what developer did u use with the toner colors please?? This is an amazing job btw, sis..goodness!!!! ❤
AriBee MUE: This makes me want to balayage a wig even more now! Also, what exactly is the purpose of a balayage board?
Gladys Lebeslour: Love it
Airika: Beautiful
Chamilla Foxx: this hair slay and mug are so right!!!
Ambria W: Soooo cute!
Ariel Foxx: Very beautiful
Karen Wallace: beautiful!
Dejon Minnifield: Fantastic!
Chantel Doan: Awesome!!!! Perfect 10
Maju Julie: I want a wig looking exactly like this
D Henny: Thissssss I don’t have the patience but thissss❤️❤️❤️
Sharice Lamon: Really good!
A B: beautiful
Sasha Whyte: Love the Victory Dance
Rose Cunningham: what is the 3 2 1 bricklay pattern that you are reffering to?
Nicholle Skylarr Hawkins: Wow nice job you transformed into a totally different person.
Tamika B: Girl that hair is slllaayyyeeedd hunny
Adrana: How long did you let the bleach sit once you put it on?
Kristyle117: How long did you let the bayalage process for again?
Timelessxbeautyy: YESSSSSSSSS PERIOD
Artemis Levenberg:
cee_harris: can i send you my wig when i buy one & you dye it like this i’m so serious
M V.S: Girl we need the hair link
lisa seward: Alright mama.. beautiful yes..
Zhara: I might’ve missed it, but why did you use box dye first? Isn’t that counterproductive?
brishay2: I’m going to try this. How long do you let the bleach process before rinsing it out?