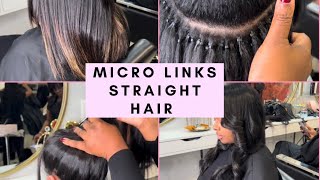
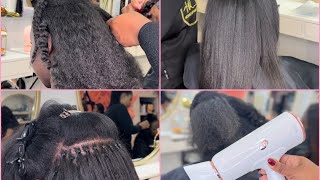
This Looks Like My Hair! Diy Microlinks Versatile Install On Natural Hair. Curls Queen
- Posted on 21 September, 2022
- Sew-In Hair Extensions
- By Anonymous
This is an easy to follow beginners DIY tutorial on installing micro links on yourself! This is my first time installing microlinks and I think they look so natural.
▬▬▬▬▬▬▬▬▬▬▬▬▬▬▬▬▬▬▬▬▬▬▬
Use Code ARYT to save $$$ OFF
I am wearing 14-16-18 inches custom color Itip microlink extensions in water jerry curly comb texture from CURLSQUEEN .
Shop the same #waterjerrycurlycomb #microlink #itip #itipextensions #extensions #braidlesssewin for #naturalhair
https://www.curlsqueen.shop/DC5B9d9b
√Ultra Full Set-300 Pcs-300Grams
√ 100% High Grade Brazilian Virgin Human Hair
√ True To Length
√ Suitable for 3c/4a Hair Texture
√ Thick & Full From Top To End
Custom colored curly microlinks has loose curl pattern than natural black ones . so make sure you get tighter curl pattern if you are going to custom color the curly microlinks
Connect with Curlsqueen :
Instagram: https://www.instagram.com/curlsqueenof...
Tiktok: https://www.tiktok.com/@curlsqueen.com...
▬▬▬▬▬▬▬▬▬▬▬▬▬▬▬▬▬▬▬▬▬▬▬
Thank you all right y'all, so I installed micro links on myself for the very first time, so I wanted to take y'all through the process of my install and how I got everything to look so natural. So first thing I'm going to do is part off the perimeter of my hair. That way, I can wear the style in a high bun or a high ponytail. Then I'm going to make a part down the center of my hair and braid that off as well. That way, I can do a middle part. If that's what I would like to do, and last but not least, I'm going to section off a part in the middle of my hair and braid it up that way. I can do a half up half down style as well, so this video is sponsored by curls Queen. They sent me 300 grams of their eye tips in the texture water, Jerry curly, to use to install this video. They sent me everything I needed in the package. Such as the clamp and the beads for the install first, I started off by parting a thin line in the back section that I am going to install. Then I'm going to take a thin piece of that section and I'm going to take the threading device that they gave me I'm going to place the O-ring or the bead onto the threading device. I'M then going to pull my hair through that threading device and I'm going to thread my hair through the bead. As you can see in the visual in the video, it's very important that you use a very small and thin sections or you will not be able to fit your hair through this bead or this o-ring. Okay, once you do that, you're going to take your eye tip and you're going to thread it through the bead as well. I then move the bead up and down. So I know that it's not too tight once I do my Styles and then I'm going to take the clamping device and I'm going to clamp the bead down. So I slowed down and zoomed in on that first demonstration piece just so you all could have a closer look. I know it is difficult to kind of see what I'm doing from this angle, because my hands get in the way of what I'm doing a lot. But I'm going to show a different angle, um of this kind of install process, so that you can see from a different angle and see a little bit more up close. So this is what it looks like when I got about. Half of the back done. Looks great and then this is what it looks like when I got all of the back done and started adding in the brighter red. So I did want to mention that curls Queen did color this hair. For me, I ended up recoloring it once I received the hair because it still did not quite match, and I think I colored the um hair that goes on the top a little bit too vibrant, but that's okay. Nevertheless, I wanted to show you all these different angles of me installing the eye tip so that you can get a different View and possibly a better visualization of the install process. So this is what the install looked like when I finished with everything, and it was a lot of hair. It definitely added a lot of thickness to my hair, but to make sure that everything Blended well, because I have a lot of different curl patterns all over. My head, I decided to do a twist out and put some rods at the end, to kind of get everything to blend a little bit better. I did use a little bit of curl enhancing mousse by Design Essentials, and I also used some wash and go styling gel by shea moisture, because initially you want those curls to be ultra defined, but when it gets to the blending process, you want it to be Giving frizz and you want to be giving volume. So that is why you see me pulling apart a lot of the pieces and kind of fluffing the hair out, so that it looks more natural and that it Blends a little bit better with my natural hair and that you can't like see my natural hair. A lot in with the micro links, so this is what everything looked like when I finished the blending process still isn't perfect, especially since the color doesn't match perfectly, but I still really do love the way that it turned out. I don't know why this hair is showing up so vibrant on camera. It is really not this vibrant in person. I think it was because I was recording a natural sunlight and it was really making the color pop, but real quickly. I want to show y'all some styles that you can try with your micro links that offer you a lot of Versatility, especially if you part your hair kind of the way. I showed you the way I parted mine with this particular install. So, of course, you can never go wrong with a half up, half down style and if your micro links are long enough and full enough, you really don't even have to add that middle part, like I did to kind of cover your micro link tracks. You want to be very gentle when you are styling these micro links, because this is metal literally clamped down onto your real hair, with the extension. So just be very careful, be very gentle and I recommend when styling you just do a little bit at a time piece by piece and don't pull your hair too tight or too taut. I also do not recommend that you try to do super Sleek styles with the micro links, because, obviously the extensions are clamped at the root of the hair and to achieve a slick hairstyles. You really need to comb and brush your hair kind of at the roots. To kind of get them super slicked down, so it's my opinion that you stick to more natural and more loose Styles. But if you are looking to do something a little bit more sleek and Slick, you can try a blowout with this texture which can help whatever Styles you want to do lay more flat, so you can achieve a half up, half down Style with a blowout. You can also achieve a high bun, a low bun kind of whatever you want to do. There'S a lot of Versatility when you are dealing with these micro links. So some of the pros of this install was the versatility of the install and how natural the install looks, I would say some of the cons would be if the texture of the extensions does not match your hair perfectly, then you might have a very difficult time. Blending also because you are adding these extensions in with your hair, the install can be very thick. I felt like my install was a little bit on the thicker side, but other than that, I really do feel like. It is a good alternative to try something new. If you want some natural looking extensions and I'm interested to know, if any of you have tried some, so I hope you all enjoyed this install. Let me know if you have any questions and until next time,


Comments
NYQT: Came out really nice and you explained it very well. I’m going to try this, a little nervous about when I have to take them out.
Cheri Nikki: I've, been subscribed for a while now. You, are Royalty! Naturally, Gorgeous lady... I, Appreciate your videos on hair &, fashion!!! Stay, Blessed Star &, Family
Sasha Jaz: Please give an update with the washing process and your overall review.