Hair Transformation: Rihanna'S Inspired Pixie Cut/Mushroom Style/Detachable Quick Weave
- Posted on 24 June, 2022
- Sew-In Hair Extensions
- By Anonymous
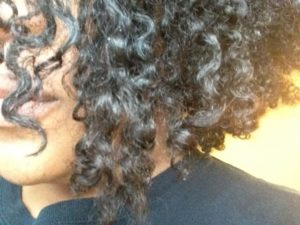
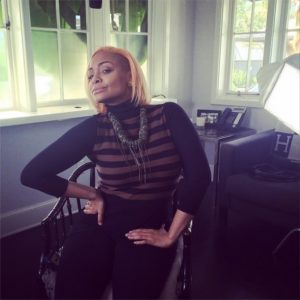
So guys, right now, this is what we are working with. This is the state of my hair, and today we will be recreating rihanna's pixie style. This is basically like a mushroom style, so we're going to draw the inspiration of today from this particular hair, so guys, please don't forget to like share subscribe and yeah. Let'S get straight to this so right here guys i have this weave, i am using i've used. It in previous tutorial, even right here on youtube, so i just thought to go ahead and use it again. So since the hair is like golden, i think it's as color golden. I decided to also go ahead and bleach this um. This weave to you know to golden, or something close to that. I guess so this exactly. That was exactly what i did and now you can see what the hair is looking like after this i'm just going to go ahead and wash it off, and then i decided to just go ahead and apply a max on just so i'm getting it. You know shiny, you know beautiful and all of those good stuff, just so i'm giving it more nutrients. So after that, i'm just going to go ahead and wash it and just make it have its air dry. So for this i decided to go with the method of detachable um, quick weave. So that's what i'm going to be using for this particular style that you'll be quick with, and for that i decided to go ahead to have a good measurement for it. So i'm not mistaken, and i went in first with six. As you can see, i found a very good position went to six, and that is three six one, exactly just so that i have my middle and my two sides neatly marked so from there. I went in also with five at the back and then i'm going to go ahead and join those two lines together. As you can see, i also did the same thing to the other side and then right now, i'm also going to join those two lines together. So now you see, we've already created the place we are going to place in our wrist, so i'm going to be using a glue for this, and i just you know just go straight up with my glue and then i place my weave on it and then I spray so that's what we are going to be doing. We are going to go ahead. You need to just place your glue and then you pick up your weave and then you place it on top of it and you spray as simple as a b c. Exactly and so guys for this, i decided to actually just go with a glue, because here i wanted you guys to see this in detail. I plan to actually have the soul, so i'm going to go in really professionally with that and i'll have that soon with a swing machine you know all those professional stuff. So if you want all that, you can go ahead and other either here or my youtube page or my instagram page or wherever you can find me just drop a message and i'll get to you so guys this actually um yeah. Just i went in with the first one i think i went in three lines and then for the rest, i'm going to go, you know around you see, just as you can see right. I think this is self-explanatory. You just want to make sure you know what you are doing. You know, even though you don't know what you're doing yeah. I think i've said that a lot in this channel so you're just going to go ahead and just go around a very good finish, and you know i i think you can actually find a different way to finish. If this is difficult to start, i could just pull this through. Since you know i was in front of camera. I don't want to waste time so, as you can see i've gotten to at the end of this, and now i'm just going to go ahead and comb this just so. I prep this for cutting so depending on the style you want to do. For me. Remember we're going for that rihanna style, which i have shown you guys in the beginning. So right now i'll start cutting and i actually usually use the bristol point. First and after that i went in with clipper. I think i wasn't supposed to go with clipper, because that cut was mostly um. I think um, a sharp cord was a pointed cut, whatever they call it. I think something like that. I shouldn't have gone with a clip up there. I think i did, and i couldn't go back so right now, i'm doing this i'm just going to. I applied a protective um heat protectant and a little oil, and now what i'm doing is just treating the hair okay. Okay, that's what the hairs look like. I think i love the color, even though it's like a little dark for her color but yeah. I think it's just an inspiration we're drawing from us. So this is what our detachable quick quickie is looking like. I saw this moment and i think i like it. I love the way it turned out. I didn't know about you just go ahead and say something about that in the comment section and there for the many parts in which we're not going to you know attach any weave to definitely you want to go ahead and cut it off. So that's exactly what i did i went out, so you know cut it off gently nicely and hey look at what our detachable quickly is looking like and now, of course you want to go ahead and put in some hooks and for these hooks guys i just Decided to just go with the glue and then it works your hair. You know i went in with the glue and yeah it just stayed in perfectly, and i decided to put four of that in all of the positions. So that is, you know, sticking in my head and still pulling out so now. I think this first time you guys have seen me know no, not really guys. I actually went in to set my hair. You know i did all the good stuff to eat, even though i think the hair wasn't too dry, so it didn't sit well. But then here we are um and this is our hair and you can just see me putting it all putting it and also just trying to put in this clip. So it's sitting perfectly well, yes, guys so right now, this is what the hair is. Looking like. I went in to just brush it and yes, this right here is our final look. Let me have you see something about this hair in the comment section, let me have you say something nice, please. I don't know if i got the hannah's hair, but i think i tried. Let me have you see something about that in the comment section. Thank you so much for watching this tutorial, don't forget to like share and also subscribe. You know, thank you very much and i hope to see you guys next time, bye,
Comments
Nakesha G: Wow! Amazing job, color looks so great on you! You are so creative!
Itswhitney: Wow you literally just created the vision I had in my head definitely subscribing
Chimbala Collins: Beautiful , love it
Joy Akanet: Beautiful ❤
Joy Akanet: You are so gifted, I love the colour ❤
Odanibe: Amazing ❤️❤️❤️
tasha watts: Oh honey you did that ❤️❤️❤️
Annie Geenens: You deserve much more Views & Followers on this Channel ❤️❤️ This kind of Toppers sells by 250$/300$.Thank you for blessing us with your creativity.God Bless you my Sister.
stacy ikani: I love it.
Tanzy The Glow Up Guru: Yes adorable I love this u did that.very cute on u.good job
Mary37 Saved by Grace: Wow ! You are talented God bless you
KezTalks: This was beautiful sissy love it. You sure say I no go come steal am
ذا ذز: que Kayantanii.UNO encantan tus videos. Bendiciones hermosa Celina que Dios te cuide donde quiera los mortaless abian apreciado tan hermosa mujer
Ellle LoveLee: Please make me one of these but in black!