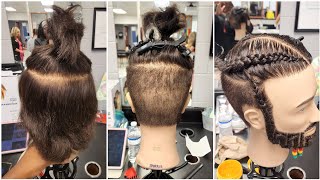
Two Braids On Natural Hair | 2 Braids With Weave
- Posted on 17 June, 2021
- Sew-In Hair Extensions
- By Anonymous
#2feedinbraidsonnaturalhair
#twofeedinbraids
Social Media
* Facebook : londoncurlstyles
* Instagram: @thelondontayy
* Business only email : [email protected]
Location: US -Columbia, SC
————————-
Link to hair used:
I used 2 packs of Braiding hair https://amzn.to/2TzRT2F
I used 2 packs of hair total
It took me 1 hour
————————-
Products used in this video:
Shine n jam https://amzn.to/3cPOcMX
Edge control. https://amzn.to/34flSPq
Got2bglue spray https://amzn.to/3zznvG7
Moussee https://amzn.to/3gx4Q6d
——————————————
Music by Madeline Lauer - Wanderer - https://thmatc.co/?l=9A8D8878
Keywords
2 braids with weave,2 braids on natural hair,2 braids with braiding hair,2 braids on short natural hair,2 braids tutorial,two feed in braids,two feedins,two feed in braids on natural hair,two feed in braids on short hair,two feed in braids tutorial,two feed in braids for beginners,two feed in braids on thick hair,2 feed in braids,2 feed in braids with weave,2 feed in braids on natural hair,2 feed in braids tutorial
Hey guys, what's up welcome back to my channel, this is london tay coming to you today with another video girl. Today'S video, i'm going to show you guys how to do two feeding braids on a natural client all right. So if you guys are interested in seeing how i do this style, then go ahead and continue watching and do not do not do not forget to subscribe to your girl channel. So let's get right into it all right, so my client is natural. She'S been natural for a while: okay, she has shoulder length, hair and yeah. This is how it looks all blown out and that's how i'm going to start the style right. So here is the braiding hair that i'm using i'm using only two packs of pre-stretch braiding hair. The link to the braiding hair will be in the description box below i'm using 1b 1b. It'S like a off black color, okay, so i'm using my table. So a lot of people ask me: why don't i use a braiding rack anymore because you can't hold enough hair on it. That'S why you have to keep replenishing it and replacing it, so i usually just use a table um for like longer styles. However, i didn't even want to put the braiding rack out for the shorter style, so i just use my table. Okay, i got this method from dope axe. Panna, okay, i love her she's great yeah girl. I got that method from her, so i just basically layer the braiding hair on top of each other until i'm done with the two packs. So i'm just approximating like two packs for two braids. You know just kind of makes sense, so i'm going to use all two packs, i'm just going to section them out. I'M not going to do a super small sections or super large sections kind of like medium sized pieces that i'm just going to lay on the table and lay it on top of each other and yeah so just layer. It make sure that you know they're not combined together, so here i am, i'm going to use the shiny jam green tube. Okay. So let me go ahead and put you guys on game, so the shiny gem, green is way has a way better hold than the regular shining gem and also a better hold than the shine and jam braiders, which is the red bottle. Okay, so i highly recommend for especially styles like this, to just use the green shiny jam all right, so that is what i'm using i'm just going to go ahead and put her hair down the middle now in order to get a perfect middle part. Make sure you go in front of the client and you just go up straight up from the center of the nose and then go straight up through the forehead, and that is how you find your perfect middle part all right. So once i do that, i'm just going to go ahead and perfect the part with the shine and jam. I always use a shiny jam after you do like a rough draft part to go ahead and just kind of perfect the part because it just lays everything down. So you can see exactly what you need to take away or fix all right so yeah. So i'm going to use that her hair, it's nothing on her hair or anything like that. I'M not going to put anything on her hair because it's not dry um. She must have put something on it already, something like a leave-in conditioner whenever she shampooed her hair. Okay, so here i am, i'm just going to just comb all her hair back on one side with the shiny jam product and then i'm just going to literally just put that product on a lot of her hair. Okay, so i'm just going to just part, apply the product part apply. The product part apply the product. Okay, once i'm done, i'm going to go ahead and smooth everything in formation. It'S exactly to the position that i wanted to be in. So that way, i'm not struggling trying to fix the hair, while i'm braiding all right. So i'm doing it the approximate location that i kind of want everything to be in, like i stated so that way, i don't have to move the hair stop and let go of the me braiding just to kind of fix the hair. Okay, so just put it in the direction that you want it to go: okay, because it's going to be laid there, that's where it's going to be okay, so this is two braids it's hard to stitch the middle part. So i like to just focus on stitching where the ear is because it's just a smaller space um, it's hard like. I said it's hard to see a stitch when you have that bigger part. However, i'm still going to use a semi stitch method on the right side, but when i'm done, i'm really just going to smooth it all down. So that way you don't even see any stitching. Okay, the only stitching you're going to see is over there above the ear, so just start off part in a little piece and then you're going to start off the regular braid. Now i like to start off with smaller pieces of braiding hair, okay, so the braiding hair that i laid down i'll just split that in half and then just use half that so i like to gradually get bigger. So it just gives me more control of the hair, all right so um one one thing i can say is always use a comb, i'm starting to use the comb pretty much every time instead of just my pinky, because the comb gives me more control and as Well, as the comb kind of smooths as it detangles and puts in the direction that i want it to be in okay, so, like i said the finger smaller parts, smaller braids, maybe but for this big braid, i'm going to use the comb for sure okay. So i'm just going to just braid go left to right. I am left-handed. I don't know if that matters in this tutorial, but i'm just letting you guys know so. It'S way way more comfortable for me to feed in from that left side. Okay, um, yeah girl. So it's way more comfortable, so for the right side, i'm going to feed into through the left side again, um, because it just like i said just where i'm comfortable doing. Okay, so um, as you can see, i'm combing as i go um and then i'm going to add hair. As i go. You see on the right side, i'm using my pinky because i'm not too much focused on the stitch part on the right side, because i'm going to smooth it all, but that left side every time, i'm braiding to the other side, i'm detangling, the hair. So also, i'm smoothing the hair down with that comb before i'm using that comb for the stitch part, as you guys can see. So i'm using that comb, it's going to smooth everything in comb detangle and then move to the right side. I'M going to use my pinky on the right side because i'm not focused on the stitching and then i'm moving back to the left side, um yeah, so using the comb to detangle and i'm adding a slightly bigger piece now and i'm braiding in only one side. Okay of that braiding hair, so i'm using my pinky once again, braiding back to the left side. Add that hair in using that comb to do the stitch put a little product if you need the product on the hair, just to make sure it's like more laid use. The comb to detangle add the half of that braiding braiding side and then go back to the right use. The pinky use the comb go back to the other side and add in that hair back into the the pointed finger in between the thumb. Okay, using the comb to make the stitch again pulling the hair tighter when i, when you just see me, pull that hair tighter after the stitch, that's just make sure i have a good enough grip. Okay. That is what i like to do to make sure my grip is good, so yeah, so it's just the same method. Use your pinky finger or use our stitch. Go back to the other side. Detangle with the comb. Add the braiding hair into the pointed finger and thumb smooth out with the smooth out the next part with the comb and then stitch with the comb. Okay, if you need product just apply product on that part, and i'm just going to keep on doing that same thing, stack of rhythm, once you get the rhythm down pack, you are good to go so yeah guys so um, like i said, i'm using that shiny Jam now i have oh, let me go ahead and give you guys a disclaimer try to buy one of those um, those those watches like those magnetic watches. So that way you can put your product on it because your your hand heats up the shine and jam and makes it slippery okay. So using that product that product on top of that watch, it really really helps and it keeps it cool and it keeps the shine and gem in into that same state that it was when you originally put it on okay. So after this video i did upgrade to that watch and if you guys are interested in using that watch so that way, you're not having a product on your hand and that way the product is not heating up. So it's not sliding around then just go ahead in the description box below. I will link that if it's not already linked, it will be linked this week, okay, guys so so yeah. That is basically how everything looking now. If you need to go ahead and smooth like you see me, smoothing, use a comb and smooth don't be scared to kind of fix. Little mess up that you feel like you messed up, okay, and even when i'm done, i'm gon na go back and smooth everything into that braid. So that way everything looks way more neater and way more streamlined. Okay, so i'm just gon na go ahead and just keep doing that same same motion throughout the whole thing. You'Re is i you're. A wonderful is, is, is so unsure, hi guys, so here i am done with the braids and i'm just going to use my comb and smooth that side out really really well. If you need to apply more product, then go ahead and do that, but i'm just using my the comb part just to kind of comb it in place and then i'm going to use the rat tail comb part to smooth everything down into that braid. So you guys can see half of the stitch, the other half isn't if you need to go ahead and just fix that part, the stitching part into the braid, if you have any type of like wrinkles or something then go ahead and just try to you know Smooth that in um here i am going to do the other side. The same way you're not going to get a tutorial on that, because i feel like it's kind of pointless, because it's the exact same thing: okay, um yeah guys. So while i'm getting that done um, i am going to just keep on braiding girl, keep on braiding and i'm just kind of visualizing the other side just to kind of mimic and try to get it to match. Um close enough to the side. That'S already done. Okay and then i'm just going to literally just braid the ends of both of them. Now you want to make sure that the both of the braids kind of match the same length. Okay, so i do um put the braiding hair um. I don't braid all the way down until i'm done with both braids, because if i need to add more length i can add more length and if i need to take away length, i'm gon na take away then nine times out of ten. I'M never really taken away, i'm just adding a little piece just in case. I need to add more length to whichever braid okay to make sure everything is even now that i'm done like i said, i'm putting that shiny jam that product back on the other braid and i'm smoothing everything down after i do that i'm going to just do Her edges, i use the style factor: edge, control, um. I mean right now, i'm using the gray bottom. The gray box bottle thingy um, the gray color one. I i don't know the difference between that one. It doesn't really have a smell. So maybe that's the difference. It'S kind of like the original style factor edge control, okay, but i'm going to use the um edge brush to kind of just maneuver it and get it smoothed on down. It'S so hard to do edges when you're wearing these masks. Okay! So but i'm getting it done, okay, girl, the struggle is real, okay is, is okay, so now i'm done with the product, i'm going to just spray that freeze spray first and then i'm going to put some foam on top okay. Everything i'm using, like i said, will be in the description box below. If it's not already there, it will be there soon. Okay, so just check back at a later date, um to see which products exactly that, i'm using all right so yeah, and then i like to use wrap strips okay, so wrap strips um. It lays everything down and helps everything dry flat. So the key for wrap strips to hold everything is to make sure that everything is dry before you lift it. Sometimes i do sometimes i don't, but for the most part, to make sure everything is dry. I like to just keep the wrap strips on top of the hair until i am done all right so use a blow dryer to kind of dry the hair. If you need to do that and your girl and finish it out with some oil sheen or some type of oil free shine or whatever you feel like you need to do. Of course, i did dip the ends in hot water, that's kind of self-explanatory. I dip it a few times and then kind of squeeze the extra water out. Okay guys. So i hope you guys enjoyed this tutorial. I hope it was a little informative for you. Okay hope you guys show me some love and subscribe and like this video or dislike the video girl, if you don't like it dislike, because you know what likes and dislike both count the same on youtube. So just let you guys know that. Okay, that still count as engagement all right love. You guys

Comments
Tori Hudson: Cute love this style Quick, Cute, Simple ♥️
London Tayy: Yasss ! This is a quick , cheap and cute style Here are some time stamps to help you navigate: 0:31 sectioning out braiding hair 1:25 apply product and part hair 3:30 start feed in braid
Marquitta Taylor: Thank you!! I really loved this video. I really needed a better holding gel.
Donisa808: Thank for the product recommendation Nice work!✨
Blackqueen2me: Thank you for the video, I learned a lot
Margie Graddicks: I’m left handed as well and your work is beautiful, new subbie
Takira Rosa: Yess yesss!! I tried your box braid method I’m feeling myselfff gurllll✨✨✨
Fantasia Island: I don’t understand why it’s hard for me to do 2 braids
Kara Biles: Yessssss queen love these braids
K B: Perfection!!!!
Tanesha Franklin: Yesss I'm left handed too. I understand where u coming from with the braiding
Dana Macklin: ☮️amazing
Serendipity: What’s the big difference between the green, yellow and red shine and jams?
mamusik: I' m left handed, just out of cosmetology school, have two african european girls and this wonderfull!!!!!
deseraymiles87:
lay: It's the head shape for me..
lady diana: Lolo