Simple Leaveout Sew In | Full Light Yaki Bundles |Curlsqueen Hair
- Posted on 10 August, 2022
- Sew-In Hair Extensions
- By Anonymous
Use Code YTIV to save $$$ OFF
I am wearing 26 inches weave bundles in light yaki texture from CURLSQUEEN .
Shop the same #lightyaki #bundles #weavebundles #extensions #leaveout #sewin for #naturalhair
https://www.curlsqueen.shop/00354C18
√ Luxurious Upgrade 150 Grams/5.3 ounces per bundle
√ Easy styling & Hold curls very well
√ Longevity: at least 1 year with proper care and maintenance
√ Hair can be colored and bleached
√ Double wefted hair extensions
√ Tangle free and minimal shedding with proper care
Connect with Curlsqueen :
Instagram: https://www.instagram.com/curlsqueenof...
Tiktok: https://www.tiktok.com/@curlsqueen.com...
▬▬▬▬▬▬▬▬▬▬▬▬▬▬▬▬▬▬▬▬▬▬▬
Welcome to My Channel
Be sure to SUBSCRIBE & TURN ON YOUR ALERTS
HAIR CHANNEL @iambeautifulhustlertv
——————————————————
MY PERSONAL YOUTUBE CHANNEL : @Life with ShaeTV
https://www.youtube.com/channel/UCB9xX...
——————————————————
Follow My Socials:
PERSONAL
@iambeautifulhustler
BUSINESS
Instagram:_Beautifulhustler
@thebhslay
@girlsniteoutapparel
Twitter:_Beautifulhustl
YouTube :IAmBeautifulHustlerTV
✨For Sponsorships ,Reviews,& Questions
Email:[email protected]
786-571-1313
To Purchase Hair & Products Www.ibhslays.com
Allow 3-14 Business Days For All Orders
#miamihairstylist,#miamihair,
#browardhair,#browardhairstylist, #Atlanta #atlantahair,#atlantahairstylist #reels, #explore #trending #tiktok #viral #miamimakeup #miamimua #miaminails
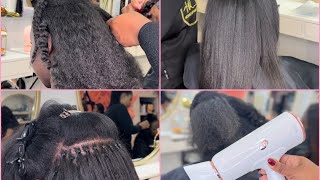
Hey beauties and welcome back to, i am beautiful, hustler tv. Today we are back with a new video and today we'll be doing a simple side. Part sewing leave out and today's has provided by curls queen hair. They sent me over three bundles of 26 inches light. Yaki, bundles and i'm going to be doing a side. Part sewing on genesis today. Now, for starters, you guys this hair came so so full and i'm going to show you how full the hair is just in one bundle itself like one bundle, is super full. So you know, all three together is like really really light. It was everything and i love the texture of the hair love. The thickness from root to end like these bundles is a one okay and it's a very natural, looking texture. So i like the way it blended and everything when i finished the install, but for starters i did go ahead and start off with the braid pattern and now i'm just taking my beautiful hustle growth, oil and just putting the oil into the braids. Now i know my braids look a little rough y'all. I got these nails on, so it was kind of hard to really you know grip it. How i want it and gin texture is so thick, but i'm going to sew on top of a stocking cap today. Just to release some of the tension off her hair and just make everything you know easier. As far as installing, i could just sew on the cap going back and forth back and forth. So i'm just going to take one black cap and apply it over the braids and i'm going to take the first bundle and begin to sew. But i'm just stretching it out, because you know cap a little tight and i'm just going to apply that um. You can use a netted cap for the sewing versus a stocking cap. But if you don't have any, you can use a stocking cap or you can just sew on top of the braids. It'S just up to you whatever you prefer, but this is what the cap looks like on her head and now i'm going to go ahead and take the very first bundle and begin to sew. So what i do for that first bundle i double wefted. I saw it as a double weft and the remaining of the bundles are so single, but, as you can see, this is the very first bundle and it is super super full. When i tell y'all i love this hair and this texture absolutely full, absolutely a natural. Looking pattern and i'm just going to unravel it, but i'm going to keep the weft doubled and i'm just going to start by taking my needle and the two loose ends of this weft. I'M just going to stick that needle through both of those uh tracks. On the end and um, stick the new through and begin to attach it to the braids and the stocking cap and sew it down. And as i do my stitching, i just um do like a double or triple wrap around the needle and then pull it to create a knot in every stitch that i create so um, i'm just you know, be quiet and let you guys see what i'm doing So um for me the way i stitch - and i know it's totally different for most people - i go under the weft and then i come on top of it like out where the braid is and i wrap the needle around um, two or three times well wrap The thread around my needle two or three times and i pull it and it creates a knot within every stitch and also when i'm doing my sewing, i do not cut the wefts. I just you know, do the flip over method? Um, you know tack down the end and just continue to go back and forth, and this is why it takes a really only takes me 30 minutes to do a sew in honestly, like 30 45 minutes at most just for the install part and then, of course Doing a leave out, it's like an extra 20 minutes or whatever, but honestly it's because i do not cut the tracks and i just do the flip over method. As i go along, i get to the end flip the track back, secure the end down, and i continue to sew and like i'm mentioning i'm only double wefting that very first bundle and then the rest of the two bundles. I will sew it singly just to make sure it is super flat. You know at the top and everything like that, so i'm just trying to get that fullness in there and that's why i start with a double weft. But then i go in not single and i do want to apologize. You guys for the angle that i'm recording in so i actually left my phone holder for my ring light. So i literally just had to sit the phone on the ring light as still as possible, so i'm so sorry i could not get like the top view and the angles that i really wanted to get. I had to just like place my phone on there and just make it balance um. So i could record this. You know video for you, so i do apologize in advance if you're not getting the best angles, but i felt like you know, the most important part was actually how i do the sew in and i would switch the angle once we get to the leave out. Part, so you guys can kind of see. You know how i get it to blend and everything like that, but um. This part here is basically repetition, i'm just going to continue to sew back and forth when i get to the end flip it um tuck the end down and just continue to sew and i'm trying to bring you know zoom in a little bit more for you Guys to see i'm flipping in here, bringing a needle underneath and i'm going to do like two or three or four two or three or four two to four knots on the end and secure the track. And then i'm going to continue to sew along the perimeter - and here is an even closer uh look of what i'm doing going underneath wrapping around two or three times pulling it through tighten and i'm just going to keep doing that. Okay! So now that their first bundle is in now, i'm gon na go ahead and i started on that. Second bundle and i am sewing a single just, so it can lay really flat towards the top. So i'm just gon na do the same thing start by putting a needle at the end of it flipping it um. You know, stitching it across flipping over securing the ends and moving right along and like i said once again guys. It'S still repetition. You just want to go back and forth as you work your way up to the top back and forth back and forth. Back and forth. Um loops uh wrap the thread around the needle two to three times: pull it and just keep it going, and you do not have to sew so close together, because every knot that you create is securing the track. So you don't have to do super tight, tight stitches. You know what i'm saying you could do like a few centimeters apart. It still will be secure. It still would last that would be fine as long as you're securing it with those unknots in between every stitch and again, here's a closer view at the top flip over method, and i'm just going to go like i mentioned guys once again, just back and forth Back and forth - and sometimes i get my little you know thread tangled up when i do my little pull out, but just take your time and un loose the little knot and you know just keep it pushing, keep it going and i'm just going to do this. All the way up do so here is the angle change. I'M almost done sewing at the top. I still have a few more tracks to go at the top so, but before i do the rest of it, i'm just going to take my scissors and cut that cap. Where that leave out is so you guys can what so. I can really see what more you know. I have left to sew, so i still have a needle attached to her head and i'm opening up that third bundle, which i will only need a little bit of that, and i only use like two and a little piece of that third bundle. When i tell y'all this hair was super super full, so even when, like really just two bundles, the hair is super full like when i tell you this hair is thick root to ends thick roots ends and, like i mentioned it, is light yaki pattern um. So it's like that natural looking stray hair and um. It is 26 inches, so super full. I have no complaints um. I just love these bundles all around, but um i'm going to continue to uh stitch at the top and then, when i get closer to the leave out, i'm going to cut that cap to expose the leave out. So i can really see why i'm stitching the last few pieces before um. You know blending the leave out and you just want to be very careful when you cut in that cap, you do not want to cut their hair um. You just want to cut all the hair to expose the complete leave out and finish sewing whatever you have to on that top area right there. So i'm just going to be stitching that back and forth and when i get as close to the braid as possible, i will stop stitching and begin to um blend the leave out. I didn't do no hard crunchy leave out. I just kept it nice and soft. Using a little wax stick and you know a little edge control, a little holding spray but um. As far as the leave out itself, i didn't put any product on a leave out other than the wax stick and using that flat iron to sleek and blend it. All together but stay tuned, i will show you that shortly so now that i have um, you know unbraided the leave out it's time to do some blending so for my blending today. Well, the parts that i'll be using for this whole leave out. Entourage thing here is just the my glam like stick, which you can purchase right now on my website, my edge control, which you can purchase right now on my site as well, and that would be like the only two products and i did use a little holding Spray but then i went back in with my um uh edge control anyway, but what i'm doing is i'm going to just part all the hair away from the um leave out. As you can see, i sewed it all the way up to the lever. As i mentioned, and i'm just taking that hot comb and just hot combing the tracks down so any little lumps from the tracks being like bent or foldy, i would just smooth it out and now i'm gon na take the wax stick and i'm going to take My um edge, i use my little small edge, um hot comb, first to get like to those roots, and then i'm going to go in with my babyliss um flat iron and press that hair right again. Um, if you don't have a really really skinny flat iron um, like a regular flat iron to get to those rules, you can definitely use that little edges one and hit those roots really good. And then i went back in with my nice hot and steamy um. Babyliss um iron and went and pressed it out and then went back in with the edge brush just to get anything i missed and jin hair is very, even because she just recently got like a dominican blow out and trim so um. Her hair is very straight, and i know usually, if somebody just got their hair freshly cut and you do like a sew-in. You will actually see the separation from the cut piece um to the rest of it, but i'm going to show you guys how i blended the ends of that straight cut piece with the hair as well, so that i will also be showing you that as well. But i'm just going to go in and i like to go on a section by section piece by piece and just add: wax and hot comb and press it out straight and you know just get it nice and sleek. So, as you can see after hot combing that, if you kind of pay attention to where gin hair stops is very straight and blunt and it's not blending in so what i'm going to do is take that wax, stick and apply it right at the ends of Where her hair has been cut and i'm going to take the flat iron as well as some of that weed and flat iron and blend it together, and you will see it will become a smooth transition into the hair. Even though the hair is slightly uh darker than her natural hair color, but once i press everything together, it just blended in and smoothed right on in it didn't give like press leave out, frizzy ends and then hair. I had to press her natural hair with the weave with that added wax on the ends to really get it to blend and flow in there so um. Now that i did that, i'm going to pull out a little piece to give her a nice curl, sideburn, um and a little swoop, i didn't, do no crazy, dramatic swoosh. I wanted to keep it nice and natural looking, but this is what the hair looks like. After using my wax and the hot comb, i mean not the hot comb but the flat iron to blend it nice and healthy. Looking as it should it's supposed to give leave out which you should get natural as it should and i'm just going to go all around and make sure um everything is blended all around and another thing i wanted to mention you guys, like i didn't even bone Straight this hair, because i liked that kinky texture look, so i just ran my flat iron through it, but i didn't want to give off no bone straight. Look i liked it. You know, i really like that. Yaki look so i try to keep it looking as natural yaki as possible, but you know still gave her that nice blended look so um. As i mentioned, i'm going to put a little piece for her sideburn area to give her um that you know more of a dramatic look versus just regular like this and i'm going to use holding sprayer first and then i decided to go in with the edge Control - and you know really secure that area there um and i will show you that after i finish, you know going through the back of her hair to blend that leave out before i actually hot comb and smooth out the other side, and as i mentioned at First, i went in with the holding spray and you know smoothed out her hair and you know swooped it, but then i wanted to go back in and really catch every little piece. So i decided to use a little edge control on top of that holding spray. So first i started off with the holding spray um curled, the sideburn area secured it with. You know, um the holding spray, but then i was like nah. We need this thing like sleek sleek. So that's why i went in with the edge control right after and you know really gave it. It gave it more of that sleek. You know, look um, so i just kind of like you can say prepped it with the holding spray. But then i secured it with the edge control. So that's what i'm going to be doing, and this is what it looks like after adding that um edge control, nice, swooped and sleek nice clean, look and that's exactly what i was going for. So now we're going to go ahead and do you know press the leave out on the other side? Um, you know, add, wax and then go in with the flat iron and press it out straight still going piece by piece. Um - and you know, i'm gon na hot comb that top part down some more to just catch any kinks in the bundles itself, just to make it nice neat and smooth, and i'm just combing and smoothing everything into place and i'm going to go in with a Little edge control on the other side as well, just to smooth and sleek that front area in and just blend it in once again with um. You know a little edge control, like i said i didn't add any spritz or anything to the leave out part um. I just kept it nice, something natural and you know sleek, looking using that um using the edge control in a wax stick to make it all nice straight and smooth. So once i brush in that other side - and you know comb the hair over like a little comb over - that - will pretty much complete the look. So once i do this last little finishing touch that will pretty much sum up this tutorial. So don't forget to give this video a thumbs up once again, i do apologize about the angle for me, leaving my phone holder for my ring light, but overall, like i mentioned just to recap, this is three bottles of 26 inch from curls queen hair um. This is their light. Um light yaki, bundles super full root to end super full route to end um. They sent me three bundles, but here i only use two and like two and a little like two and a third um of that last bundle, and you can still see how full sleek - and you know straight - the hair is like naturally straight the hair. Is i absolutely love the look and i'm gon na show you the final look in just a few seconds, so let me know what you guys think down below. Don'T forget to like this video comment subscribe. If you haven't already and stay tuned for more - and here is what the hair is looking like after we blended and smoothed everything in nice, soft natural blended, you can't tell where her hair ends anymore. As far as those blunt ends and everything like that - and i just do a little filter at the end because you know or whatever, but thank you guys for watching this video and don't forget to check out the description details down below until next time.

Comments
David golv: Pls if you are reading this, know that a few years of grinding can produce a lifetime of freedom.. So be patient.. The lord is by your side. Amen.
Queen.: This is soo cute!!!..I’m glad your able to flip the tracks it’s nothing more annoying than a stylist that cuts your expensive bundles
_Vanntastic: I be doing hella stitches when I do sew ins. You’re making me rethink that. Thanks shey.
Sam Willis: This was everything Let’s normalize leave outs HEALTHY leave outs that is. Shae this was satisfying to watch because it brought back a lot of old memories lol.
Princess Toyia: I'm going to just like the video first because it's ALWAYS a slay!!! ❤❤❤❤ and I want everyone to know that The beautiful hustler growth oil WORKS!!!! It absolutely works!!!
CurlsQueenofficial: Thanks for the sharing,You are so professional and you always do a great job!
Sammy Da Goat: Lovely Hair Stunning Outcome
mama bear: Beautiful I wish u could do my sew in
Ngozi E: Hey girl ! Can you do a video on dying curly hair jet black
deseraymiles87:
Alexis G: You did that
Tee Hanks: Yess