Minimal Leave-Out Multi Part Sew In!!!
- Posted on 30 January, 2022
- Sew-In Hair Extensions
- By Anonymous
Heyy! This is just a quick tutorial how I did my multi part minimal leave out sew in!!
#sewin #hair #extensions
Hair
1 5x5 closure and 1 13x4 closure
3 bundles of Kinky Straight 18"
Link to Hair
https://m.aliexpress.com/item/32864499...=
Titanium Flat Iron
Hot Comb
Black Hair Spray
Follow me on IG 1_danirenee
Business inquiries: [email protected]
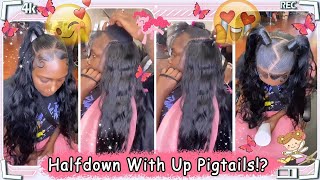
Hey you guys welcome back to my channel. Thank you so much for tuning in for another video. Please make sure you like comment and subscribe that really helps with visibility to my channel um. Today'S video is just how i did this um multi-part showing showing and it's a minimal leave out, multi-part sewing. So i don't really. I wouldn't consider it a thin leave out because it's a little thicker than a thin leave out of what i've been calling it thinly about. But it's still minimal leave out and you can actually do a middle part or a side part as you guys can see. Right now i have a side part, i'm actually about to head out to the airport um, so i wouldn't do a better interest than this, but i never got a chance to so here we are um anyways. If you're going to see how i got this look. Make sure you stay tuned? Okay, this is my braid pattern and my leave out so, as you guys can see, this is not like um. This is a little bit more than what i usually leave out as far as a thin part, but i really want it to look natural, but i do only have a little bit out on the side. So this is the braid powder, and i did it like this in order just to have a better base so yeah. This is my braid pattern, okay guys. So what i'm doing is. I'M basically sewing a whole bunch of different closures on my hair in the front and then regular sewing in the back. So i had a 13x4 closure that i cut up and it's in and it's in multiple different pieces, um yeah. So i'm just mitch matching and sewing in different closures in my hair, but listen, it's gon na turn out real cute and that's why i have this this base the way i have it because i've done this before and i realized that it will slide. If i don't have like really good anchor braids, so those are basically my anchor braids all the way around and so yeah just kind of watch. What i'm doing like these are all different closure pieces that i'm pretty much mismatching and just gon na sew them. In my hair, so i also um - i also sprayed them with um, because for some reason i cut them all over the place, but for some reason, um, this type of lace did not take black dye. I don't really know why, but i tried to dye this lace multiple times and it did not take black dye, so the particular closures that i purchased they were not able to be dyed, so i had to buy spray. It'S like you know when you go to like a beauty, supply store or even like a walgreens, a drugstore or something, and they have that black or that spray for people's roots whenever, like they're trying to get their roots to stay a certain color. That'S the spray that i picked up and i just sprayed these and let them dry um and it's pretty much last. I'Ve actually washed these a couple times and it's pretty it's lasts pretty. Well, so that's what i use. I will link it below um, just because no anyone wants to know what i'm talking about so yeah just kind of watch. What i'm doing i'm probably not going to talk anymore um, because i've done multiple sewing videos, and so i might skip through a little bit play some music but yeah stay tuned foreign uh! Oh my! Oh, oh uh! Okay, so i have all the closures sewed in and i'm gon na turn around. So you guys can see. Oh snap, i didn't just hit the whole desk, so, as you can see, the closures literally cover the first half of my hair hope you guys can still hear me and so now i'm just going to sew the tracks on the rest of the hair and then I'Ll be done so this sewing process. Really, it's probably the quickest that i ever do, because it's really just slowing down a whole bunch of closures and then like sewing the rest of the hair back in the back. So i'm gon na do that and i'm gon na come back and then show you guys what it's looking like when i do the two different parts. Okay, i just finished my sewing: i'm gon na take my bun out brush it down. My hair utensils are all over the place, all right so right now we have a straight back of course, and we can do. We can only do low ponytails because i didn't leave any here in the back, but if you did want to do higher ponytails you just leave hair out in the back um all right. Let'S see what we got going on, so i am not gon na. I was gon na, not curl my hair tonight, but the curls will last because, with this hair y'all, these curls be lasting. So i'm gon na start off with a middle part, and then i might do the side part tonight just to show you guys what we got going on and we're just going to do a little curl. I don't want it that high there we go. I got it on 380 because my hair is already straightened, so i don't need that hi as you can see, it's really really flat just make sure it stays this flat over here, because this to me is looking a little puffy on the sides right here. Looking a little puffy so um - i don't know about - i mentioned this, but i am going out of town in a couple of days. So that's really why i'm doing i'm still in just so. I don't have to like worry about my hair. I was debating whether to do curly hair or to do straight hair, and the only reason i'm not trying to do curly hair is because i have to bring a lot of products hair products to keep that that joint curly. So i decided i'm just gon na. Do right here, i don't have to be bring a flat iron and that's it, and so it's easier way easier. I don't plan on getting in the pool or the beach anyway, i'm gon na be there, but i in my swimsuits dipping in my dipping in the water. So i don't know what is going on right there. But to me, there's like this puffiness on the side of my head, so so bear with me how we do this so first, i'm gon na go ahead and brush it over. Okay, that's the first step, brushing it over figuring out what part we want to do. There we go, this brush is so painful. I don't know where it came from. Oh you know what i didn't even really need to. I didn't even need to use the um. What do you call this? The hot comb? It looks really good, so i usually like to have it behind my ear when i have it on a side part, and let me just there we go now we got a more fruit takes fruitist. I don't know why i'll be trying to change the name of this thing, and it's just that simple. We have the side part which i think i'm gon na wear the side part, because i'm kind of filling the side part alright. So that is the end of this video um. If you guys didn't notice, i was not looking in the camera at all. I have a mirror behind me, which is what i was looking at. So sorry that was kind of weird anyways. Thank you guys so much for watching. I hope you enjoy make sure you like comment and subscribe comment below if you're going to try this style out. This is literally for people who want a long-term like sew-in type thing, but they don't really like. If you don't know whether you want a middle part or a side part, do both okay do both anyways. Thank you for watching i'll, see you guys in my next video


Comments
Juju🍒: You are amazing, love this idea. Will be doing this for my VDay look. Thanks!
xxtoronto xo: It was meant to be!! I literally came to youtube for this. Thanks
precious: I need a video on how to look after kinky straight bundles
Maëlle PREIRA: girl this is smart smart wow
precious: What length are the closures ?
Bee S. Tee: Just came from your thin part vid. Was wondering why you didn't leave thinner leave out since you were using closure pieces??
coolgirls1603: How much degrees did you put your flat iron?