Flip Over Mehtod Sew-In | *Step By Step Tutorial* | Minimal Leave Out | No Heat Blending Technique
- Posted on 02 January, 2022
- Sew-In Hair Extensions
- By Anonymous
#Sewin #FlipOverMethod #Blending #NoHeat #Tutorial #Detailed #NaturalHair
INSTAGRAM: SamanthaAlyssaa_
https://www.instagram.com/samanthaalys...
BUSINESS INQUIRIES:
XOXOXOXOXOXOXOXOXOXOXOXOXOXOXOXOXOXOXOXOXOXOXOXO
Music by Ryan Little - Diamond in the Rough - https://thmatc.co/?l=123AE0CC
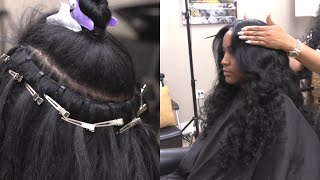
Hey everybody welcome back to my youtube channel. I hope you guys are doing well in today's video i'm going to be showing you how to do this simple and easy flip over method. Today, i'm going to be using a combination of a old u-part wig that i already had as well as some leftover bundles. Basically, the flip over method is nothing new. It'S been around for a long time, but i just haven't done it on this channel. So i wanted to show you guys how i do it, how i blend my hair without further ado: let's go ahead and get right into this video okay, so i already braided my hair up in the front portion is where i'm gon na leave my real hair Out i have an anchor braid um and then the rest is just cornrowed back. So this is a u-part wig. We'Re going to be using. I just put in some subtle highlights, and i'm just going to be using this as majority of the hair, because your girl did not feel like sewing in individual tracks onto my head. So this is a quick and easier way. First, things first is i'm going to cut off the clips because it makes it easier to sew it on your head, it's more uncomfortable! If you leave the clips on so i'm gon na take those off first now, i'm just gon na. Take the? U part wig and sew it around my anchor braid all the way um around the entire perimeter of the wig. Now the wig is securely on my head and we literally just saved ourselves so much time because we didn't have to sew on all those tracks. So, let's go on to the next step. Now we're going to start taking some leftover bundles that i had and fill in that gap at the top, so we're going to start by placing the tracks straight across in the back of where we have that open gap. Once you get to about this point, you want to stop laying the tracks straight across. We want to change the direction and start laying them sideways, so the key is you want to lay the tracks, the opposite way in which you want to flip your hair. If that makes any sense, so if you watch me here, i'm going to be placing the tracks laying to my left so that way, i can flip it over to my right all right. So can you guys kind of see what i'm talking about? I'M able to flip them over the opposite way in which i laid them down without you being able to see any of the tracks. So that's our goal here now that i have enough tracks laying um for my flip. I'M just gon na switch to the opposite side and start laying the tracks in the way in which my hair is going to fall just to fill in that one and a half inch gap. That'S left! Okay! Now that i have filled in the entire gaps. This is how it looks, and i'm just able to flip my hair over seamlessly to get that effortless curly flip over method. I just want to remind you guys, don't forget to subscribe, like comment, really helps out my video, my channel. So this is me: the next day i like to put my hair in braids overnight, just it's the best way for me to preserve the hair and to keep this style in for a long period of time, and it makes the hair look really cute. The next day, so i just put a little bit of oil on my hands and i'm going to go ahead and unbraid the hair to show you that wavy texture it will create here is how the hair looks and honestly it's so pretty, and all you have To do before you go to bed is wet the hair up just a little bit, not soaking, wet and put a little bit of mousse in your hair, um comb that mousse through and then braid it up in cornrows. If you can - and it just creates this really really nice texture and your hair is basically ready to go in the morning, all you got to do is blend in your leave out, i'm going to use some argan oil for my leave out. So that way, you know your real hair can stay very moisturized. So the first thing i'm going to be doing is taking some edge booster edge control and just combing out my edges a little bit to start to shape. How i want to lay my hair, i'm going to be taking some bobby pins and tucking my hair, my real hair away. I lift the tracks up and tuck my hair underneath so that way you know it blends better and you don't have your ends. Sticking out and stuff super easy just do it until all your hair is blended up really nicely, and this is how it um looks once i'm finished. This method is a great option for us curly girls, because we don't have to use any closures or hair glue or anything. So i highly recommend that you check out the style and it's really easy for you to achieve on your own. So i hope you guys enjoyed this video. Thank you guys so much for watching this video. I hope that you enjoyed it. Please remember to give this video a thumbs up. Leave me a comment down below letting me know your thoughts about this hairstyle as well as any other videos. You would like to see from me. Last but not least, please subscribe hit that bell notification button so that way, you'll be notified. Every time that i post a new video, thank you guys so much for watching and i'll see in my next video you

Comments
MsHaleema: I never thought of using a u part wig for the flip over method. Loved the end result!
Nia Thomas: Awesome idea thank you ❤️
Lexiuh: Hey! Would you mind sharing the details of the hair used here? Love your video
Nate: I think if you use a glossy type shiner or mix chicks products it will help your natural hair blend in with the added hair and you wont need to pin your natural hair under. Just lightly brush or comb your natural hair into the added hair after using the products i listed.
Alexis G: I wish i knew how to do hair because mine would always be done lol that hairstyle was cute.