Flawless Sew In On Natural Hair: Small Leave Out | Step By Step| Lena B
- Posted on 26 September, 2019
- Sew-In Hair Extensions
- By Anonymous
FLAWLESS SEW IN ON NATURAL HAIR: SMALL LEAVE OUT | STEP BY STEP| Lena B
If you are wanting to learn how to do a flawless sew in This step by step tutorial is all you need to get started slaying the best natural looking sew ins.
Thank you so much for watching my video!
Did this video help you? If so, please leave a like and subscribe!
Any questions? Comment below!
-
Connect with me on social media!
Facebook: https://www.facebook.com/hairbaptism/
Instagram: https://www.instagram.com/iamlenaberry...
TO PURCHASE HAIR BAPTISM GROWTH SERUM
Located in Atlanta, Georgia
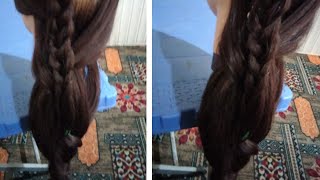
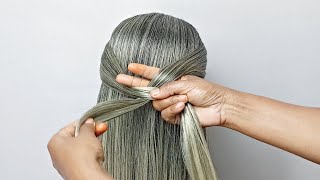
Hey beauties welcome back to my channel today, we'll be doing a traditional, so in on natural hair, we did blow-dry her hair to give it a straighter texture and we're going to start by just sectioning off her leave out and we're gon na braid that just to Keep it out of the way today's video, it will be a step by step video, but it is very simple if you just follow along and I'll try to talk you through as much as I can. The reason that I leave the side sections out is because, if she wants to pour her hair back into a ponytail, her hair will easily cover the tracks and it'll look very natural. This also takes some of the tension off from her hairline and it keeps your edges from breaking off, because the hair right at your hairline is usually baby, fine and very soft. So if you just leave that out, you won't have to worry about breakage right at the hairline again guys. This braiding pattern is a simple braiding pattern is the one that I typically use for. Most of my sew ins, this very first braid, is going to be very, very important because this is going to ensure that you don't have any lumps or bumps at the top of your sewing. So you want to part off a very thin section of hair, just following the outline of that leave out and your front brake and you're going gon na make this again a very, very thin braid. The rest of your braids can be just a little bigger, but this first braid you want to make sure that it is very thin. Also guys you will notice that there is some flaking in her hair. I did try out a new pomade. I won't won't mention the name of the pomade and I won't be using it again because, as you guys can see, it did calls flaking and I do not care for that. So, as you guys can see, I just follow the outline of her Laval and then I'm going to just follow around the perimeter of her head. Basically is going to be pretty much like a circle again. This pattern is very simple and easy. You'Re just going to follow going around the entire perimeter right here of her head and then just following that around in a circle. This pattern does require that I go around in a circle around the chair. But again, this is the pattern that I generally stick to and that I love the most and again guys I do put pomade. So you can just find you know a pomade of your choice that you like. If I find one that I really love I'll, let you know you can also use just a little bit of beeswax, so you'll see that I reach back, I grab a little and put it on my hands. This just makes it easier for you to grip the hair and give a nice secure foundation without over stressing the hair or making the braids too tight. What you have to remember with the sew-in is that there is a lot of or not a lot, but there are a few different steps that are going to apply pressure. So you don't want your braids to be super tight because you have to remember the net. Will go on top of this, and then your hair will be on top of that. So you want to ease up on the tension as much as possible that way your client or, if you're doing it on yourself, you don't experience any breakage again here we're just going to follow around the head. It'S pretty simple! So I'm just gon na. Let you guys watch and then guys, you're just going to take this single, finishing braid and stitch it down flat right here. As you can see, I am applying the hair baptism growth serum. I do suggest it for also ends underneath it is also great for regrowing. Your edges and your hair, it stimulates the follicles and promotes healthy hair growth, and, if you guys like to purchase the hair growth serum, you can visit hair baptism dot-com to do so. So right here guys we're moving right into the net. I use the weaving net. It is infused with argon argon oil. I just like that one, because it's a little softer than the normal Nets and I'm gon na stitch it down just following it around that perimeter, braid we're going to cut off the excess lace and, yes, I do a net for all of my so ends. I will not do a sew-in if you do not like the net. Some people don't like it, for whatever reason, however, it takes the tension directly from your hair. Okay, guys right here we're going to start it with the doubled width. On the end, I go directly through the weft and directly underneath that first braid, I only recommend going through the weft at the end, because you don't want your hair to start shedding from going through the West. So I'm going to take this needle and threw it under the weft and under the bottom of that first braid and guys it's important to go under that bottom braid, because then, if they want to pull their hair up in a bun, it kind of just goes Up seamlessly - and you don't see any of the weft right here - I'm going to show you the ends. This is very, very important to a flat installation. You want to open your weft up and just stitch down on one weft and then you're going to do the flip over method. So you're going to flip it over you're, going to stitch that first weft down and then you're going to grab the second weft underneath and then start stitching them together, double as double tracks again. This is a very, very important key for your flat installation. When you flip it over and I'll show that to you guys several times when I stitch, I do curved my needle over to the side, I find that it makes a better stitch. Okay here we go again guys on the end. You want to open your web sup and you just want to stitch that first web down flat and then you're going to flip it over and do the flip over method and you're going to stitch back a few times and then grab the second weft and start Double wedding again and we're coming to the end again guys split the Wealth's open stitch on that first or under the first wealth. Then you're going to do flip over method stitch that single weft down go in about two stitches and then you're going to grab that. Second, weft from underneath and start again stitching them as double widths, and today I believe we use two and a half bundles for her hair, but we're just going to continue stitching and doing the flip over method on the edges. All the way up to the top, and when I'm stitching, I keep my stitches pretty close together. I know there are some people that they'll have one left and only about five stitches. I don't do that because you're so in will start to loosen you'll start to snag on thread, and I just like to keep everything really close and secure that way. Yours so in your installation. It will be flat and in place the entire time, and I only recommend a sewing be kept in from six to eight weeks. I will not touch so in beyond eight weeks and right here we're going to start a new bundle, so I went through the very ends of those weft to get started and again I only go through the ends at the starting and the ending points and we're Going to just speed it up just a little bit here and, as you guys can see again, I curved my needle over to the side when I'm stitching to me. It just makes the thread go in a little closer and tighter and we're here at the very top section now at the top. I will stitch even closer, because this is the part that usually grows out fastest. So you need to make sure that this part you're taking your time and getting a very secure stitch. So I started with the double because she likes that side a little heavier, but then I'm going to go ahead and cut that to a single weft at the top. So it can be as flat as possible, I'm going to take it under the track and then under her hair, okay and guys. I do want to tell you up front that my camera ran hot, I'm working with the Sony a 5007 hot. So we did not. We weren't able to capture the video where we actually did die and highlight and style her hair, so we'll have to try and catch that one in another video. So today's video, it will just be showing you how to do the basic install, which is the most important thing really about the video, is getting that install very flat and secure and being able to last eight weeks. They actually could last longer than that. But it's not healthy for your scalp. You do need to also be getting your hair shampooed and conditioned during that time, as well as using your growth, serum and your hair will grow healthy and strong, and you see how natural that looks without putting any think on it. Thank you so much for watching my video. If you have not done so already, don't forget to Like comment and subscribe and I hope to see you beauties in the next video. Thank you. Bye, bye,


Comments
Lena B: Thank you guys so much for your continued support. I will start doing shoutouts and giveaways in upcoming videos as a token of my sincere appreciation of the love I've received
NATALIE ‘MsCrzySxyCool’ HARRIS: *Hey Lena B♥That looks beautiful!! I'm glad you said that the sew-ins need to come out after 2 months because honey when the cornrows are literally detaching from your scalp...come on now.*
Qiana Harbin: That looks great
Kimberly Kyles: You’re welcome
Kimberly Kyles: Lena i like it sew in thx for sharing