Half Up Half Down Sew-In / No Leave Out Ft Wiggins Hair
- Posted on 31 August, 2018
- Sew-In Hair Extensions
- By Anonymous
Wiggins Hair Official Website: https://goo.gl/ovpQJV
Curly Hair 3 bundles with Lace Frontal: https://goo.gl/N7qS8z
Curly Hair 3 bundles with Lace Closure: https://goo.gl/8gc2u5
Curly Hair 4 bundles with Lace Frontal: https://goo.gl/Qeg4SD
Body Wave 3 bundles with lace Frontal: https://goo.gl/znSpCY
Straight Hair 4 bundles with Lace Closure: https://goo.gl/4K1u91
Natural Wave 4 bundels with Lace Frontal: https://goo.gl/RjNpXR
3/4 bundles with frontal/closure: https://goo.gl/sk97kn
(7 Styles for you to choose!)
★$3 off over $159, $8 off over $269 and $13 off over $399
Wiggins Hair Aliexpress Officiacl Store: https://goo.gl/7kKeFc
Body Wave 3 Bundles With Closure: https://goo.gl/4iGSgQ
Straight Hair 3 Bundles With Closure: https://goo.gl/HeGdnq
Straight Hair 3 Bundles With Frontal: https://goo.gl/YUbTtq
Wiggins Hair Store on Amazon: https://goo.gl/kzZDAJ
Follow @wigginshair on instagram: https://goo.gl/AhdsXo
Facebook @wigginshair : https://goo.gl/GqrSQt
Subscribe Wiggins Hair on YouTube: https://goo.gl/w1Kxie
E-mail: [email protected] / [email protected] [aliexpress](provide wholesale)
WhatsApp: 0086 17703997280 /17719937667
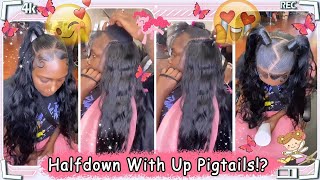
Today, I'm going to be showing you guys how to do this really easy. Like partial, sewin, half-up half-down, look, I think it's super cute or the summertime. The hair that I'm going to be using is from Wiggins hair. It is their curly hair and I they send me three bundles of 22-inch and also a 20 inch closure. So here's the closure for this look. I use pretty much most of the hair. This is basically all the hair that I have left. I'Ve been wanting a really cute hairstyle like this for a while, so yeah once I finished wearing in this hairstyle, then I'm going to create a wig with it, like. I said it's 22 inches so far. I haven't really had any experience with it. Tangling, I've only had it in stock for about three days. Now, though, alright I really like this hairstyle is really cute. It'S really fun, so yeah stay tuned. If you guys would like to see how I achieved this look, don't forget to check out Wiggins hair. All of their information will be linked down below and let's get started. So let's jump right into it. We'Re gon na start by showing you guys my braiding pattern. So I just have my hair parted from ear to ear, and then I have an anchor braid going around the perimeter of the back half of my head and then the rest of my braids. I just have going straight back and down and connected to each other. So when I do sew ins, I always like to use a weaving net, so I'm going to start by just sewing this weaving net along the perimeter or my anchor braid and basically weaving Nets. Just allow you to fill in more space into so webs where you may not have a braid moving right along I'm going to start with my first bundle. This is how the hair looks after it's been. Co-Wash. Is a super pretty curl pattern, so yeah it's 22 inches and it falls pretty long, so I'm gon na start by sewing my first track under that anchor braid and I'm taking it up about a third up towards the center of my head or maybe halfway up The center of my head on the sides - that's so, as I sew the anchor or not the anchor braid, but this first track. The hair will fall towards my face and hide my anchor braid. I hope that makes sense so yeah. I took it up halfway from like my ear to the middle of my head, so that the hair will fall towards my face and it will hide the braids or that yeah it'll hide the anger, braids, and so here is how that looks after I finished sewing. It around I'm gon na turn and show you guys what I mean by it falling towards my face and, as you guys see when it's flipped back it hides that braid. So now I'm basically going to start filling in this back portion like I would do a regular, so in just going from side to side - and I am doing the fold-over method for this first bundle. So what I mean by fold over method is that I'm not going to cut my whips, I'm just once I get to the end, I'm just going to fold it back to the other side like you'll, see in just a second. So it's a fairly common technique. Nothing new but yeah, that's what I'm doing for the first bundle, and so this is how it looks with one bundle in my head: it's pretty full, but I still have a nice portion that I need to fill in so for this next portion. I'M going to start sewing my tracks in a u-shape, so going yeahjust around in a u-shape, and I did start to cut my webs at this point. I'M so sorry that I'm not all the way in frame. I am doing my hair myself and it's really hard to film the back of your head when you can't really see what you're doing and have a mirror in front of you and a camera behind you. So I do apologize that you can't see it all the way, but yet I'm basically just sewing these next tracks in a new form and the you form basically kind of continues to hide that anchor braid like the first track did so we want the hair around The parting area to basically fall towards the front of my head so that you don't see any party and you don't have to leave any hair out and then to close this section out. You should just keep doing it until you have like a little slither lab. So I'm going to take a short little piece of hair that you see right here and I'm going to sew that last track going forward. So if you can kind of see, I place the track falling towards my face and I'm just going to sew it. That way, and then once I've done stitching, I'm going to flip it back and this kind of allows it to hide that last track and again, when you do it this way, you do not have to have any hair left out other than my top knot portion. I do not have any of my natural hair out covering up these tracks, and this is how it should look once you have all the hair sewn and in the back. So I'm just gon na flip that back and voila now moving on to the top portion of my head, I'm gon na start by just moisturizing my hair, making sure my hair is. You know well moisturized, so, for this top part, some people like to flatiron their hair, I'm working on not putting heat on my head, so I'm just gon na start by spraying, my hair, since this is curly hair. I do not need my hair to be super. Sleek or super straight, so, if I, if it waves up, it really doesn't matter because it kind of goes with the looks, so I'm just making sure that my hair is fully detangled and I'm going to start with some setting foam. I feel like setting foam just kind of helps, hold your hair in place a little more and it doesn't make it super hard and crunchy as it is when it's just with gel, but I am gon na use joe. So I'm going into my Old, Faithful, eco styler gel and just applying that all around the perimeter of my head and then I'm just going to brush this up. How I basically similar to how I wear my natural hair and top knots, when I kind of do like a fake ponytail or like a fake bun, so she's taking a brush and just smoothing my hair up into a ponytail. So I'm just going to put my hair in a bun, and I kind of messed up here. So when you do this, make sure that you get your bun as small as possible. I ended up having to go back and redo my bun, because it was just a little too thick and fluffy. You guys will see it a little later but yeah. So now, I'm going into another bundle of hair, and when I do my ponytail looks with bundles. I basically like to fold it in half and then braid off each end I feel like it just makes it a little easier to wrap around and it keeps it neat as well. So I'm taking that first in and taking that braid that I created and just wrapping it around the base of my natural bun and then I'm going to take the rest of the bundle and start wrapping it in the opposite direction and just doing your standard falcone. Tail with a bundle, then, when I get to the end, I'm just going to take that braid at the other end, just to kind of wrap it around and secure it. And then you can always go in for extra security, with an open, bobby pin to keep that braid in place. Now we're going to add some cute little detailing to the ponytail. So I'm going to take a little bit of some regular like kanekalon, braiding hair and I'm using about this much and then I'm also gon na take a few bands or strips of this gold hair accessory and lay it with the braiding hair. And basically, I'm just going to use this to wrap around the base of my ponytail to hide the bun. So you don't not hide the button behind the lips, so you don't have to do this. You can always take like a piece of the ponytail hair to wrap it around and hide the lip, but I just wanted some cute detailing so yeah, I'm just taking that and kind of twirling it and just wrapping it until I get it in a style that I like and then for a little extra security, I'm just taking some free spray and just kind of spraying, my little hair accessory in place and then to finish off this look we're just going to do some baby hairs. Baby hairs are always the fun part. So again, going back in with my setting foam setting foam is good like just to kind of move your baby hairs. You know well to easily move them before you set them with a stronger gel, so I'm just applying that and then just kind of working. My baby hairs until I get them in the style that I want and then I'm gon na go in with some got to be the black one and just kind of seal that off or steal my edges in place, and that is pretty much it after. I do my edges, I'm also going to just take some wrapping paper and just kind of tie, my edges down to keep it in place, but yeah. That is it. I am loving. This hairstyle is super cute, super fun, super girly and I have no hair left out and most of my hair is protected.

Comments
Sindhi house wife: Nice dear friend