Realistic Edges On A Wig: How I Create My Soft Textured Edges Hairline Lace Wig
- Posted on 29 September, 2022
- Sew-In Hair Extensions
- By Anonymous
In this video, I share my technique for making a realistic hairline with edges. If you are tired of crunchy baby hairs and ready for your wig to look like it's growing out of your scalp, this wig is the most realistic to apply!
WIG IN VIDEO: https://bit.ly/3Cjzvz9
Length: 22 inch
✨ DISCOUNT: Marie
♡ Get Your Slay Band https://bit.ly/3CMaF8Y
EVERY TOOL AND PRODUCT I USE: https://www.amazon.com/shop/msprecious...
Every product and tool I use will be in this link.
FYI VIDEOS:
HOW TO CUT EAR TAB ON WIGS https://bit.ly/3AkkyL1
HOW TO CUSTOMIZE A LACE WIG https://bit.ly/3QrGuKM
CUTTING EAR TAB AREA 360 LACE WIG https://bit.ly/3w8zYAp
HOW TO MEASURE WIG TO FIT HEAD https://bit.ly/3A41UXg
NO BABY HAIR BEGINNER WIG INSTALL https://bit.ly/3CdZLuX
TIPS FOR APPLYING WIG ON NATURAL HAIRLINE https://bit.ly/3CcyCZy
SECURE NO GLUE WIG INSTALL https://bit.ly/3c00y8e
8 TIPS TO MAKE YOUR WIG LOOK BETTER https://bit.ly/3w94quf
HOW TO BLEACH KNOTS ON A WIG https://bit.ly/3w7zASY
HOW TO REMOVE WIG & WASH PROPERLY https://bit.ly/3SWCLq8
HOW TO SEW FAKE SCALP MATERIAL https://bit.ly/3PP5MBH
___________________
TIMESTAMPS:
0:00 INTRO
0:38 Blowout Hair
2:46 Cut Layers on wig
4:38 Rollerset On Wig
6:44 Glueless wig install
8:50 Create Natural Edges on wig
13:15 Final Touch Ups
Get the SCALP Material:
Fake Scalp Material https://bit.ly/3mp7qwU
___________________
FOLLOW ME ON MY OTHER SOCIAL SITES:
♡Instagram: https://www.instagram.com/mspreciousma...
♡My Website: https://mspreciousmarie.com/
♡ Tik Tok https://vm.tiktok.com/ZMRwbmjdu/
Business Collaborations Email: [email protected]
________________________
*Hair or products shared are my OWN personal and honest experience. This video may contain sponsored content and affiliate links which I get a small percentage that helps invest back in my channel to continue to bring great content! Thank you for your support!*
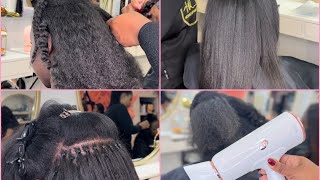
I always believe the best way to get a wig to look amazing and very realistic is to add your own personal touches to a wig. Yes, wigs can come with a lot. However, it's just doing little things that fit your style edges, no edges baby hairs. Whatever you like today, I'm going to show you how to create the soft textured edges on your wig. Now, if you are a beginner, if you are not a beginner, this is a very simple way to do it. If you want your wig to look as natural as possible, no gels, no hair sprays, no hair glue, nothing so be sure to subscribe. Let'S jump right into today's video, so I'm starting out with this beautiful straight wig. That is a brown and it is a silky texture. I want this wig to look like my hair. If it was relaxed, I don't want it to be too silky, so I'm adding water, you can wash your wig. If you want to - and I'm just doing this so I can create a blowout style anytime. You use the hair dryer on your wig. It'S going to give it a little bit of texture. It just gives that blowout relaxed type of look to a silky texture. Now, yesterday's video, I dropped a lot of tips on how to make your wig Salon ready. If you have not seen that video definitely go check it out and if you don't mind thumbs up the video leave me a comment to show your support to my tips that I share with you all, because I know it's not easy to install a wig and I know a lot of people charge a lot to install your wigs for you, so I try my best to give you guys as many tips as possible, so show your support. Support just by thumbs up the video. Also sharing this video is also helpful and I really appreciate it because I share a lot of tips with you all and helpful videos. Thank you guys so much for your support. Now, I'm not sure if it's showing through, but the hair color is a brown. It'S not black. I don't know why my camera cannot pick it up correctly, but you can see it. I hope you guys can see the true color of this hair if not stay tuned, I'm going to do a close-up of this hair, but this hair is actually pretty long. It'S about 22 inches. I am going to cut it shorter, just because I feel like it'll. Look more realistic at a shorter length, and I want the flow of today's style to look very natural foreign, so I am going to razor the hair shorter. I highly recommend, if you cut your hair, to definitely use a razor instead of scissors unless you're going for the blunt cut, like a short bob or a style like that. But I'm going to go ahead and just add some layers and cut this to about a 16 inch. Just because I want this flow of the hair to be very natural and just like, I had a fresh blowout. I'Ve been to the salon, but I didn't go to the salon, but my hair looked like I went to the salon, you guys know what I'm talking about and let me just say to all the stylists out there me sharing. These tips is not trying to take away from your job, however, not a lot of people can't afford to purchase a wig for the price that wigs cost and also pay the same amount for installs. So I am just trying to help those who cannot afford it and the ones who can they will come to you still and get their wigs installed. So yeah. That'S why I share my tips, so I'm not trying to step on anybody's toes. I did get a comment in my last video foreign go ahead and continue to layer. The hair. This hair is absolutely gorgeous it's so soft. There is no Tangles. I believe this is a straight texture. So, with straight textures, you really don't need to worry about. You know the maintenance on it, because it's a low maintenance wig all right. So this is what the layers are looking like. I will be sure to put all the products that I use in my Amazon link below in the description box. If you guys want a list of every single wig essential that is mandatory, that I use click that link and go check it out foreign. So, let's move into adding some curls to the hair. I'M going to use my dryer and rollers today to create just a nice volumized flow to the curls. I don't want anything tight. I want the flow of this wig to look like. I want to get a blowout and it just looks really good with some roller set curls. You know that type of look, so this is very simple. All you do is take the hair, separate sections work in medium sections, take your dryer and I'm using a brush. Dryer and I'm going to curl the hair onto the dryer, let it sit for like a minute, then take these rollers and roll the hair up and pin it um, and that's basically it. This is the most simplest curl. You can do it's not going to create a curl curl, but it will give lots of body to the hair. I remember a long time ago I was so against hair rollers. I thought it'd take up so much time and I only used to use them when the hair was wet but adding them into my hair regimen for my wigs have made the biggest difference in the appearance of how realistic the hair look, especially using the dryer. A lot of times I used to let my wigs air dry, which I highly recommend because it holds the most moisture, but if you can dry the hair at at least 95, let it air dry until it's 95 and then use the blow dryer. The dryer definitely gives texture, and I love that. However, I still make sure to use uh leave-in spray. You guys see me use my frizzy spray. I love that I don't put too much product on the hair because I feel like the hair does not need too much product. Otherwise there will be a lot of build up and, of course, the hair won't flow. The way I want it to so yeah. That'S just a few tips also, if you need to throughout the week you can add just a little bit of some argan oil and it will definitely make a difference in the moisture levels. So this is what the end result is now, let's install this wig and I'm going to show you all how to create these edges now, today's wig install is going to be completely glueless. I don't know if I've mentioned this. This is a full lace. Wig, just like yesterday's video, I actually had two and this one. I wanted to customize just a little bit, so that's why I have two of them, but the hairline on this wig is absolutely gorgeous. It really does not need any customization, however, because I am going to be creating soft edges. I am going to touch the hairline just a bit and show you all how to do this without over doing the hairline, because of course, it's already pre-plucked. So I'm actually just taking out hairs right at the very edge of where the hairline begins, because sometimes it can be very uniformed if that makes sense. There'S like a strand of knots going across the hairline, and I hate that look so much so I'm getting rid of that part now, just in case you're wondering no. I did not bleach the nuts on this wig. I did use the even tinted lace on the knots and as far as the lace color, the lace color on this one is a just a little bit light. I don't know why it's different. However, it is slightly so I did tint the lace with the lace tint that I like to use. I forgot. I will link it in the description box, foreign. Of course you want to remove the extra lace. I see a lot of people do this with the lace there, but if you are a beginner, this may complicate things because sometimes when you go to remove the lace, you need to cut a little further back uh for everybody. It varies. I highly recommend cutting the lace prior to doing the next step. One thing I love about the new hairline wigs is that the hairline is thinner. So when it comes to creating edges natural soft, beautiful, realistic edges, there is not so much hair the hairline that it will look ridiculous. So you can easily create this without the struggle of trying to thin the hairline too much now. Look how beautiful that lace has melted into the skin. I have not glued this wig down and already there is little to no work. That needs to be done and that's why I chose not to glue today's wig, because when I put it on - and I saw how well that lace melted, I was like okay girl - you don't need to glue this down today, just give the natural flow of the Hair a lot of times some wig adhesives can cause like crunchy, looks or hardness to the hairline, and that's not to go for today's wig. Today'S wig. We are trying to get that natural, soft textured, baby hair. So what I'm doing is separating just strands of the hair around the hairline and then taking my hot comb to make sure it stays exactly where I needed to go. You don't need a lot of hair. You only need just a little bit and make sure that your wig is positioned exactly where you want it to fall on your head, foreign, that's already super pre-plucked it eliminates having to tweeze the hairline before you can get the soft edges um. So keep that in mind - and this is why I love the new hairline wigs. So I'm just taking my tweezers and taking out just a little bit of hair out of there, because a lot of times when you go to add product to the baby, hairs or the natural edges or whatever you want to call them. When you go to add product it thickens up the hair, so you want to make sure that your edges are super thin before you go to style them. Foreign thing you want to make sure to do before creating your natural edges is to curl the hairs. A lot of times when I've tried to style the edges, and I don't curl them, it just looks like a stringy mess. Okay and the best thing about the curl edges is that they flow very natural and soft, and then on top of that, since this is a glueless wig install, it covers any of the lace, the edge of the lace that may show - and you don't need gels - You don't need hair sprays; all you need to do is curl the hairs and let them flow the way they naturally would flow. And, of course, you want to use a razor when cutting them. You can cut them as short as you would like. They do not need to be long, they so now what I'm going to go ahead and do is set my party and then just style, the wig, because I've already curled the hair. I don't need to go back and do it again. As you can see, the flow of the hair is so pretty like this hair is just everything I am using. My wax stick to lay down the hairs, make sure there is no flyaways. You can also use that on the edges now this is a full lace wig. You can part it straight back if you want to there's no wefts. However, I chose to keep my parting short, because I want the flow of the hair to look like. I have a part, but not look like I have a part at the same time, if that makes sense all right, so we're about done and, as you can see, it looks really good now, because this little area here kept sticking up. I did take us just a little bit of spray just to make sure it lay flat if you use too much, it's not going to flow right. So definitely, if you have to just use just a teeny bit, you do not want the hairs to become stringy. You want them to look fluffy that way the edges can stay soft and natural. Looking look how great that lace is it melts like girl? This wig is not glued down and the lace just looks so invisible. I absolutely love it again. This wig will be linked Below in the description box. I will also put a discount code down there and be sure to check the Amazon link for all the products that I use in today's video. I forgot to insert my Combs into my natural hair, so I'm just going to add just a tad bit of spray right here at the forehead, so that this wig does not slide back um. That'S a little tip! You can do if you don't want to glue it completely down, but you don't want it to move just a little bit of spray right at the forehead area. Let it dry foreign. So this look is complete. You can, let me know in the comments section what you thought about today's wigging star. Do you like it also be sure to thumbs up the video subscribe if you're new to my channel, so you can turn on those notifications, and I will see you all back in my next video. Thank you so much for watching
Comments
Hairluscious: All of your tips are greatly appreciated. I have used many! I am on a budget so there are just times that the salon is not within my budget and you offer and provide an excellent service with your tips etc.The salon is a great experience, but, we all should have a back up plan for when it's not in our budget and you fill that need. Thanks again beautiful install and love the eye look, matching is perfect!❤❤❤❤
Beauty by Jay Morris: Beautiful Marie, everything looks so soft and gorgeous, the hairline looks amazing
73pinkchocolate: Oh Marie, this video was so helpful for me! I’ve always struggled with cutting layers, but your tip was phenomenal! I also love natural edges, but didn’t know how to do them, but thanks to you, I know now!!! You’re so great Marie!!! Thank you for your amazing videos!! ❤
Julie Braime: Your tips have been very helpful for me to learn from and to try on my own wigs ❤❤❤❤
Corina Sowe: Love you, Marie. You always be slaying these wigs. Looks so natural and gorgeous!!
Donna Wallace: Beautiful! I'm so tired of dying my wigs. This is beautiful! Thank you for the discount! God bless.
Crystal Amos: The hairline is flawless you slayed today as always you did that absolutely beautiful mama.
C Rhymes: Beautiful install Marie! Thank you o sharing your tips they are lifesavers!
Jasmine W: Beautiful wig, thank you for the tips keep them coming
Esther Sowell: Oh my goodness marie i have to get one of those wigs with that hairline your installation is awesome yes the color of the wig show brown i appreciate all the help you demonstrate very helpful
Andy Edwards: Another amazing video. I really like the soft edges. I tried your tips with my natural hairline. It came out amazing. I didn't have to cut my hair. Keep up the great job!
L StCl: Beautiful job and thanks for the tips. I don’t know if you can answer this question but here goes. If you were going to recommend one affordable wig with realistic hair lines which company or wig would you recommend?
Marie Jordan: Thanks you slammed it looks very natural just like your hair. Thanks
Roberta Simes: Bayybeeeee when you said the disclaimer to the stylists— paying for a wig and then the install is the same price essentially. I felt that. It’s discouraging . You’ve given me hella confidence to wear/cut/style wigs. Keep it up!
Gail Hopkins: Thumbs up!& yes i can see the brown color. yes u always bring the full tea on all things u present on your channel. Plus u know what u are doing! Always plus & what u are about. We so thank u (MPM).grace to u & all.gh
DARLENE MATTHEWS: WoW so Pretty!
40ish Sophisticate: Hair dryer tip I always wondered how you got the texture.
honeysvw: Beautiful
Traemaxx2000: I prefer this method. A lot of women go crazy on the baby hairs and it's so unrealistic.
Tammy Jones: I appreciate all your help, lawd knows you have helped me save some coins lol.
Ari J.: The hair is so thick and pretty. What’s the density?
Muñeca Smith:
Paricia Jones: ✅️✅️
Ari J.: Girl where did those big ole scissors come from at 8:23