Curl The End Of Your Braids, Box Braids Without Rod...Wool/Threading Method/Hot Water
- Posted on 30 April, 2021
- Sew-In Hair Extensions
- By Anonymous
Hi Fam.....how are you guys doing?hope you all are doing great...In todays tutorial,I''ll show you how to achieve deep curls at the end of your braiding hairstyles.You can use this technique to curl the end of your box braid,Cornrow braids etc .Its very easy and less time consuming.Enjoy the tutorial and don't forget to leave your questions down below...
My Favourite Products For Braiding♡:
SHINE N JAM GEL - https://amzn.to/3eiDj4O
PRECISION COMB - https://bit.ly/2VslVTQ
PRODUK BAND - https://bit.ly/3ocEHuE
CANTU SHEA MOUSSE - https://amzn.to/2WYeQf7
EDGE BOOSTER - https://amzn.to/3c11wej
HAIR CLAMPS - https://amzn.to/2TChyVC
SUPER HOLD SPRITZ - https://amzn.to/36vNdNu
HYDRATING SPRAY - https://amzn.to/36AYTik
Check out my other Videos...
Full Head Bangs Sew-in No Leave Out No Closure/Quick Weave full Sew in with Bangs/Chinese Bangs
https://youtu.be/8h9asanvNGs
Braid pattern for a full sew in no leave out no closure
https://youtu.be/6hYEEh-jhPg
Most Realistic Braided Wig/DIY Braided Wig Using Expression Braid /No frontal/No Closure
https://youtu.be/IoTkPg4Q960
DIY No Closure Cornrow Braided Wig Tutorial for Beginners
https://youtu.be/LjjJ1-A5S9s
Braids, Box braids tutorial, Ponytail tutorial, cornrows tutorials, natural hairstyle tutorial,
natural hair tutorial, stitch braids tutorial, natural hair
Flat twist made easy/Senegalese twist cornrow tutorial for beginners
#boxbraid#Curls#Diy
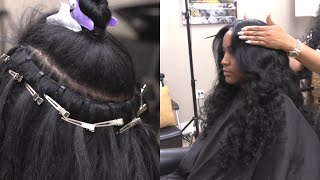
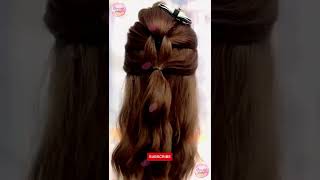
Hi from welcome back to my channel in today's tutorial, i will show you how to achieve a deep curse at the end of your bread, all right, especially single braiding hairstyle. You want to achieve that course. At the end of the breast all right um, i will show you how to do that. Just stay tuned, relax and enjoy the video. Thank you all right. Firstly, to get your coils popping at the end of your breast. The method i will use in this tutorial is my wool all right. If you don't have a wool, you can substitute the wood with a thread. Okay, i'll cut out the the wool i'll cut it out, the ones that i need to do this process i'll cut out some a tiny pieces from this bunch all right. I will start by doing it one by one, but for the sake of this video, but on the normal day, if i'm doing like a professional hair i'll, take it two or three at a time so that um it will serve me time. Okay, okay, firstly, did you see my wool? I'Ve cut out a little pieces all right, so you start by here. We are your boss. Breath stopped all right because you want her from here to then you want to achieve the choice from there. So what you need to do is you start tying the the wool you can use a thread to achieve this method to you start tying the wool. This way all right. Okay, you start tying it all right! Okay, let's start you do as if you're doing a treading hairstyle, you start how you need the spaces you're going to leave, depending on the on how tiny you want your choice to be, or you want your choice to be a big choice. You'Re gon na have to give a a big space in between the thread. You are tying all right, so you start tight make sure when you are tying this wood, you are not tiny tightly, it's just a loose something you are not i'm not tiny tightly. All right so that when i pull at the end, when i put the wool um, the coils will be there, because if you tie it tightly when you put the wool, unfortunately, you won't get any coil. Alright, look at the way, i'm tiny! Okay, i'm not tying! The wood, it's not tight, it's not tight, i'm treading it loosely. Alright! All right did you see, where my hand is almost at the end of the of the of the braiding hair. So when you reach here what you need to do to achieve that course, you put the the wood this way. I don't know whether you can see my hand very well. You pull it this way, all right, it is pulling freely, because when i was tying, i wasn't tying tightly all right. You pull it this way. This way, all right all right, so the next thing you will do is after pulling it this way. The next thing you will do is to tie this straight tie tightly here that your hand is so that the coils won't lose all right. You make sure it's tight in here all right and you cut out the the depending on the one you're using you cut. It out we go to the second one, as i said earlier. Normally i will do two at a time, but for the sake of this video, i'm gon na do one by one so that you guys who understand what i'm saying very well all right. Okay, let's go to the second one for this second one, i'm gon na start. Did you see the the i'm gon na start from here? You lit you leave a little tiny pc there so that it won't lose okay, all right, then, we'll start with the threading. Make sure you are threading it as loosely as possible guys as loosely as possible. It'S loose okay, so that when you're pulling, you won't find it difficult to get the coils. When you pull it all right, it's time to pull all right. This is the end you hold it this way. All right. Did you see the two? This is the the the woo, and this is the braiding hair. You start pulling now you pull it this way. All right. Did you see the curls now make sure you secure it here so that it won't lose secure it here, you cut it out. You cut the thread for the wool out. Okay, this is the third example. The third one you're gon na secure, leave a little pieces of food here all right so that it won't lose after that, you start threading loosely remember the space you're living is depending on the on the, how big or how tiny you want your coils to be All right, if you want your voice to be like a little tiny choice, you leave a small space. If you want your, if you want to get a big voice, you leave a big space, all right, all right after that, we'll start pulling all right. You tied to secure it here. Okay, after that um. The next thing you do. Is you dip it in hot water? Did you see how it is all right guys? The next process is to dip it in hot water right dip. It in hot water go ahead to to cut out the wood gently in order to lose the coils. You cut out the wood from here. Where is you tight all right after you finish, cutting out the wool from where you dye it you're losing the coils from there? Okay, this is the first one. Let'S do the second one, we'll follow the same method. We cut out the wool from the place. We it you cut it out gently all right after cutting it you're losing the coils. Okay, the same way, the same way, the color of the you're losing the course you losing the cars. Okay, you go ahead to cut out the excess at the tip, all right. So that your work will be neat okay, if you enjoyed the tutorial, don't forget to give it a thumbs up subscribe like and share to your family and friends, see you in my next video bye,


Comments
AKANIMO IKITDE: I love this tutorial! So detailed and easy.
Flavia: Thank you so much for this!! I love my results. You did a great job explaining the process.
Bridget’s Circle: This tutorial is helpful and curly looks bouncy. Thank you for sharing.
Yvone ziko: I have just curled my braids now using your video ,thank you for the easiest tutorial
Patience Johnson: Wow! Thank God I found this. I’m so doing it for my baby this weekend. Thank you
Hellen Chabala: This is so easy to do thank you so much for this video I was looking for this Thank,, it's so helpful
iiApplePlayzx: Thank you so much! This video helped me out alot
popessalifestyle: Thank you so much for the tutorial. I always love those deep curls
Faith Abigael: I'm loving this ,thanks I can do it myself
Lifted Vicky: This video was very helpful thank you
Dinma John: Very detailed tutorial...
Jessica Onyii: This is really helpful especially to me. LIKE IT.
Vida25: Fantastic how long do you have to leave it after putting in hot water ? Overnight?
abigail adwoa: Very helpful❤
Jessy queen: Looks so good nice tutorial
aa m: Thank you so much this was so helpful if I could give you a hug I would this trick really works
Beryl Okoth: Thank you very much it was helpful
EsteeLicious: I enjoyed watching this video at your premiere. This tutorial will be very helpful.....thanks for sharing
Patrick loveth T V: So beautiful thanks for sharing
lega sola: Thank you
Empress Chronicles: Thanks for sharing. Would it a work/curl the same way if you braided the hair all the way to the end before threading it?
Thembela Ndesi: This is an excellent tutorial, thank you
Grace Opoku: Thank you so much for your help
Lillie: This is a nice way to learn how to braid
Jacob Hannah: I hardly comment on videos, but this video is rated number 1, thanks so much for this video
Ebless TV: Well detailed
CYNTHIA HOT GISTS BLOGS : Waoo the curly is very beautiful ❤
AMV cat: love it! love it
Melinda Burnside: GOOD JOB
Gracelike rain: Im going to try this
Cadmus World: You are so talented. Nice one
Eugit's Kitchen: Wow look so beautiful
Real aproko matters: Look so beautiful
Pastor onyekachi John: wow so great one
ms.branch: Dose it work on natural hair?
HE REIGNS TV: Thanks love
Sheila O: Please can i do it with an expression?
Tracy Morris: Can you use yarn?
VALIZI UCHIE: Waiting host thumbs up dn
Edny L.:
Jessica Onyii: I don land