Weft Hair Extensions For Volume [How To Add Fullness For Thin Hair & Fine Hair]
- Posted on 27 August, 2021
- Sew-In Hair Extensions
- By Anonymous
In this tutorial, I'm sharing my favorite way to add fullness and volume to thin hair. This is the perfect solution for someone who is happy with their length but just wants a little vava-voom!
Using @donnabellahair 22inch Hybrid weft extensions in color 60 and 22inch iLinks in color 60
Watch how to add wefts for length and volume here: https://youtu.be/1MNnmzPiq-0
Find all the tools here: https://donnabellahair.com
For more education visit http://mirellamanelli.com
Instagram: https://www.instagram.com/mirellamanel...
Facebook: https://www.facebook.com/MirellaManell...
TIKTOK: https://www.tiktok.com/@mirellamanelli...?
Pinterest: https://www.pinterest.com/mirellamanel...
HairB&B IG https://instagram.com/hairbnb_podcast
Learn how to upstyle in 7 days course: https://mirella-manelli.mykajabi.com/p...
Rebel Femme Shop https://rebelfemmeshop.com
Model Call https://mirella-manelli.mykajabi.com/p...
Click the link to shop my fave Framar tools: https://framar.com/?rfsn=5729303.eb090...
The extra big color brush https://zerotimesystem-com.3dcartstore...
Color correction tools https://malibuc.com/shop/rebelfemme
Need a mannequin to practice on? Buy one here: https://hairartproducts.com?aff=688
My favorite weaving combs: https://vellen-hair.com/collections/co...
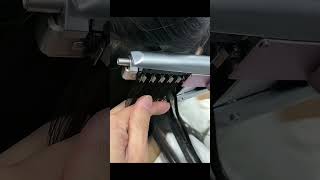
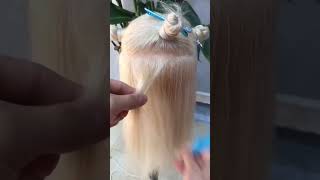
Hey it's marilla monnelli and today i'm going to show you how to quickly add in some volume and thickness using all donabella hair with this customizable weft installation, along with some eye links for added fullness around the face. But before we move on make sure you hit that subscribe button and turn on all notifications, so you don't miss a tutorial. Now, let's go ahead and get started. I am so excited to share this install with you today, because this is the ultimate customization and solution based installation for this particular model. So, as you can see, her hair is already pretty long, but what she's lacking is a volume and density, and i thought putting in a singular weft, along with a few eye. Links for volume and fullness around the front was the perfect option for this particular model. So what you're going to want to do first is of course color matcher, so i decided to use donabella's 22 inch hybrid weft in color 60, and then i also got some eye links in color 60 as well, and now i'm gon na go and show you How i sectioned her for this super simple, but impactful install that you'll see at the end of this tutorial, so for her sectioning, i decided to go in with a horseshoe shaped section that starts a slightly below the temple area, but a few inches above the occipital And then i secured that with my donabella clips and here what you see me using are these hair grippers. So these are a must-have to have in your arsenal to keep all the baby flyaways at bay. So you can hit work with nice, clean sections, especially important when doing hair extensions. Some tools that you'll need, of course, are your donabella hair swatch, your hair grippers, as well as some pin curl clips a boar, bristle brush needle thread additional clips. Your quick pick loop tool lux tool, some beads and your stork shears. You can find all of these tools on donabellahair.com now before you get ready to do her, install you're going to want to customize the hairline, but a good indicator for your starting point is about two to three fingers length away from the hairline or you can also Use the edge of your comb and wrap the hair around it and if you can see the edge of your comb through the hair, it's probably a little too shallow. So you got to take a little bit of a thicker section now for this entire section, i'm going to install silicone beads now. The reason why we're using silicone beads is because it is providing a little bit of cushion, because this is the only thing that's going to live inside of the silicone bead is your client's natural hair, so you want to protect it, so the silicone bead, essentially, is The best type of bead to use for a weft install you're simply going to use your quick pick and put these right next to each other for support when you start sewing your weft in so basically the way you use this is use. Your quick pick select your section. It shouldn't be any wider or deeper than your bead and then you're going to use your loop tool kit to loop through your bead and then use your lux tool to squeeze the center and each side of the bead. For a nice secure, fit a little added tip is to use a bead that matches your clients natural hair, the best. So these are actually medium brown, silicone beads from donna bella hair. I suggest having an array of different color of beads, because, honestly, you never know which one you're going to use and a lot of times. We think that we're going to use blonde beads for our blonde clients, but, as you can see my blonde client here, she has pretty deep roots. So the medium brown was a perfect fit for her. Another added tip is when installing your beads make sure that your luxe tool is laying nice and flat against the head before you clamp down. What this is going to do is ensure that you have a nice comfortable but also snug fit that's not too close and allows you enough room to get needle and thread through when you get ready to install your weft you're, also going to want to make sure That each of your beads lines up next to each other. So that way you have a really clean and organized install. Just remember when you have really clean sections and a clean beaded row, there's no doubt that your install is going to go seamless because you're going to know exactly where each of the beads lie. Now i'm getting ready to measure out her first weft. So i just line it up from the first bead all the way to the last bead and i'm actually going to be using four individual, hybrid wefts right on top of each other, and i personally like cutting them individually and then lining them up. It'S honestly, a personal preference. Some people like to just fold them over, but for ultimate control. I personally like cutting them and then lining them up. I decided to use four of these hybrid wefts and, as you can see, they are as light as hand tied, but what makes them so much better is that you can cut them without the fear of them unraveling, because they are machine, sewn and because they're considered That hybrid they're actually really light at the base, so using four of these was not thick whatsoever and it was actually the amount of density that the client was really trying to achieve. So once i got each of those four pieces cut, i then laid them out on the table and secured them with these pin curl clips, and then i went through and lined them up right along the beaded row that i just installed. If you want to check out another hair tutorial on hybrid weft installation for volume and for length, make sure to tap the link in the description or right above here, just make sure to take your time as you start to position this hybrid weft, because this is Exactly where it's going to live for the next six to eight weeks before she comes in so definitely take your time for her thread, i decided to use the color that closest matched her extensions and usually a good rule of thumb, is to use the color of Your client's natural hair, but i just felt that they were going to be a little too visible for her extension. So i went with a blonde instead and a general rule of thumb is, i personally measure out six times the width of my hybrid weft and that's how i know how long to cut my thread now to get it started. You'Re, just simply going to take the thread and loop it through your needle and just tie a few knots to make sure that it's nice and secure and what i'm going to share with you is a really great beginner's way, but also it's a great way period To get your hybrid weft install started so just simply start two beads back and then pull your thread all the way through and just simply tie two to three knots. You'Re gon na wan na make sure that they're, nice and snug and secure and tying a knot, is gon na ensure that the thread is not gon na unravel and it's not gon na go anywhere, and what i like about tying those three knots is that i Can cut that string, pretty darn close without the fear of it unraveling now, once you have your thread, secure you're, now going to work your way towards the outer edge. Just remember that the outer edges are probably the most important parts of your weft install. This is where it's beginning and ending, and you don't want it to unravel - and you also want it to feel nice and secure throughout that six to eight weeks that she's gon na wear this hybrid weft in her hair. So i'm gon na loop, my needle and thread on the left side of that second bead and then i'm going to continue on to the outer edges looping once on each side of the bead. Keep in mind that on these outer edges, however, you are going to loop, the needle and thread a total of two times on each side of this bead and again, that's because you want it to be nice and secure, keep in mind that you're going to want To triple stitch the very first bead and your very last bead on this row, this bead has the most wear and tear over time, and this is where you're gon na find that most extensions start to lift or unravel. So it's super important to thoroughly tie the weft onto the first and last bead and make sure that it lays nice and flat so ensuring that the extension lays flat as possible is key for a lasting installation. So i'm going to continue on stitching until i get through the entire weft. Now you can see that i'm making this sew in really simple by doing a cross stitch by taking my c curved needle and instantly creating a loop and ensuring that i'm making each stitch nice and snug, and also asking my client periodically if she's comfortable. Usually, if something's not quite right, your client can instantly feel it. So this is a great time to continuously ask her how it's feeling and if you need to do any readjustments, an added tip when sewing is to make sure that you are sewing on the right and on the left side of each bead. You'Re. Never going to want to sew right on top of the bead, and the reason for this is because your reinstall, when she comes back in eight weeks, is going to be very simple. So the best part about this installation type is that the reinstall literally goes by. So fast, all you have to do is find the extension bead and clamp it with your lux tool and then slide the bead all the way up and then once you have re-tightened all of the beads in your row, you are done so. This is exactly why you don't want to sew right on top of the bead number one. Is you don't want the thread in your way and number two when you go to re-tighten your bead now you have a loose thread so make sure that you're always sewing on the right and on the left, and a good indicator is to always make sure you're Using your hands to feel exactly where that bead is at so in this tutorial, you can see how my hands are always laying on top of the weft. That'S because i'm feeling for where exactly that bead is plus, you can get a visual feel for where the bead is at by just simply looking right on top of your weft. So now i'm right at the very edge of my weft and i wanted to slow this down a little bit. So you can see exactly what i'm doing so when we got it started. We started two beads in and then worked to the outer corner and then worked back in, but when you're finishing your weft install you're going to want to ensure that you're looping twice on each side of the bead, starting with the second to last bead. So that's what i'm doing here! I'M sewing two times on the left and then i'm going to sew two times on the right and then again on that very last bead remember the edge is all about making sure that it's nice and secure and laying really flat. So once i get those two loops on each side of my bead, i actually start to move back in, because i want to finish on that second bead. Instead of the last, this is just going to ensure that it's going to be nice and secure and a lasting install for that six to eight weeks and once i loop it through the second to last bead. Now i'm going to create three knots. So i'm simply going to take that needle and loop it through the thread in the same spot three times really really close and simply pull all the way up, creating a very secure knot, pretty close to that weft and now i can go through and cut the Thread pretty close without it worrying that it's going to unravel once i'm all done with my install, i take my boar bristle brush and i simply brush the weft just to make sure that it's nice and detangled, and it's ready for me to continue on with the Rest of her installation now, as you can see, my model is lacking just a little bit of fullness around that face frame and we felt that the eye links were going to be the best solution to help complement what she had with the added volume from the Weft, so i know she parts her hair, naturally down the center, and i decided to come down right around the parietal ridge, but also about three fingers deep. So still using the end of my tail comb to ensure that we have enough hair right there at the hairline and then i'm just gon na simply clip that away. So i know exactly where i can start so that way, we don't see the point of origin of where these eye links are going to be installed. So using my quick pick on my pinky finger, i'm just going to go ahead and select a section. That'S no wider than the bead and no deeper than the actual eye link tip itself. So i insert my bead with my loop tool and then simply insert the eye link and then i slide the bead right on to the tip of the eye link. You don't want the tip of the eye link to be poking out, because this is going to actually irritate your client's scalp. An added tip is make sure that your luxe tool is nice and flat against the head before you clamp down the bead. So, as you can see, these types of extensions are installed strand by strand which allows for 360 degrees of natural hair movement, and this allows for the ultimate customization. So we just wanted to add in just a little pop of fullness here. The beauty of the eye links is, you can add as much or as little as you want. So i we just felt that six was plenty for what we were wanting and you can see that it will blend in really beautifully and give her the fullness that she was looking for right there at the hairline. Now i'm completely done with this install. So i'm just gon na finish trimming her hair up. I actually kept this trim really really simple, but just some added tips for you. If your first time cutting extensions is have your client stand up before you cut. This is especially important when you're doing really long, hair extensions such as these 22-inch donabella hair extensions. So i like to add a little bit of texture towards the ends and then finish up her face frame, starting at the point where her shortest hair is at. Just to complement the cuts she already had and then further point cut those edges for added texture. I also finish up all of my models with a style, because what good are hair extensions unless you can curl them and have beautiful, mermaid hair. So here i'm just using a one inch, curling iron and focusing on those mids to curl. It'S super trendy right now to leave the ends out to give that really beachy lived-in look and then i like to use a shine spray or a texture spray to finger comb out her curls, and this is the perfect time for you to remind your clients about How to care for their extensions at home, how to sleep with them at night and when you're going to book your next appointment to see her back in for her reinstall and here's. The final result of this customized weft install with some eye links using all donna, bella hair. So, just to give you a little recap, i went in with donna bella hair hybrid weft 22 inch in color 60 with a deep use shaped section throughout the back and then for added fullness around the face frame. I decided to customize it by adding in some donabella eye links 22 inch in color 60.. I finished her off with a little trim and some shaping just to bring it all together and then for her style. I went in with a 1 inch curling iron for these really gorgeous beach waves. So i really hope you enjoyed this hair tutorial and if you did, please give this video a thumbs up and make sure to subscribe and comment down below what your favorite part of this entire tutorial was and i'll be sure to respond. You can also find me on my other social channels like instagram, facebook and tick tock, all under mirella minnelli. And if you like, content like this, but you want it, delivered right to your inbox, make sure to get onto my email list on morellaminelli.com and finally be sure to check out my other hair tutorials right here on this channel, and i will see you next time.

Comments
Beautiful Dreamer: I love that you explain it well and show the full steps.
Madam Chloe: Absolutely gorgeous
Lisa Parsons: Do you have a video of a reinstall? I always seen people remove the weft completely then move beads up then reinstall weft and resew.