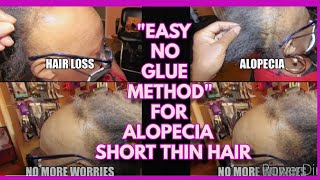
Diy Full Sew In With Closure For Thin Edges/Hair| No Leave Out |Mistakes+ How To Fix
- Posted on 24 October, 2021
- Sew-In Hair Extensions
- By Anonymous
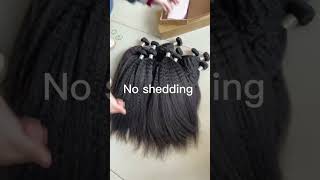
Thank you for watching how I do a full sew in with closure on my fine hair/thin edges. This hair is from my favorite hair company- INDIQUE HAIR. It’s absolutely GORGEOUS! I was so excited to install.
Full review here:
This was my first using a closure. The final look came out beautiful but I made tons of mistakes throughout the process. I shared my mistakes and ways to avoid or fix them. I hope this video is helpful!
To enter the giveaway to win personalized tumbler from CupsCouture (https://www.etsy.com/shop/CupsCouture?...):
Subscribe to my channel
Comment on this video below
Follow @CupsCouture on IG
Follow my IG @ChakaVanessaD
Comment on my picture with this style on my IG
Winner will be announced on my IG Page (@ChakaVanessaD) on November 7, 2021.
Below are all the items I used to achieve this look:
Braiding Hair
https://www.amazon.com/Pre-Stretched-B...
Hair Weave Needle and Thread
https://www.amazon.com/Weaving-Threade...
Mesh Dome Style Wig Cap by Qfitt 5011 Black https://www.amazon.com/dp/B01GR1ZH5S/r...
Indique Virgin Hair Extensions- (3) 20” Pure Wavy Bundles
https://www.indiquehair.com/products/p...
I used all 3 bundles
SEA TAHITIAN WAVE CLOSURE 4X4 - 18”
https://www.indiquehair.com/products/s...
THANK YOU FOR WATCHING! Like, comment and SUBSCRIBE!
IG: @ChakaVanessaD
https://www.instagram.com/chakavanessa...
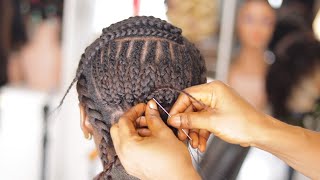
And welcome to my channel in this video, i'm going to be showing you guys how i did this full sew-in with a closure. This is my first time doing a closure and it was a way harder than i thought. I made lots of mistakes. So if you want to see my mistakes and how i fix them, keep watching so i started off by bleaching my knots. I used some powder bleach and some developer. I just made sure it was nice and thick and put that on the back of my closure. I left it on for about 15 minutes and i just shampooed and conditioned it. I am about to figure out how to do this closure. I hope it looks good. I got hair from my favorite company. I got some new bundles. They are gore jess. This hair is beautiful. This hair is from indeed it's 20 inches, it's their pure line and it's gorgeous. So i don't really know what i'm doing, but i'm excited because i can. I just feel like it's gon na give and the last couple styles that i did y'all. I used this hair once before and i did like cornrows at the top and then like kind of like the half braids in the bundles. In the back that one was ugly, i had to take it out and fix it and do something else. So i filmed it, it was ugly, i don't think i'm gon na upload it because i didn't like the style comment below. If you want to see the video of how i did this style. I didn't like it on me, but it might work for someone else, but i did make it work, but i didn't film how i fixed it so i mean i know these bundles are going to be beautiful because i already wore them. I have just never done a closure, but i'm i'm i'm hyped because i just i have the energies today and i'm manifesting a beautiful style. This is what i got so far. I'M gon na go ahead and do i'm doing a middle part, so i'm gon na go ahead and do these braids on this side, um and then just braid it straight back and i'll be back to show you my braid pattern. I'M excited y'all. This is my braid pattern. I got two anchor braids with braiding hair, two regular braids, a braid going this way and they are all connected in the back with this one braid we're gon na see. So this is my beautiful closure. It'S a 4x4 wavy closure, i'm gon na do a middle part. I bleached the nuts. I never did this before i'm a little nervous. I think it's gon na look good. I'M just gon na try to like lay that there um i'm gon na put like a little makeup on here. I don't know. I see people do that. I also got my dome cap and it's nude because i didn't know if i was gon na put this on and then put this over. I don't think i am because i feel like it's just going to slip back now. I'M clipping the closure to the dome cap, i'm going to trace out where i want to sew around and cut the piece out, i'm just using some liquid lipstick because i couldn't find anything else um. So i'm just tracing around the closure. I'M gon na sew like normal and then i'm gon na clip around the dome cap and where the leave out goes, i'm doing another giveaway y'all. If you want to be entered to win a personalized tumblr from a company called cups couture on etsy, all you have to do is be subscribed to my channel. Follow me on instagram comment below on this video and comment below on the picture on my instagram. So good luck, i'll be giving away three. This cup is beautiful and i can't wait to see you once what i did here. Don'T do this. I started sewing from the front as if i was doing like a sew-in, but i really should have started from the middle of this closure and then sewed from the back to the front because sewing from the front to the back kind of pulled the closure back And it ended up being too far back, so you will see how i fix it, but when you were doing your closure start from the middle start from the back and then sew up to the front. I know that's a little confusing, but keep watching and you'll see how i fixed it here. I'M just parting like behind the closure and sewing into that first anchor braid. This was my attempt to not have it go back, but i already messed up. It was already too far back so i did that on both sides and now i'm just starting to sew in the bundles. In the back. I have a video on how i do my um, my full sew in go ahead and watch that it'll make a lot more sense. If you see that video so now, i'm about to do you know my half to cover my edges situation, so i'm taking the second bundle and i'm gon na lay this right under this braid right here. I'M gon na use this clip to hold it. So it doesn't slide slide around gucci, slides, yeah, i'm gon na use that clip to hold it i'm using another clip to hold it. I'M gon na take this back um and i'm gon na sew it across i'm gon na fold it over and sew it right. There then, once i've finished showing this down, i'm gon na go ahead on this side and do the same thing and just keep going back and forth. Until i close this up up in the closure, then we go we're gon na figure. We'Re gon na figure. This out, um, i'm not gon na lie. I am a little anxious about this, but i'm trusting i'm trusting the process. I am trusting the price. I i think i think i got it. Okay, i'm almost done. This is how much i have left this dome cap is actually cool, because it's easy to see. You know where i need to fill in. So i'm gon na take this next piece and i'm just gon na lay this. I'M gon na lay her right there. I'M still going this way so that the hair is going towards my face and then i'm just going and now it's creating like a little triangle, shape i'm gon na just bring it. If you have fine hair and thin edges like, i do definitely go back and watch my full sewing video. It'S really really detailed and it'll. We all this will make so much more sense. Once you watch that video and after this one we're just gon na close that joint up and hopefully hopefully, we will figure out what to do with this um, because this hair is gorgeous, it is so stinking soft and beautiful. I didn't even color it. Oh, i would be so sad if i can't figure this part out, because the hair is gorgeous and i've really been taking my time and sewing this thing down. So i'm nervous. So my joint is sewed up. Okay and we are sewed up so down to the ground. Now i'm on pray with me brother, i don't know, i don't have a hot comb. So that's a thing um. I could get one, but i don't know all right. So here we go. What are we gon na do? This is up here up here everything looks save the elastic band that you cut off of the dome cap. It will come in handy when it's time to melt down your laces, so i'm gon na take some of this and i'm gon na put it on on youtube. That'S right holiday! Oh, i think i was supposed to move my hair back first. It doesn't look good. So here is when i started to lose confidence a bit, but i figured i'm gon na keep going and try to finesse. It you'll see what i did. It did not work. It was just way too far back, but everything else pretty much worked so biggest mistake and biggest lesson in doing this is to make sure i start with the closure way further up like as you sew in your bundles, your hair is going to start to just Slide back and it's just going to pull back it's getting tighter. That is what happened here. I ended up starting all over. I just put water on that closure and loosened it up and tried to pull it as far up as possible. Here we go. I'M scared as a merge i'm taking this off. It feels tight as hell. So at this point i figured out how to melt the lace and make that look good, but it still was too far so i took the whole. So i took my closure out off out and i just sewed another track here around here, because it was just back way too far, so i'm going to attempt to start it up closer okay y'all. So you can see. I have learned from my mistakes and i'm determined to get this right, so i'm starting to sew from the back to the front and i'm gon na do each side, i'm not going all the way around. I'M coming back and doing the same thing. On the other side and kind of sewing over that track this time, instead of sewing the tracks around the closure, i'm just trying to make sure that it's nice and flat. I do the same thing. I did the first time with parting behind the closure and just securing that to the anchor braids. I also think it helped to sew the closure on last instead of starting with the closure, because, again once you are sewing down your bundles, your hair um is gon na just start to pull a little tighter and so you're, just naturally gon na pull that closure Back further than you want it, so maybe, instead of doing the closure first, do it when you're closer to the end, you can see already that that closure, at the top at the front, is way closer. This time, almost like a little bang on my forehead um. That was key. So now, as i have that elastic band, i'm just curling my hair and i just take it off - and you know comb it out and make sure it's not all crunchy and so much better. I can work with this. I can actually work with this now. I'M just clipping the lace from the front and adding a little bit more that gots to be glued hair gel on the lace and just pushing down the hair in the front, so it kind of covers the lace. What box um? What box i'm happy! I am happy with so this is it i figured this out. I really thought it was gon na be a fail. It was super difficult. It took me hours, but hopefully y'all will learn from us. My mistakes. Thank you so so much for watching. If you try this closure, if you try this hair, let me know it's absolutely gorgeous all the details for this hair will be in the description box below. Thank you again for watching this video be sure to like comment and subscribe and check out some of my other videos right here. I will see you in the next one.

Comments
Laporshajanelle: You did that!!! I love how you show every step ( even bloopers ) Keep up the good content ! )
Kiera Jones: It looks soo good ! I’ve tried to do my own sew in but I have a widow’s peak and I never figured out how to work around it with a closure
Natassia Wright: You did well for your first try. Soon you will perfect it. Love your videos!
Krissy James: I LOVE THISS. TY! Can you also show how you did the braided sew in style?
Lamisha Forever: Love it!!!! You did that.
Cheryl Clarke: Beautiful and brilliant!
Brittany Torrence: How long do you wear your sew ins? Also, does it start to stink if you workout? Thank you in advance!
Marketa Allen: Awesome job!
Demira Muhundrew: It ended up looking soooo good
Brandy Herman: You do a very good job but I do not like when people put make up on their closures. It’s so obvious and it looks so dirty to me