Wig Makeover | How To Balayage | Amazon Wig Update | Youmily Hair
- Posted on 16 March, 2018
- Sew-In Hair Extensions
- By Anonymous
Hey there GlamFam! Here is the Link to this wig: http://amzn.to/2FRgXJY
7% DISCOUNT CODE: GlamFam8
So, if you are like Alison, you can get a little bored form time to time with stock wigs. Sure, they can be quality wigs, but sometimes you just need a change, you just need something to compliment you a bit better!
Well, in this video, I'm showing you how to do Balayage on a wig from Amazon by Youmily hair. It is a great quality wig, and it colored well!
Balayage is basically a haircolor technique that involves hand painting on lightener to soften the tones of the hair, often used to create ombre type looks, which are very popular and all the rage right now!
Here are the tools I used in this video:
Canvas wig block: http://amzn.to/2tRliYM
Mannequin head stand: http://amzn.to/2HzoZEr
Schwartzkopf Blondeme Lightener: http://amzn.to/2FC1xtH
Schwartzkopf Developer (30): http://amzn.to/2FDiUun
Color Track balayage/highlighting paddle: http://amzn.to/2FM0xPT
Color Track Foils: http://amzn.to/2FK7FMs
Viral Colorwash in Silver: http://amzn.to/2FKppra
Ion leave in conditioner: http://amzn.to/2tNt9Xn
Speed Freak blowdryer: http://amzn.to/2tOskxA
Round brush: http://amzn.to/2FIr40n
Did you miss the first review video for this Youmily wig from Amazon? If so, you can watch that here: https://youtu.be/pZ6hYJn_KZY
As always, thank you so much for watching GlamFam! I hope you learned something! Take care, God bless, and you know I love you boo!
Linwood
*This description box contains affiliate links, which means, if you make a purchase after clicking, I get a small commission for referring you to that marketplace. All opinions in this video are my own, and I was not paid to speak well of any brand featured. Thank you for your continued support!*
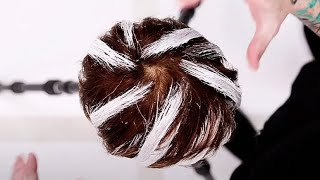
Hey clamp, em Linwood here and today I'm going to be showing you guys how you can take your plain wig and revamp it and make it into something a bit nicer. So I'm going to be showing you guys a technique called balayage. Now balayage is a colouring technique that I use quite frequently in the salon. It'S literally hair painting, so I'm going to be using a bit of Lightner, which I'll be using schwarz cops blonde me Lightner for this tutorial I'll be using their developer and 30 volume as well. For those of you who don't know the higher. The number is on that the more lift you can get. So with that specific brand, it goes from 10 volume, all the way up to 40 volume and other brands. You can go everywhere from 5 volume, all the way up to 80 or 90 volume, which I really don't recommend non-experienced people without protective measures and all that using anything near that high, because professional quality products just work better and more efficiently than most of those. Now the width that we'll be doing this on its from you Millie Allyson, has one and done a review on it before she absolutely loves this wig for the breathability. The fact that the hairline already came less tint and pre tweeze and the quality of the hair was amazing, so she felt like it was a great summer wig just because of the breathability of the wig. So, of course I was like you know what let me go ahead and revamp this, because if you've ever purchased a stock wig like this, you know that they come in this plain hair color and you kind of get tired of having that same. Look with it! That being said, I'm going to go ahead and do a bit of brightening in here. So I'm going to show you guys my technique for balayage as well as how to get that color pop right around the face. It'S really popular right now, Bobby I'll, just kind of gives you a nice softness to the look of your color that you see really trending with celebrities and things, so I will be using a balayage paddle which they make these from several brands. The one I have is from color track, primarily because they have a nice quality but they're, affordable in terms of professional supplies and for the front portion I'll be using a little bit of foil which we'll get into momentarily. So let me go ahead and get this all mixed up and then I'll show you what the scoop is. All right, clamp, em. So I've moved it a bit closer. Just a little. That way, you guys could kind of clearly see what is going on with this wig and you guys can see. While it is a nice wig, it's a little on the plain side, so I am going to go ahead and start off just by kind of creating a pop around the face. So what I want to do is pull this hair up and back, and this is a wig without any baby here by the way, of course, you know you can always cut it into there if you want, but I'm kind of not really on a baby hair. Kick at the moment, I feel like it's a little played out so yeah and from some of my other videos it seems to me you feel that same way, so I'm gon na go ahead and pin this excess hair out of the way and this small portion Of hair here I'm going to create a pop of lighter color, so this is just right around the face everything else I want to stay out of that. So what I'm gon na do, because I want to give a certain look to the hair everywhere. Is I'm going to still use my balayage board, but I'm not going to do it in the same manner that I will everywhere on the head. So I'm gon na start off by taking my Bali Oz board, I'm going to place my foil onto it. Likes foam because here I'm actually going to be using the foil from there. I can go ahead and take it right on underneath that section or panel of hair, which I really want to get it nice and close like so, and then from there. I'M going to basically take it and apply a bit of Lightner on they're, not that initial bit of Leitner's just to stick it to the board so from there. I can go ahead and take it and I would recommend, especially if you're, not professional, that you do wear gloves for this process, because it can be very messy. In my instance, I do this literally every day for work, so yeah now for those who are wondering, no, I'm not being sponsored by this video to use like sports, cops, lighten or anything like that. I actually saw it trending all over social media, and I was like what's the big deal with this Lightner, so I went ahead and did a bit of research and basically the thing that is nice about it is it has bond reformers built in so you can Still use things like all the places, but it's not 100 % necessary and basically, what the bond reformers will do is they help out with kind of softening the degree of damage is able to be done by the lightener, because, no matter what every Lightner is in Some way really damaging to the hair, so you want to ensure that you're doing as much as possible to kind of condition and care for that hair like it should be. So I'm gon na go ahead and slide that baby right on out of there, and instead of trying to fold my foil up, I'm just gon na take another foil and place it directly over the top. Now these foils are also made by color track. Again. That'S not sponsored it's just something where this is literally the stuff I use in the salon. I just feel like you know, if it works for me for client use. It definitely works for me for the videos - and I just don't see the sense in trying to use a million different products and have the old feeling, like they've, got to buy a billion different things. I literally use the stuff that I already have so now that I've done that let's go ahead and get into the actual balayage portion. So what I'm gon na do is I'm just gon na lightly separate out from this crown area on and basically what I want to do is I want to basically pull everything up out of the way and then I can focus on this mid to lower portion. Now that underneath segments I want to leave darker, because I want it to have more of that - a softened look towards the top, so I'm gon na start off a little bit lighter with the balayage here and then I'll gradually make it heavier now. The reason why I followed this front piece is because you want it to stay as moist as possible, and that way it helps out with just ensuring that you have maximum lift there. The foil doesn't do anything special. It just helps to incubate that color. So it doesn't dry out and the more moist is stays the better and more consistently it's going to lift now and throughout the rest of the head. I'M going to go ahead and section off this here and I'm just going to go ahead. I want to make sure I'm picking sections no bigger than my two fingers can spread apart. So basically, what I'm gon na do is pick up that section which actually, let's, let's start closer to the face, so we're gon na pick up a section of hair. I'M gon na go ahead and separate out I'll. Do it this hands, you guys and see, I'm going to separate out and we're going to do a section about like that there? Okay! So once I've got that small section of hair picked up, I am then going to go ahead and place. My balayage board right on underneath here this is a bit higher than I'm typically working out, but I want to ensure that you guys are able to see easily what's going on now. What I'm going to do is I'm going to place my board there and I'm going to just place it pretty pretty heavily right around the bottoms. So basically, what I'm doing that V section for is because I want to concentrate my color pretty heavily towards the bottom of the V, but at the top part, I'm just going to go right around the outsides and you're gon na feather up at the top right Around the outside isn't feather up at the top, and basically, what that does. It helps to soften the look of that and I'm just gon na go ahead and do a quite a bit of feathering notice. My brush is not straight. My brush is angled because I want to gradually move on up now from there. I can go ahead and take it place again, and I want to insure it, especially towards those ends. I'M getting a nice saturation on the hair from there. I'M gon na go ahead and let that fall notice. I don't have that in a foil. I don't want to do incubate. I really want to leave that hair out like so, and that way is going to allow it to lighten up, but not too much, because the hair is able to dry out, unlike the hair in the foil. So this will allow me to give a certain softness and look to this hair without having to worry about a ton of extra to do through the process. So again, this time I'll show you some without the paddle I'm just going to go ahead and paint on the outside of the bean. We'Re gon na go ahead and paint a bit more heavier in there, and once I get that kind of outline laid out, I can then underneath there with my board and I'm going to place it a bit more heavily towards the bottom portion. So I don't have to focus a ton of energy and effort on those proportions, because I want it to gradually fade down the main area. I want to make sure it's saturated. Is these ends? Because that's where I want the effect to be the strongest? I want it to go from darker and gradually fade down to lighter at the end, so you guys and see how quickly I'm working with that it's important when you guys are using professional products that you are using it in a very quick manner. So you guys noticed like the way that I'm able to talk and work at the same time. You really want to be able to do the same thing as you are doing here. If you have difficulty with that, I suggest that you don't talk or that you get a bit more practice in in terms of being able to speak and work, because it's not something that many stylists are good at and when we're doing color yeah something you have To be good at you, don't really have the choice. I will say anytime that you are lightening weave or wigs, make sure that you are doing a test strand somewhere on the wig, because certain certain brands of hair and things like that will have chemical treatments. They'Ve put on the hair and some manner that will cause it to get excessively hot or lift quite a bit faster, and you want to ensure that that's not happening, because if it gets really hot, it stands a chance of all reprocessing which is yet another. One of the reasons why I opted to use this light nerve versus another Lightner is because I want to ensure that I'm doing optimum conditioning throughout the process just to make sure that we're not over processing the hair, and I use olaplex. But I don't have it in this formulation because is that the shop right now I didn't want to risk forgetting to take it back to work. It is too important of a product, and I literally have like four of these containers of lightener. So I don't have to worry about taking that one back. Society have other ones a half a salon. I use a lot of it. So, of course, if you guys have any certain question special requests, things like that, make sure that you leave them in the comment box down below. Ultimately, I want to ensure that I'm sharing different things with you, so that way, you can make sure that, even if you buy a stock wig like this one, which honestly it was a great price, I'll put the links to it in the description box below. But if you get a stock wig like this one that you're able to customize it and make it look more unique and look a bit more you so once you've lightened up this, you can literally tone it with whatever type of colors that you like. So if you prefer a red instead of a blond, you know you can plays it with a red, no bear in mind. If you try to do something like a blue, you've got to lift it out, it's considerably lighter than I'll be doing it in this video. So you know just utilize all your senses when you make those type of decisions, because those decisions are irreversible and blue. You have to ensure, like let me take y'all back to the elementary school real, quick with, for some reason. No one ever thinks about this stuff. With hair color, hair color is like painting, the only difference is with painting are usually painting a white canvas with hair, color you're painting a canvas that already has existing pigments. So you want to keep those pigments in mind anytime, that you're doing hair color because they will impact your finished result. That being said, if you plan on doing blue and you haven't lifted that hair out extremely light, you have to bear in mind that if there's any yellow left in that hair, blue and yellow make green. So it will go green on you in a heartbeat. If you're, not careful and unfortunately a lot of people, just don't think about that when they're selecting their colors to do things like that, so when you're looking at it whenever you're lifting up the hair, is natural for the hair to have a certain degree of warmth To it, so this is going to go through like an orangey phase, then it'll get like a yellowy phase and with certain a certain light nurse they'll tone a bit for you, other ones, don't do as great a job of toning. This is another reason I prefer to use professional products. I know all the other youtubers out here are using like basic light and bw2. I personally do not care for those they use them, because they're available in Sally's and in their local beauty, supply stores. Things like that, but I honestly want stuff that I do to look like. I did it because I am a professional not trying to knock all these other youtubers, because if you know you do better when you know better and in my instance I've been a cosmetologist. Now, for eighteen years, if I don't know better, something is wrong, so you know not to try to discount or take anything away from them, because I think you guys should know by now. My goal and my mission on this channel is not to tear up other youtubers or tear down, I should say other youtubers. My goal is to ensure that we are providing quality information, good videos and just helping you out as much as possible with understanding some of the basics. Of course, if you want to know more in-depth stuff, I can do more in depth, but honestly, if you're that interested, you should probably look into getting in cosmetology school. You know just just so. I'M gon na go ahead and finish this and then I'll come back to you at the end and we'll go ahead and pick it up from there. Alright glam fam, so I'm completely finished with applying the lightener and let me go ahead and see if I can live just up to show you guys. I don't know if you can see the toned underneath there, but we already have a lot of light orangie tones lifting which is a great sign. It means this hair has not in fact been treated with color. I notice it's not getting super hot. We don't have any smoking anything like that going on and you guys noticed. I have gone a bit heavier around the face because I really want that area to pop on the unit I'm just really making it just have some bone. Now, if your nose, underneath the entire underneath section, is darker - and that is intentional - it helps to create depth and also adds more movement to the finished look of the style. Now, the goal of doing balayage is usually about giving a very soft feel. So this is something interesting people do for like balayage hombres, which an hombre is basically where you're fading from one down to another. You do see somewhere will do like color melts, and things like that, which, of course, I can do videos on all those. At some point, but right now I really want to go ahead and show you guys this technique. Now I will tell you when you watch it the first time it looks a lot easier than it is to do it. So please don't feel like you can. Just do it and slap it on there. You want to make sure that you're doing everything you can to lighten and blur those lines as you go up. Otherwise, you will have harsh starting point. It'S all about the concentration of your product, the amount of sweeping of your brush feathering that product up there's a lot of detail that goes into it and honestly, the hair, underneath majority of the times does not have color on it until you get down towards the Mid-Shaft and ends so this looks like a lot more Lightner than it actually is on there, and I think you guys will see that once I get it styled out and all that, so don't let this part freak you out now after I go ahead and allow This process, which I'm gon na, let it process for probably about 30 minutes or so just so you guys know you do want to check on about every five minutes whenever your lightening the hair, and then on top of that, you want to ensure that if you're Doing it you're, not professional, you really don't want to leave it on there longer than 45 to 50 minutes or so now, if you are licensed professional, you know what you're doing you take an extra protective measures. You can literally leave it on there for hours. I know the back of the container says something else, but let me give you the truth. I have left Lightner on people for upwards of four to five hours and still achieved lift without hair, breaking off hair still moving and flowing. It feels better after they leave and it did when they came in. You can absolutely do that with the right protective measures and the right education and skill set under your belt. The average viewer on youtube, though, is not going to have that. So please, whatever you're, seeing on YouTube, whether it's from my channel or other channels make sure you always err, err on the side of caution, rather than trying to do too much because you don't want to buy a unit. That'S like this, and even though this is an affordable unit, you don't want to spend your money on it to turn on teared up it's just not it's not really something I would suggest now it's show money, it's been how you want to so after I go Ahead and get this finished out, shampoo it with some viral color wash or silver hair. The reason why I'll be doing that is because I don't feel like mixing up another toner, and that way I can actually just ensure that I'm toning that hair. While I shampoo, it saves me a ton of time and then I'll go ahead and show you guys how I blow-dry style stay tuned, alright, glam fam, so I have finished with processing this wig. It has been shampooed and conditioned and the shrimp that I was telling you guys about that. I shampooed it with with my viral color, wash and silver. The thing that's nice about this: is it toned, while you shampoo, so it helps out with cutting some of those brassy tones. I don't have to go back with a separate toner Andry tone. Everything now I'm just gon na go ahead and pop this wig onto the mannequin head and we're just gon na pin it in place here and there, and I want to make sure it's pinned nice and secure because I'm going to blow dry styling it. And I don't want it to be something where I can order our styling and it comes a loose or anything like that. So I want to make sure that holds nice and secure and then I'm gon na place. One final one, that's just because I don't want that lace up here to lift so I'm gon na shoot just past that center portion, or that first whole portion of lace and pin there and basically what it's going to do is allow me to be able to Do a little bit more tucking, then typical and not have to worry about doing a ton of damage today. Here now I don't have any product and it's here presently it has been shampooed and conditioned. I went ahead and shampooed at first the color wash and then I followed up with the Sebastian drench, shampoo and conditioner. You don't have to use that it's a standard moisturizing, shampoo and conditioner, but I do really like it. It'S the launch wallet II, and now I am misting with just a little bit of leave-in. This one is from moisture because any time that you lighten the hair, I guarantee you've taken some degree of moisture out of the hair. The stickers don't come with it. Little people, so I'm gon na go ahead and work that, through there notice, I did not put a ton on there. I think one of the mistakes people make when they're working with commercial hair is that they are over saturating it with products, not realizing that this. Here is not the same texture as yours; it tends to be a bit less coarse, and so you want to ensure that you are giving it what it needs versus what your hair needs to thrive. Now I'm going to section off this hair in the back and I'm going to be blow-drying with a round brush you all right, Glen Pam, so I'm finished blow-drying, and this is how this color turns out. You guys can see how it just nicely goes from dark to light ur down, and I think that it turned out. Rather nice thing, you can see, look how much lighter. I ended up around the face where I had that foiled in vs on these ends, where it gives you more like a softer more of a deeper tone in there so anytime that you're wanting to get a bit more lift out of something you incubate it to Keep it moist and if you are wanting to get a bit more subdued, you want to go ahead and let it stay out to the air. So that's the key difference there. Everyone always asked me what the foils are for, but I just want you guys to see this hair is not catching. It still held up really well through the coloring process. The only product in here is to leave in spray that you guys saw me spray in there and the rest of this. Is it so yeah? Let me know what you guys think in the comment box down below and of course, until next time, I'll probably throw it on a house, and just so you guys can kind of see it on a live person. But until next time you guys take care. God bless, stay clam and you know I love you. Boo boo,

Comments
GlamFam Hair & Beauty: Here is the Link to this wig: http://amzn.to/2FRgXJY 7% DISCOUNT CODE: GlamFam8 So, if you are like Alison, you can get a little bored form time to time with stock wigs. Sure, they can be quality wigs, but sometimes you just need a change, you just need something to compliment you a bit better! What do you think of the finished results? How about the information? Was it too much information, just enough, or would you like more information? Linwood Love you boo!
Deborah Green: That color is giving me life!!! Linwood, as much as I enjoy the giggles, smiles and belly laughs I get from the silly you mode, I adore when you are in teaching mode (although I always learn from your videos) You are always so thorough, knowledgeable, professional and concise with your information and your work is stunning and beautiful. Alison looks amazing as always and I don't see why she doesn't just go ahead and change her part to the other side - she looks so extra cute that way! LOL! thank you guys so much for your time and for sharing. I truly love me some Glamfam! ❤
ToriZee: This turned out gorgeous!!!!!!!!! I love it!! I swear Alison putting on the wigs and feeling herself always gives me life!! Of course like usual it is gorgeous on her!!
Youmily Hair: Love this updated video!!! It turns out to be gorgeous, thank you so much Lin!!
Gwendolyn James: The professional advice I receive from the many videos I’ve watched makes me so grateful for the Glam Channel. And by the way my Silver hair also says thanks for the many moisturizing tips I continue to use.. Before the Glam Channel my hair was dry and brittle but now we are moist and happy
Sharing God: GIRL he did that!!! Looking Gorgeous as usual. GOD BLESS YOU AND YOUR FAMILY
Sinndy Morr: I absolutely love ALL your content! Great information, great explanation! The color is subtle and lovely. Thank You!
Mosha Gavin: I have watched this video sooooo many times.. the technique is just so bomb.. He is always on point and so informative... Love him and his beautiful family
Miss Kitty: Oh wow the end result was beautiful, Alison looks so lovely. The subtle soft colour is so pretty! Very classy and feminine. This is so interesting to watch. You give so much information and are a great teacher.. I have never worn a wig or had my hair dyed and had no idea what a Balayage was lol, yet I really enjoy watching you work because you explain it in such a way that complete novices can understand. What would be the best kind of clips to pin up long, thick, Caucasian hair? I try using those hair claws but I feel like I have so much hair it is hard to keep up when I am trying to condition my hair or when I am doing a scalp treatment.. It always falls down and is so bloody annoying.. Maybe I need bigger ones. Anyway great vid as usual, Linwood! You look great with your hair pulled back like that too :). Have a great evening!
Rowena Sanders: I said it before, I'll say it again!!! You are an excellent teacher and an awesome stylist!!! OMG!!! This was great! Allison looked BOMB!!!!!! Wow!!! Thank you!
Korica: You make me feel like I can do any hairstyle!!! Thank you!!!
Sweet Covergirl: this is such a pretty job Linwood and Alison you look very pretty I love it
Freddie Buckley: That wig is so pretty ♥️ the color & it looks bomb on Allison!
Donna Williams: Turned out Beautiful! I Love it!
Prisla Em: When I saw the title I thought "is this some kind of belly dancing?" You learn something new everyday! You did an amazing job with this unit! Allison, yes you killed it!
Fay Samuel: This really turned our great! You have blessed hands! Blessings hun x
Latonia Bradford: Beautiful Alison...... Great job Linwood. Loved the pre tweezers and breather cap. way to go!!!!!!!!!!!!!!!!!!!!! yeah, you took that plain and BAM!!!!!!!!!!!!!!!
Isabel S.: Great tutorial! I’m going to try it tonight on an old wig to practice, wish me luck
Shamonia Johnson: Beautiful work, you are truly working that hair Allison!!!!
Sincere Presence: Omgoodness!! You just turned that wig into a 1B/30/27 short body wave. I just was shaking my head with hand over my eyes. You are a gift from God! So often I look for (smh) that type of blend and it's out of stock or don't come in it. Omg smh
Crafting with Angie: No matter what you do Linwood, you can color or shape any wig beautifully. Alison looks stunning and the hint of color around her face really compliments her gorgeous features. Well done my friend and congrats on 131k. :)
Micheal Williamson: That looks amazing, I love watching your videos, they always bring a smile to my face You have a lovely family. If I lived in the US I would be visiting your salon to get my hair done regularly, I live in the UK , London . I have only been natural for two years now, I like watching to go tips and ideas. Wishing you all a happy Sunday
Jaymin: GM fam, this is stunning!!! You always give me great info. Have a blessed day.
Denise Noles: The result is stunning!
Renee Roberts: WOW... What difference the lightener made!!! It’s BEAUTIFUL!!
Mary Saunders: Nice video I love the color and i am love the way the unit looks after the color and the styling. Alison looks very good in the unit.
Nickie Rasberry: Looks nice. Thank you for the info ❤❤
lynn simmons: Good jobit looks beautiful and it look amazing on on Alison.
Kymberlie Montreal: Thank you so much for quality info to help me do better hair for myself
Kymberlie Montreal: Thank you so much for quality info to help me do better hair!
Do U C What I C: That is Nice! If I was Alison I'd be like I'm wearing this everyday!
Latrice Byrd: What can I say, you do hair. Looks good, and I know Ms. Allison will look great in it.
Princessa G: Wow! Great transformation!
Jomi Bleau: I can watch you do these wigs all day...
Kersha Beaver: He always gives good education advice . Very good job as always
Natalia Rose: always slaying love ur channel ❤️
Jeeyaz: Linwood is the Bob Ross of balayage.
Cheryl Moore: That’s beautiful . Not something that I have the skills to try. But it gives me great ideas to bring to someone qualified.
Sharon Browne: Absolutely beautiful.
Regina Jackson: Beautiful wig makeover!
Ruth Hayles: I clicked on this because I want to see more Alison videos. Linwood, your the best an all, but I like to hear your beautiful wife sometimes.
Bethlatee Washington: That is beautiful love it
Sherry E.: Very nice tutorial! I looked at the link for the wig and it says synthetic-- I thought synthetic hair could't be colored.
Rhonda Friday: Hi Linwood. I'm enjoying the videos. Can you do one on using a filler when doing a re-color?
Vernice Aikens: OH I LOVE THAT WIG THAT IS THE LENGTH I LOVE I LOVE THE HIGHS YOU DID.. HOW CAN I GET A WIG LIKE THAT... YOU ARE GREAT.. I LOVE WATCHING YOU.. LOVE AND BLESSING TO YOU AND YOUR FAMILY
Allmebaby73: It looks great on Allison!!!
LisaMarie: Thank you Mr Linwood! Looks great on Allison.
Sunlight Shore: Looks so good on Alison. Good job.
Just Steffi: Hi Linwood! I have natural hair and I would like to wear straight hair wigs. But every time I do my natural baby hairs peek through and won't blend. How can I fix this? Preferably with out straightening my edges (don't want to ruin them). Thanks for any advice you can offer!
Yvette A: OMGOSHHHHHH!! So so gorgeous!
P P: Back 3 years later to color my hair again!!
vamp357: Beautiful as always.
Midnite Love: Turned out gorgeous. Tell Allison to leave that part alone lolol!!!
Monsie Babe: I love this look but I don't want to damage my hair can you do this with just developer and will it damage my expensive unit
Roxxanne Roberts: Don't wear wigs but been very tempted love how it came out my son wants me to die his ends but not sure he's only 14 any suggestions for me Glamfam
Dr. Leah Jackobson: GlamFam 1. Hey Linwood, I love that you encourage (and answer--[some ppl don't yet want you to fill up the comment section] ; < | ) your audience's questions--Anyway, I learned from watching (your videos), that there is no general blonde; it's complexion specific. 2. Would 80-90 be a platinum blonde/what would be? 3. Can you PLEASE do a demonstration, on a small piece of human hair, showing the correct lift on someone your complexion, then another piece lifted to platinum? Finally, if it's okay with Allison, can you show us why it's important to follow this rule using Allison as the model? TY
~Daphne Amy's World~!: Oh la la Alison yes I love the color on you very nice❤
Jocelyn Pitts: Great tips
Rita Malone: Omg that is awesome
SmileAlways ♥️ Natasha: Very nice results
Evelyn Wallce: Beautiful
larla03: new word for me. I like the color.
Latrice Byrd: Even the little people added their touch in this video.
Esther Sowell: Good grief you are awesome
LINDA SMITH: Thanks
Kerstin Davis: That's cute! I have a big head. I've been trying on wigs and they just don't look right on me. Do they have wigs for us big headed people.
sariah Barker: greetings every1 and omg love that wig
samantha lowery: Lin be on it ....so talented
Do U C What I C: I know I know! GREEN!
Wigaholic #SharingisCaring: I’ve seem other videos and they say to tease it before applying is that not necessary? Also if you are starting with a black and you want a medium ash brown with platinum bayalage what do you suggest for how to achieve it?
Alise Wilson: WOW that's my kind color nice
Venita H Litty: ♨️❤❤
Michael Rhodes: Alison and you are ready good
Carmen Bailey:
Fortune Cookie: He's a good hairdresser, but I feel like he do hair for mommoms tho, people my age like lime green, lavender, hot pink and turquoise hair colors
debra broussard_bell: Nices
Bella millz: Handsome...I'm sorry
Sunlight Shore: 2nd