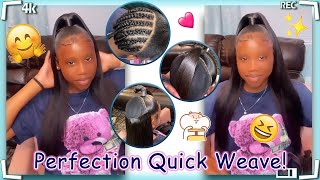
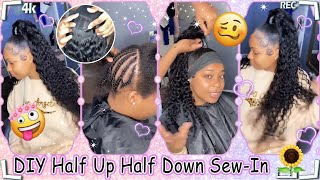
No Leave Out ! Half Up Half Down Sew In On 4C Natural Hair
- Posted on 28 January, 2021
- Sew-In Hair Extensions
- By Anonymous
#halfuphalfdownsewin #wandcurls
Duvolle® 70% OFF PROMO CODE: LONDONTAYY
Duvolle® Desire Series Styling Iron: $28.50
https://duvolle.com/desire-series-styl...
Duvolle® Desire Series 32mm Curling Wand $28.50
https://duvolle.com/desire-series-32mm...
Duvolle® Desire Series 25mm Curling Wand $28.50 https://duvolle.com/desire-series-25mm...
——————-
Social Media
* Facebook : londoncurlstyles
* Instagram: @thelondontayy
* Business only email : [email protected]
Location: US -Columbia, SC
——————————
Link to hair : https://m.ruiyuhair.com/wigs-for-sale....
Virgin malaysian body wave 12, 14, 16, 18 and 10 inch closure bundle deal
——————————-
****Most used products ::
Lotta body mousse Https://amzn.to/3gXFI5Y
Shine n jam : https://amzn.to/304oKw9
Freetress water wave hair : https://amzn.to/3ojZcpb
Braiding rack : https://amzn.to/30G50PR
———
Music
——-
Keywords
Hey y'all: what's up welcome back to my channel in this video, i'm going to show you guys how to do a half up, half down sew in okay with leave out on 4c hair? So if you guys are interested in seeing how i do this, then make sure you just continue watching and do not forget to subscribe y'all, i'm pretty consistent on my channel for the most part. So i do all types of styles so just go ahead and subscribe. So you can just see what's coming on next, okay and while you're doing that, just follow me on instagram facebook, all of it's basically the london tay or london tay, so yeah. Let'S just go ahead and jump into this video okay, so her hair is um half it's washed or whatever it's clean and basically for the most part, it's blown out. Okay, like i said she has four c strands. So what i'm going to do is i'm just going to part ear to ear and then the front part just going to tie it up in a band, a rubber band and then the back section. I am going to start to braid okay. So when you do half up half down styles, guys whenever you are braiding down the back, that is actually very, very, very important. Okay, you're not going to want to braid all the braids going backwards, you're going to want to braid the braids going sideways at least having one braid going alongside the part. Okay. So, like i said, you're not gon na want to have that space where you just part and braid all the braids back. You are going to want to braid a tiny, tiny, skinny braid alongside the part. Okay. This is important because this will help you close in that sewing space in order to have a seamless blend of tracks to the client's hair. Okay, so it can match pretty pretty well. So you guys gon na see me braids um, her hair, you guys are gon na see the braid pattern as well. Oh uh, uh, okay, y'all! So basically this is a braid pattern. Like i stated, i have braids that are close to the part. The braids are going to the side and not going backwards because of the simple fact that i need braids close to the scalp. So that way, when i do so, everything looks streamlined and everything looks close together. Okay, here, i am, is just moisturizing, her scalp with some shea butter, whatever shea butter oil, whatever oil, you want to use it's fine, whatever you know it's up to you, okay, so here i am just sewing down the extra braid in the back. I'M making sure that i'm sewing under the braids, because i want it to look flat. You don't want to sew on top of the braids, because it may look bulky okay, so the key is you want everything to look flat, streamline all right. Please, hey cookies, come on okay y'all, so the lips that i used was 12 14, 16 and 18.. It did come with four bundles and a closure. However, i only use three and a half bundles okay, okay y'all, so i accidentally deleted the footage for the how to sew the tracks in at the back. But what i just did was. I just included an old video that i posted about about a year ago, year or two ago um, i did almost a similar style, so this is basically the concept in the back. You literally are going to sew the tracks regular and then, when you get to the end of that row, you are going to curve the tracks up and then cut the tracks. Okay, now, when i was at the very very back, i actually did not cut the tracks cut the wefts or anything. I just would fold the wefts over itself and then just kind of continue back in the opposite direction, but, like i stated, i already did this type of video half up half down, and this is how i do my old, my half of half down without having Leave out in the back, okay or having leave out out in general, so you don't have to worry about blending anything in with a texture or something like that so yeah, so um, so yeah guys. So literally, all i do is sew the tracks onto a u-shape and then just keep going that keep doing that and keep going until i get to the very top. Now, the very top. I did film the very top okay, so you guys are going to see how to close in the tracks the half up half down at the back okay, so i did use about about two and a half bundles in the back and about a bundle and a Half at the top okay, so when it comes to the sewing, i hope you guys are not confused. Basically, it's very, very, very simple y'all. Whenever i sew the tracks onto the back, i end the tracks at a curve. Okay, so right here, basically, i'm just cutting little pieces of track and i'm just closing in that little space. So i literally just show just sewed a piece of track across to close in that you pattern. Okay, now, in order to finalize and really close in everything without you seeing the tracks, you're going to cut another little piece of the track, hair and then you're going to flip it upside down and then sew the track upside down. Whenever you are doing that, you're not exposing the track hair just so just in case your ponytail may move out the way or something you're not seeing a whole bunch of just tracks at the back. Okay, so um yeah, and then i'm just going to really how i'm going to blend that i'm just going to hot comb it down with some spritz or with some got to be glue, spray, hairspray and just kind of fold that hair over itself. So that way, you're just seeing folded, hair you're, not seeing any tracks or anything like that cookies come on hey as far as the ponytail i i just used. Some got to be glue in the yellow bottle, and that is after i, silk press out the front. Like i stated, she is natural 4c curl pattern, she's actually transitioning, so her roots are basically pretty much the most part that is natural. Okay, so, like i stated, i use the got to be glue in the yellow bottle. That is what i'm going to use to really kind of have the hair stick together instead of using some type of beeswax, that's just really hard to get out your hair, but they got to be glue gel in the yellow bottle, which is more so like a Cream works really really well and after i do that, then i'm going to use a got to be glue spray and then i'm going to spray that in sections and then just use the blow dryer to kind of dry. It in that state that i basically i'm holding it in okay, so that way it does end up drying in that ponytail state and i can just go ahead and close the ponytail up with a hair tie and then i'm able to proceed okay. So when i do tie with the hair tie, i use a couple of rubber bands. Nothing too thick. I then plait her hair plait, the braid okay apply her braid and then i'm ready to proceed. Okay, once i plated the braid, then i started to sew the tracks onto the head. Okay, now you have some people that use glue and you know, but i decided to use all sew method. Okay, so i like i said i didn't show the bottom because i mean it's relevant, but it isn't because it's literally the same exact process guys as you see i'm doing right now, i'm literally wrapping okay wrapping on where the braid is wrapping on the braid and Then i'm stitching through the braid okay and then i'm wrapping come back around stitching through the braid. I did that at the the bottom of her hair, the braid and i'm doing that at the top, as well, of course, make sure you seal the braid with a hair bow or a rubber band. So that way the braid does not unravel okay. Also, if the braid is like frizzy or something you can just use some type of gel and cream to braid that braid for the ponytail. So that way, it's more so it's streamlined and it's kind of you know tight and everything so guys, um after i basically just sew the ponytail onto her head, i'm just going to start just wrapping at the base, i'm just going to keep wrapping, wrap and wrap. It until i feel like the base is thick enough and i feel like the the ponytail is thick enough with the hair that i've added to it and then to end the track. As you guys can see, i'm literally pulling a little piece of hair and then i'm wrapping that around the base after i am done with adding the tracks to the ponytail okay. Here you go here. You see how thick it is, how full it is. Um yeah! So i think that works out pretty well for me. Now i'm going to pull out a thick piece from the back of the ponytail and then i'm going to start to seal the base and i'm going to make sure that the tracks are covered, etc. Okay, so i just use the gut tippy glue spray spray it on that piece that i'm wrapping around and then i just start to wrap around the base. Keep spraying keep combing, wrapping, keep spraying, keep calm and wrapping until i'm completely done and then i'm going to seal it with more got tb. Goose got to be glue spray and then i'm going to use a dryer and i'm going to make sure that it's dry and in place so that way it won't unravel okay and, of course, use your fingers to kind of keep smoothing along that. Okay guys. So here i'm just going to do the edges, i'm just going to get some even edge control put it on the the edges and i'm just going to literally just smooth her edges in um and then, after that i spray it with got to be glue spray To top it off and then i'm going to tie her edges down with two wrap strips to make sure that the edges, don't you know, get wavy or you know anything may happen to them. I just want to make sure they're set really good, while i style her hair, okay, okay guys so i was sent this bomb curling wand by duval or zoo or duvelli - i'm not really sure how to pronounce it. But the sculpting tim in this curling wine is my first time using it guys and i highly highly recommend the wine curl stayed in like literally the same for days after i did this style. Okay, i literally just put some serum onto the hair spray. Some got to be glue spray, just to kind of give it more holding room and literally just wrapped the hair and twisted it with my wrist onto the curling wand. Guys - and i did that in a ponytail - and i did that in the back right here as well after that i did let it cool down for about 10 minutes before i started kind of piecing apart, the wand curls. I didn't want to do too much because i didn't want them to fall or get messed up, but yes guys. I think this style turned out really really well um yeah. I i appreciate you guys if you watch this video, this far comment some hearts down below, and i really really appreciate that. I really appreciate you guys looking at my content and i will talk to you guys in my next video again. I want to thank the company zoo ball for sponsoring this video and sponsoring me this one curl. I really really like it. I'M going to continue using that wand curl on my clients and on myself again. Thank you guys so much if you want to figure out how to purchase this wand curl everything will be in the description box below, and i will talk to you guys in my next video bye, guys, love, y'all, bye, okay, come on hey cookies! Hey! Oh! Oh! Hey you


Comments
Clarified Tangles: Great tutorial
London Tayy: Use code LondonTayy for 70% off the wand curl !!!
Ninth Jewel: Tfs
nicole: Early