Diy: Sew In/No Leave Out, With Closure
- Posted on 07 November, 2020
- Sew-In Hair Extensions
- By Anonymous
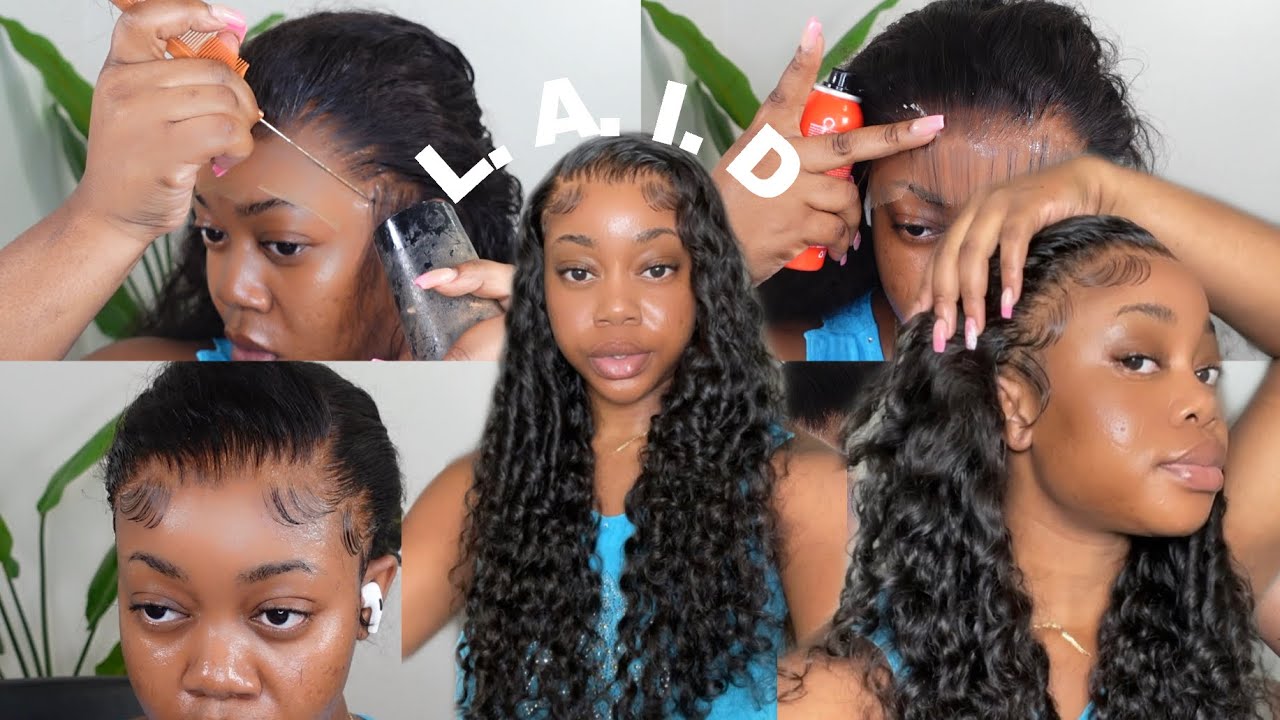
Watch as I slay this full sew in with closure no leave out. In this video, I walk you through my braid pattern, how to stabilize and install your lace closure, and sewing in the remainder of your head. For this style you can find the hair here:
Organique:
https://www.amazon.com/Goood-Hair-Unpr...
Ooh check your girl out. Yes, this hair is laid and it does look cute. I am doing a full sew in today with closure, because i was headed to miami and i wanted to try something different. So yes check your girl out, we making another video all right. So, as you can see here, i am getting ready to start my braid pattern. So what i just did with the comb was just get the baby hairs that i want to save out out of the way before i started braiding. So, as you can see, i'm braiding down into this pattern with the middle part. That'S key! You want to put the middle part right exactly where you want your closure part to go, so you want your part as straight as possible during this process. So with that, i am braiding very close to the perimeter of my forehead. As you can see, the braids are sitting right at the top and that's important because you want your sew in to look natural. If you wait to push that thing, farther back, you're going to be all forehead and it's not going to look real so make sure you start your first braid right at the perimeter of your head and then i make my braids they're, not extremely small but they're Small enough, so that my rows, when i sew in they'll be really close together, so my braids are, i would call them medium they're, small medium, so it won't take me all day to braid, but they're still small enough for this. So i am simply going through and braiding the hair down so that it's neat and it's sectioned off so that it'd be appropriate for my sew ends. So that is what i am doing here. So i am finishing up my braid pattern and, as you can see, i have a consistent rose all the way across where i have the braids connected at the ends, so that i'm left with only one end piece, and this is important because you don't want your Sew ends to be bulky. Okay, so now i'm done braiding, my hair. You can see my braiding pattern here. Um, i have the hair that i'll be using for today it comes from organique and, as you can see, here is a synthetic mixed brand here um and it comes with a lace closure here, a middle part, so today i'll be showing you how i put this Together and i sew it on and get to it, so there's really a lot of things to consider when you're doing the middle part. You want to make sure whatever braided pattern you choose to do. There is a middle part that matches and it lines up with where the lace front will sit. I haven't plucked it or anything like that, yet i'm just going to sew it on first and then i'll work with plugging and all that in a second. But i just want to get it all on there first and then i'll plug it at the end. So let's get started so what you're seeing me do here is align the the closure with my part and now i'm stabilizing the closure to my braids. So i'm using two separate needles, the first needle i did, as you can see there on my right side and the second needle i'm using on my left side and i'm securing the lace front so that i'm able to sew seamlessly without holding it with one hand. So that's an important piece, especially if you're doing this on yourself, like i'm doing right now. So as you can see, i'm moving down each row and i am sewing the lace specifically on the lace to my braid. So i'm going in under each braid and sewing onto the lace and repeating it as i go along and down the braid. So i'm doing that on one side first and then i do it along the other side prior to moving into the back and that's a critical point. You want to do your backlash that i'm about to do right now, because when you do the back, it creates some sort of resistance to your front, so it pulls it back more. So you want to make sure you have it aligned when you sew in the back, so that you're not kind of lopsided. When you do your closure and that's important, because you will look crazy at the end, if you don't make sure that it's aligned on both sides before you sew in the back piece, so make sure on the closure you sew in at the back last and as You can see i'm doing the same method that i did before and making sure that i go around and make sure that it's secure. Okay. So now that the closure is secure around the perimeter, you want to go in and make sure that it's secure in the front and that's important so that it doesn't kind of you know open up at the front and show everybody that you know you're wearing the Lace front, so what i'm doing here is creating some space for me to sew under so i'm just making a little part along the front of the lace front. So i just pulled out those pieces right in the front, as you can see there and i'm taking the rest of the hair and just pulling it back so that it won't be in my face, as i'm sewing in at the front. So i'm pulling all the excess hair to the back, just putting a little clip on it, so that it's out of the way, once i have my two pieces in the front, i grab my needle and i'm going to do the same thing that i did around The perimeter, except for now it's in the front of your head, so i'm simply taking the needle and sewing under that. Remember that braid, i told y'all to put right at the perimeter you're going to sew under that braid so that you secure your hair. That lace front to that braid and i'm going to do that all the way across the front of the perimeter of this sew in. So that's what i'm doing here and this will be the final phase of me - securing this closure down so that it doesn't move around when i'm done. Okay, so i did the first half of that front piece and now i'm finalizing the second half of that perimeter. As you can see here, i am just making sure that it is done. I'M making sure that it's secure and tight, i'm just checking and moving it around. Whatever i see, i missed the spot, i had to go back and just make sure that that was also as tight. So that was just me re-securing this that piece and that's okay. So now that the closure is on and secure, i can worry about the rest of my hair, so i am starting to sew in the tracks onto the braids at the base of my hair at the very back, so i have measured out a piece that will Fit right along the side of the braid that i'll be sewing it on, and i am beginning to sew and, as you can see me fumbling here, i'm just trying to make sure that i get that needle right under that braid and through the track in that. First, one to secure it really tight to my head, so i am going to go under that first, one a couple of times to make sure that it's secure before i start to kind of start sewing along the rest of the braids. So you see me going under that piece. You know one or two. I probably do it three times just to make sure it's secure before i start moving along the rest of the braid, so once it's on there and secure i'm just testing to make sure it's on there, i can speed up and i'll start sewing along the braid. So, as you can see here, i am at the very back of that head. There sewing along the side of it at the base of the braid, and that's going to create that good length that i want and that's why i put that that bottom braid right down there and then i'm going to go and move to the rest of my Hair, so i'm just going along and taking this same approach throughout all the braids, so i'm on the braid above it now going under that braid and attaching it and going all the way across and i'm going to keep doing this as i move through the rest Of the hair, so here we are finalizing this last braid. So what you see me doing here, i'm measuring the hair just to make sure that it it's gon na make sure that it covers the length of it, because it's the worst thing to mismeasure a track and have it be too short, um or too long. I mean you can't you can cut too long, but you cannot fix too short. So i'm just making sure that when you measure it you're you're taking your time so that it covers the length of the hair, because you do not want to go back in to have to make another track. It just takes so much time, patience and energy. So just make sure that when you're measuring you kind of make sure that it, it really does fit, and it's true to to the length of your hair, your head. So that's what i'm doing here and so for the second time i didn't show you every last track that i put on there, but i want to show you kind of the proof of concept how to do this and how to move along your hair and how To measure out your tracks, so i did want to show y'all quite a few as i moved along each of these braids and as you can see, i'm going under each cornrow and taking my time and being patient and measuring as i go across, so that it Lays really flat, you know, i want to make sure that i'm taking my time and going under each one and not doing it really fast, because if you do it really fast and you skip a row or something it'll create some bulking in those tracks. So you do want to make sure you go under every braid and here i'm getting up to the last one i'm going very close to that closure, but i'm keeping about a fourth of an inch of space in between the braid, like i'm, not braiding, on the Closure, i'm writing. Probably you know about a fourth of an inch up, so there we go guys, we are done and everything is on, and so what you're seeing me do here is remember where i had that big lace front, i'm cutting along all the pieces of that lace to Get it off, you know. I really wanted to make sure that you don't see that you don't really want everybody to know you're wearing this lace closure. So you want to make sure that you just really cut around that perimeter and i'm taking those baby hairs that i left out to move some of that hair down on my forehead so that it takes away the wiggy look of the sew end. And so, when you start to pull those baby hairs out, it starts to give the hair more life and rich. As you can see, i have lay my baby hairs down and i allowed myself to cut around the perimeter without getting my favorite of the lace front. So that you can see that piece is gone now, and so i have my closure, it might mess around with a little bit more. You know, put the part a little bit make it look more natural as i go along, but overall you know. I think the look came out like going somewhere doing something i can put on my little boot choice in my tank up in my head and walk down the street not to worry about the community or anything like that. So i'm super excited and i can't wait. I'M gon na see uh in the next video


Comments
Geornay Sanders: So pretty!! How long do you leave it in for? I'm gonna try do my own sew-in this weekend, so we'll see how it goes!
QuantumQueen3121: Im getting my first sew in with closure Tommorow! Thank u for sharing
Deneesha Bartholomew: Love it!! yeeeaah I’m coming back!!
Picaboo76: Nice nice nice!!!
Shelbbbsss: You did good but put some powder or concealer on the part