Clip In Extension~How To Install Clip-In With No Leave Out Ft. Kinky Straight Clip In Extension Hair
- Posted on 21 December, 2020
- Sew-In Hair Extensions
- By Anonymous
Hey! Today I will sharing this quick and easy full clip-in tutorial featuring this DemyHair Brazilian Kinky Straight hair. This full clip-in install has been my go to protective style as of late because it not only fully protects my natural hair but it takes less than 30 minutes to complete. I love the fact that this clip-in method requires no leave out because it eliminates having to blend my natural hair with the hair extensions. I hope you enjoy this full clip-in tutorial. DON'T FORGET TO SUBSCRIBE, LIKE, COMMENT, AND SHARE!!!! Enjoy your blessings!!! LUKE 1:45
DemyHair Kinky Straight Brazilian Virgin Hair (16", 18")
Direct Link: bit.ly/kinkystraightclipin
----CONNECT WITH ME---
Instagram: demyhairextensions
https://www.instagram.com/demyhairexte...
Business Inquiries:
----MUSIC----
https://www.youtube.com/watch?v=BQVcNP...
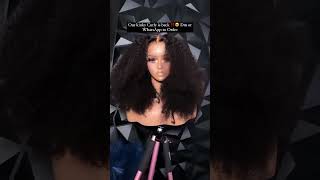
Today, i'm going to be showing you how i installed this kinky straight clipping, hair on my natural hair, with no leave out. If you want to see how i did it, how i achieved this, looks on my natural hair. Keep on watching to the end of this video i'll be using two packs of the extensions 18 inches at the back for length and 16 inches in the front. My hair is natural texture different from the texture of the air, so i'll be leaving no leave out in order to achieve a natural hair. Look there are extra clips in the hair from here to here. In order to achieve this style, i generally like side pattern. You can do a left or a right pattern, depending on what suits your face. In this case, i am doing a left pattern because it suits my face. Better beauty works for you. Something else to note in this video is, i will be doing four cornrows in the front and that's why i'm making this little hair pattern. The cornrows are what i will use to install the closure that ensures that my clips appear natural, covering my entire hair, with no leave out and not showing my natural hair at all by how means, if you want someone to help you with the four tiny cornrows. Go ahead and do it, but i've done this by myself: it's not the main test, but it sure works. It'S not going to show the clips are going to cover it all up. So there you go. That'S my four cornrows that i'm going to use in a moment, so i pick up the extra hair in the front. Bind them together, hold them with an hair band by harness be sure to use black hair band. I use the colored one in this video, but i advise that you use a black one. It'S easier it just blends better with your hair. So, as you see, i'm going to wash the air together and hold it firmly to the back just frame enough for me to install the clips now there you go. That'S what i have at the back and i have my crocodiles. So then, starting with the shutters clips, i begin to install the air the clips one after the other. It'S easy to install the clips just make sure you're installing them to the very roots of your hair. Don'T let them dangle and if you feel like any clip is not standing, is not sticking properly, take it out and install it firmly to your hair. I'M liking this already, and i just continue installing the clips from here to here. So this is the easy part of the process just clip it in clip it in clip it in and see what i've got. Let'S keep going yeah, that's not sitting properly and i'm just installing it properly. Okay, ladies i'll, be liking. This already and there's a final piece before i do the closure and the falcon rules, so i'm going to be using that wet. I joined two wefts together to achieve the natural look in the front. Follow me in just a moment to see how i do this. So i put it on the farthest, convo and pull the loose air through the closest convo to it. I hope this is clear if it is not wait in a moment when i do the other side, and you understand it better, and i just use the crochet needle and continue to take the loose air and take it through the second cornrow to the left and Once i'm done, i'm going to lift that air up and what you see in that center is my natural airline, and you won't be able to tell that this was some extension. Yeah wait a moment to see the results. Okay, then i lift it up that way and that's what you get so you see. I have two cornrows left on my head and i'm going to do the same thing that i just did on the left. I'M going to do it on the right by using the same tool wet that i have joined together. Don'T worry there is that gap in my hair on the right. I am going to cover it up as soon as i have finished installing this closure. So i install it on that portion where i'm showing you and the very middle cornrow is where i crochet it through so just watch what i do in a moment: yeah open it up that way. Now you can see. I stick the needle through that one. Take the loose air use, the needle to pull it to the other side, and i just continue the process until i've pulled all the loose air across once. That'S complete. I open it up just like the other side, and you can see my natural looking part right. There, of course, it's not sitting right, so i'm going to use this hot iron to put it in position, make it lay flat so that my cotton can sure better without me having to use a hairband to hold the hair. So now this is the final product. Ladies and i can pack my hair any way that i want, i can style it. I didn't do too much of styling in this video, but i can definitely oh i'm feeling this earth, it's feeling so good. Already, i'm ready to walk this air all the way. Oh yeah, it feels so soft. The texture is sweet. It'S the best. I hope you've enjoyed this video. Please follow my channel subscribe to my channel.


Comments
Destinyatk: I'm 50/50 on this..too puffy in the back..the hair itself is very pretty...
Gurjot Rehal: Great video!