Detailed: How To Do A Traditional/Basic Sew-In Like A Pro Ft Luvme Hair
- Posted on 27 December, 2018
- Sew-In Hair Extensions
- By Anonymous
Extra 20% Off Coupon Code: SADE20
Hair Bundles link: http://bit.ly/2ScKeSc
U-part Wig link: http://bit.ly/2rV7nxj
Special Sale link: http://bit.ly/2ScBtaW
U part wig tutorial: https://www.youtube.com/watch?v=LhC3dS...
Instagram: https://www.instagram.com/luvmehair
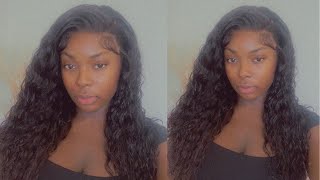
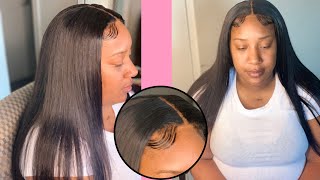
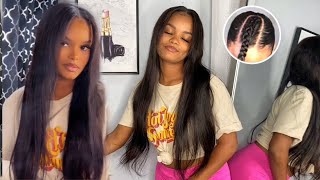
Ham satay, so today, I'm gon na show you step by step. How I do all of my sewing from start to finish very, very detailed, so pay attention. So before I get started, I have to take you back to a style. I did earlier this year with a u-part wig from love me hair. It was basically the same style that I'm doing today with the sew ins. I wanted to show you the versatility. If you want to wear someone and don't like wearing wigs, you can do either or they both come out pretty much the same one. It'S just you know a wig, and when is this going so back to our regular scheduled program? So, typically, when you do a traditional sewing, you're using three bundles of hair, only time you will use a four bundles of hair is if the hair is really long, because the hair gets thinner in the bundle, but this is 20 22 24. So this is like your typical, so in bundle lengths most people get 20 22 24 or 18 20 22. So this is pretty typical and typically you'll need 3 bundles of hair. So this is Brazilian body weight, hair from them really good. Really nice I've used their hair hair, it's pretty good, so you always want to start with the longest hair and then you know work your way up. It'S good to get hair, that's stacked and Limp, because it's going to create some layers for you. Unless you just got some long, hair you're just wearing it home straight, but when you get body wave hair, typically people are wearing it and curls, or something like that. So it's nice to get. There are three different lengths, so they can already have something like players in, so I always start with what my part is going to be, because that just makes it well, that's just what you do so we don't like all sinner is not like beachside or Syfy's Center but side so I'm going to leave her edges out now. When you do a traditional sullen, you don't have to leave the edges out, but a lot of times you do. Leave the edges out because number one a lot of people don't like their edges, pull really tight or pull out and number two. It makes it look a little bit more natural, but sometimes it's good to break the edges in because if you need your edges out too many times being into filming, your edges will break all just because it's the one. It'S the hair, that out that's being manipulated. A lot so I'm just leaving some edges out around her hairline just throw this easy. Like I said you know more of a natural to traditional showing, and I always just twist it out the way and you can braid out the way over. So your traditional leave out for sewing you're, not gon na leave a whole lot of hair out. You probably want to leave about a half inch on each side, and that makes for a good amount. I leave out. You don't want to start leaving a whole lot of hair out because we leave too much hair out. That'S how you get hair, breakage and stuff like that. Now the person's hair is a little thinner. Then you can leave a little bit more hair out, but typically I leave about a half inch out on each side and that's usually enough to cover the wefts whether the hair is thin or not. It'S still, usually enough. So with the traditional sewing, and typically just one part not going to hit like multiple part soand, that's when you're getting to something else like a versatile so in or something like, I just breathe back out of the way. So I always part a braid out right here, many ways that you could braid someone. I'Ve been braiding like just for years. It'S been the best solution for me: pork not having your hair break off. So I always part to braid out the anger braids. That'S where your your base is on a beach, so that's going to determine power plant. Your sewing is so I always part this braid around here, pretty small, because you want that to be pretty flat, so have a play. So in so I always Park that out and then I park this down. Then I part these down on the side, not too big either. Now, if the person has a thin hair, you can add some braiding hair to it, but they I was gon na mount. A thickness or you know if they have hair breakage, you get some braiding hair to it also, but if they have a good amount of thickness to their hair, then you don't need to add your braiding hair to it. You just want to ensure that especially these braids, like an anchor braid in the braids around the perimeter. You just want to ensure that those are the tightest braids, because those are the base for of the foundation for a soldier and when you bring it in the hair, you want to make sure you pull all the way through to the end. So the hair don't get tangled the person, paranoid entangle someone's are meant to run your hair. Nice break your hair off. So you definitely want to make sure that you taking the proper. You know necessary step. So you know your client, it's gon na have hair and I could have some broken off there. So when you do a traditional something and you typically want to get a weaving net, you want to get a weaving net. This is just from your local beauty. Supply store, this is gon na hold your braids together, so your foundation is not the best. This will even it out. Unfortunately, I thought I had more meat in it than I did and I don't so. I only have a little square, which is what sucks. So I'm gon na try to stretch this around the best way. I can don't judge me all the beauty. Supply stores was closed today, so I didn't get a chance to make it there and I didn't even I saw it. I didn't even know I didn't have any night, but this is like the stretchable time, so I can kind of stretch it around kind of far so I'm just gon na sew it down. So I've got the hair in that one. Don'T laugh, am i struggling it. Cuz I mean, but I did stretch it out a whole lot. It stretched pretty good, it's just a little get in the bed, but this stretch not really really good. So I always pre need pre threading, my needles um, so I have about five or six needles. Already pre fed it threaded. So when you're doing it someone you can just grab one and go, you don't have to wait and graduate needles or whatever. So I always use regular sewing thread. I don't use nylon thread because it's just too thin - and I guess, like I'm just used to working with this, I feel like nylon thread - is sometimes if you pull it, you had kind of had to pull it tight for it to be tight, and sometimes when You pull it too tight. It can pull your hair out because it's so thin and it's very strong. So this thread is strong, but it's soft at the same time too. So I don't have any issues with you know your hair breaking off. While you have a you know sewing so I'm definitely going to start at the bottom and work my way up. I always so under the track, and I always so through the track. I don't never have a problem with shedding or anything like that. If your hair is shedding because of you going through the track - and you just have a bad batch of hair, so always sew through the West and like I said, I go through the bottom, do the loop and pull method? So when I'm going through the track is automatically going through the middle of the needle. So that's gon na create my. I guess some wind pattern and I've been using a sewing pattern for years and don't take a long time. It lasts a long time and it's the most easiest sewing pattern. So when you're sawing like this, you definitely don't have to pull extra tight. That'S where the misconception is, you know you don't have to yank it and pull it extra tight, because that will break somebody's hair off. So we never want to sell it tight, but don't do like an extra cool. So when I get to the corner, I usually do like a little night and I basically just wrap the thread around and that just makes it a little tighter right there. So when you flipping your hair over and we'll be as flat as possible, and it won't be real bumpy, so you want to solve close to the end when you're flipping that over you want to definitely so close to that, so that your flip will be flat. [ Applause, ] [ Applause ], so I still make that night in the front. When I'm about to flip over then I flip it over. Don'T want to pull it extra tight like I said, because then you'll be pulling on the person's edges. So make sure you don't hold it extra tight, just pull it enough to sew it yeah. So when I get to the end of the needle, I just nodded about three times, so they make sure it don't well. That was my second time cuz. I already did it, but I'm basically just looping it around and that's gon na give me mine not and see, is tight, so I am now on the second bundle. Then one forget to the second bundle. That'S when I started to bring the west all the way up to the top, if you wanted to fall to the quiet a little bit and not just straight back, you wan na bring in the west up to the top in a click. Let'S tension on your edges playing out just pulling back and forth on the edges, so always bring it up to the top. So I'm still going to flip that over so that's still laying flat, if you can't get it to let's play, you can definitely cut it when you reach. You know point in the top like that, if you're not used to doing so, and you can't get click just cut it, you don't make a big difference, not a big deal just so when you get to this side. This is the side with less hair. Don'T force it don't force a whole lot of hair over there, so I'm still just going to keep sewing it around. But when this side runs out of here, it's just going to keep going further back, but don't try to make the section smaller to fit the equal amount hair, because this is not a middle part. Do you finish sewing all your tracks in? This? Is the last bundle, so I'm just gon na sell this around, so this is an ensure that you're selling is extra flap telling this track around is member. I told you all you other braids, oh yeah. The tracks are gon na show up on the bottom of the inker break, so we sold this around the top of your ankle braid and then, if you have some extra hair left over, you can add it in or you don't have to up to you. So once I show this around, then I will be done. These words the deal or title is yes make the claim it's a little better. So then you can just style you're. So in whichever way, just going to do some light, little curls and I'll just do some framing layers, and then that will be it so one typically lasts four to six weeks. Eight weeks, some people leave them in twelve weeks. I don't recommend past eight weeks because after that time your hair starts to Mack and you know sometimes when you take care someone I'll be like. Oh, my god, I lost so much hair. But you got to remember that you lose 10 to 12 strands of hair per day. So if you count that up by how many weeks you had you're sewing in, is going to look like that, you're losing a lot of hair but in reality you're not really losing out of here. Unless you have an improper stolen. Okay, so make sure you guys check out love me, hair. I'M definitely gon na leave some links in the description box, where you can purchase some bundles along with u-part wig. If you want to do a new part wig, if you don't want to do a sew-in, let me know how my sewing technique work for you. It should work. Cuz, I've been using it for years and I haven't had an issue. Make sure you check out love me, hair on Instagram, make sure you follow my instagram at filthy, rich dresses, like my facebook page, make sure you guys leave a question or comment, and let me know how things worked out. Thank you all for watching.

Comments
Brandy Quinshay Doss: I will never get tired of traditional sew-in's. They Are the most natural looking when done right
Moe & Company: Glad to see a traditional sew in. I feel like women/girls don’t wear them anymore. Even 16 yr olds are wearing frontals! This looks soo good!
Beautifulll B: So refreshing to see. I’m not a wig wearer and can’t jump on that train give me a natural looking traditional sew-in ANY day
V Jones: I dont know if anyone knows but the reason to use nylon thread instead of regular cotton thread (if that's what she is using) is because cotton breeds bacteria and pulls your hair out from the friction of brushing and combing. It's like wearing a hat. You wouldn't wear a damp cotton hat nor would you keep pulling on a cotton hat on your head. Nylon slides and won't harbor the bacteria ( that makes your hair smell) like cotton thread. Plus it's easier to cut out of head. Cotton can entangled in your hair and break it off.
Monica James: Great job young lady! I've been installing traditional sew-in weaves for 34 years and counting. Your finish is flawless. Most importantly, your information is accurate (We'll agree to disagree agree about nylon thread. It's a matter of preference. I started using it in late 90's/ early 2000's because it is thin, strong, and barely visible...and doesn't break/cut hair when sewn correctly ). Keep up the good work! Good Classics never go out of style.
Kendra Board: Thank you for this. I have never done a sew in and so admire people who can do them and make them look natural. What would be your advice for overcoming my fear of doing them?
mimi j: This looks so good it'll make me ditch my closures!! I'm in Cali and if I don't do my own hair I'll go bankrupt paying somebody what to snatch my edges literally
Jay Ess: Love your videos, I have never had a sew in or a wig or extensions lol but I've wanted too! I have wanted to do hair for a long time now and watching your videos really helps me learn and understand more. I cant wait to try to do a sew in on my doll head! Thanks for your help and great videos girl!!!! You are def very very very good at doing hair, that not only looks amazing, but also makes women feel beautiful and confident about themselves! You go girl!
tystays0fly: I've had enough! I NEED you in New York ASAP !!!
Cheyenne: Great video! I finally learned how to braid and I’m determined to do my own sew in lol. My arms just get soo tired and it takes me forever to sew the hair in! I always take it down mid-sewin, but I’m gonna try again today
Barbara Christoph: By far the best sew in tutorial I have seen! I'm more confident to attempt my daughter's hair tomorrow. God bless your handwork! Thank you sis!
Saintly Cyn: Loved this! Came back here to remember how to do a traditional sew-in because of this pandemic
NYCVIEWS: Love love loved this tutorial!!! Beautiful demonstration and beautiful sew in! Thank you so much for the help ❤
Codename Blazer: I would’ve loved a little more detail on the braid pattern.
The Chocolate Don: Ya girl just did her own sew in and yasssss for the whole breakdown finna see my babydaddy tonight
MzBombshell06: Yes! I've been waiting to see how you do a sew in. That's all I wear!
Diamonique Davis: Man no one I’ve seen has been this thorough. Thank u for a upcoming stylist this helped me ALOT
Nishata: You can do NO wrong...this was a nice tutorial. Thank you.
D: Beautiful job! I love how it looks so natural!
Sherkyra Davis: This was the perfect video, love a detailed video How long did it take you to complete this sew-in? I am really trying to master 2 1/2 hour sew-in! Maybe I should get a African-American mannequin head and start with braiding, and master my complete time within 30-45 minutes
Starlight Dust24: I’ll try it out definitely the finish was amazing, ill subscribe immediately
A&S TV: Love your method, and how detailed you were!! You made it super simple for me!
Jordan Norwood: Just used your technique and I loveeeeeee it! Thank you!
Call me Estelle: Thank you so much for sharing such a detailed video! I really appreciate it ❤️
Denitshia Cummingsborg: I absolutely love this❤
N Murray: We need you back in Philly ❤️
Tavie: Yass you did that girl! I do hair too , I wanna know, what products did u finish with and y ??
Ella June's Niece: How long does the entire process usually take you including wash/ condition, sewing and styling client ?
JuicyCurls: I love it nothing like a good side part sew in
The_Jazzy_ Doll: thanks for this video! I want to learn to do my own sew ins
uniquely samara: Great tutorial, beautiful/flawless style
YoursTruly RoseGirl: I absolutely enjoyed this tutorial so thank you. Definitely about to try this method
Ruth Blackman: Thanks so much for this. So detailed and really well explained. Love this video ❤️
Debra Ann: Flawless love your work.
Kimmm: Beautiful!!! I'm going to try this tomorrow! It's my first time doing my own sew-in
Lexi Jay: Great results . ❤️Wish you showed how to do the larger side tho
keykey hair_dezign: I really love doing hair and seeing new and old ways of doing a style is great to see
DESSILUXEBEAUTY: Great technique! Easy too and you did step by step didn't leave nothing out loved it ❤
Ariana Lynette: it’s the heat on the natural hair for me but this looks SO GOOD
BlackEmpress: Your models are always soo gorgeous
Gail Hopkins: I just subbie!. Your work is excellent. Glad i found your channel. I was specifically looking tonight for video's doing traditional sew ins. They are the best , since slice breadLOL. I REALLY AM GLAD I FOUND U. plus no loud music . i can hear u & learn correctly. So i can do my own sew in. Of course i wont be as good as u right now. But i will keep watching u & therefore get better. U are excellent at your craft. Thank u for sharing. Grace to u & all. gh
Kolawna Keels: I love this video. Please make more so tired of seeing wig videos everyday
Thareel Snooks: Love all your videos! Great outcome as usual!! Thank you for sharing! Keep em coming Sade!!!❤
Kaylin Simone: I’ve been saving to get my hair done by a pro but I’m not sure what the normal price is for a frontal sew in.... coming from a stylist what’s the normal price for those?
HumanFairy: This looks amazing
Devin Symone: This is the same sew in method I use on all my clients as well & u did an excellent job
Jessica Pratt: Best tutorial I have seen on the traditional sew in!!!
HikingthePCT*******: Beautiful. Simple and easy to follow technique. Thank you.
Sherene Putus RAB: Beautifully donelooks so natural
GIGI LEWIS: It turned out beautiful!!!
Stephanie Grewal: Love the way you did this!
Hayden channel: Perfection. GREAT JOB
Nina Lane: Thank you so much for this! Every since I found your YouTube I’ve been watching mine stop! I love your work!
Nani Shanae: I love this video !!! But the bio major in me just HAS to correct you you lose wayyyy more than 10 strands of hair a day it’s like 50-100! But still amazing video
Soulful Savage: Love this!
Ameenah: Omg it came out so nice. I have my appointment today and I am so nervous!! This is my 3rd time so I am not sure why lol
allison smith: Amazing job❤️
Queen mama Fabulous: Beautiful perfect ❤️❤️❤️❤️❤️❤️
Saint Tube: Loved this!
Stacey Fowlkes: Sade what type of flat irons did you use? I’m looking for a good one and I have been natural for some years and use no heat and when I recently tried to flat iron my hair it wouldn’t silk out for nothing I don’t know if it’s me or the flat iron
DollFace Shay: How long should this process take? From the braid down to the completed style?
Lisa Gaw: Hello, that was great work. Where are you located?
Jaime’Lee Chase: I LOVE my Sew in’s with a little hair left out. I go to the Dominican shop let them roll me up under the dryer, BOOM Curls popping Let mommy blow my leave out Straighten FYI Ladies Good Job SIS
Chaka Hill: Beautiful job. I also like how the client isn't staring into the camera alot LoL
A King: Thank you. This was amazing
ToriZee: Love this!!
Lia Walker: I love it im going to do this style into a full weave ❤️♀️
MSKIMLOLLIPOP: Beautiful honey!! Good job!!
Tammy Simril: This is beautiful
KltO85: Hit the like Button before even watching cause it’s Sade
High Heels High Standards: Very nice. I'm team sew in all day, never tried a frontal wig!
MARIAH C: Isn't it healthier to add braiding hair into the cornrows (less tension on hair) then the net?
Marcella May: Hi so i see you did a side part would the same apply to a middle part ..How would you do it to make it more versatile?
OLUCHI OLUWASEYI: that flip over is hard when sewing in because I cant sew from right to left. So I have to cut every time I get to the end and start front left to right. but this is so pretty! I love it.
Scrubz.N.Squatz: Hi....can you do a full sew in with no closure, no leave out, no frontal pretty please
DomO Jackson-Grant: Yaaaaaas Sade, I love it, you did a wonderful job, flawlessly done!!
Shauntwaina Best: Any products you recommend to keep leave out straight while hair is naturally curly? I want a natural weave with no closure but I don’t want my leave out to get damaged again. My hair is very soft and gets fuzzy when out and about
Minnie Mice: Oh my goodness soooooooooooooooo beautiful I want this!
ashley hawkins: Can you talk about how to prep the hair for a sew in, like shampoo, conditioner should they get a deep conditioner, things like that. Thanks
cecewd40: Beautiful job!!!!!
LoveMzStar: Love it!!!
chantert: Done well, your explanation was on point and clear, thankyou so much
Tarsha Farrington: Can you do a flawless middle part see in please?
Living with Kadesha: Very educational!!! What edge control are you using.?
tracyabstract: U know ur technique is the shit!!!! Ms.sade.......luv it.......❤️❤️
Shosho Love: Super cute im goin to try this technique
N B: Flawless!!
Chasidy Tubbs: Enjoyed the video. Do you recommend the same braid pattern for a middle part as well?
nadia albert: Awesome job and no lip smacking
Makeupswatch Fan: Beautiful
smh: What edge control and spray did you use ?
Jessica Mosley: Gorgeous work
Alzalyn Glenn: @filthy rich tresses....How long do it usually take you to do a traditional sewin from start to finish?
kayee: That's looks amazing
Maria Segovia: how many hours does it take to do a full, styled installation?
alicenete dorman: top
Material Girl: What happens to her natural hair if it rains though ? that is what I’ve always been worried about . Because of that I have never left leave out
Nikyia Vaughn: Her hair came out beautiful.
DarlesiaB: I love your videos, can you do a quick weave tutorial also
Kiana Anderson: Looks so good