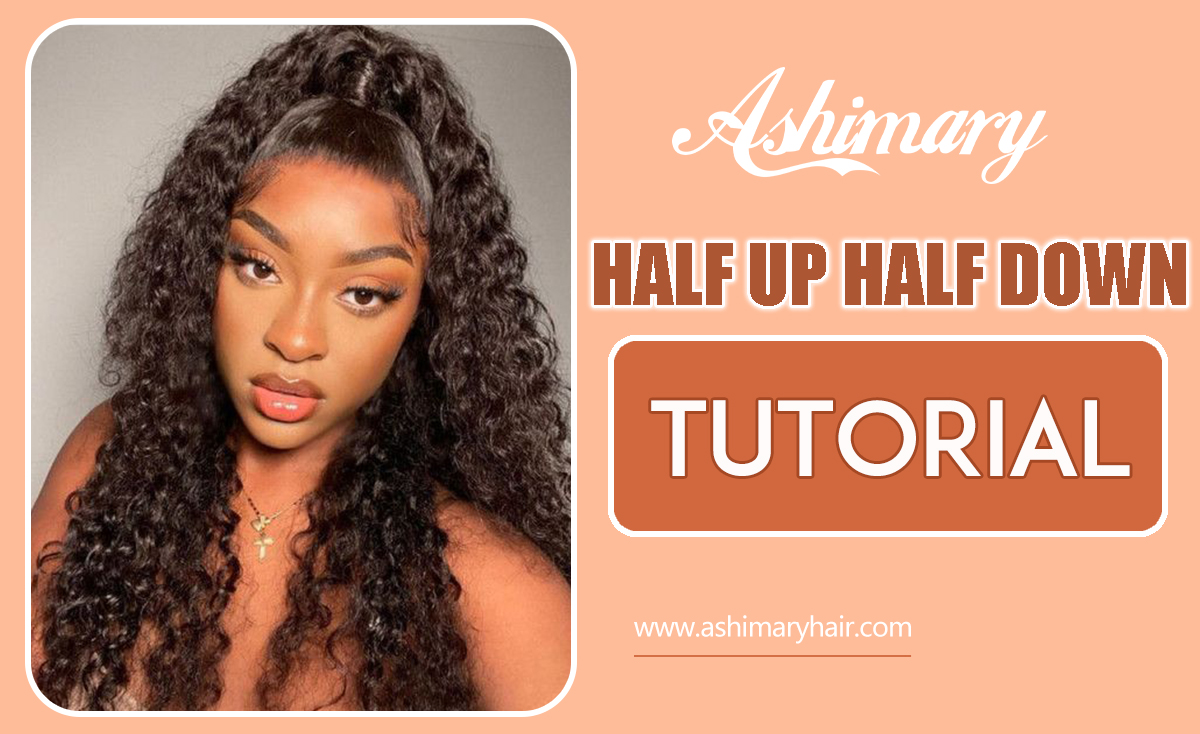
Half Up Half Down Quick Weave | No Leave Out | Organique Hair
- Posted on 07 July, 2020
- Sew-In Hair Extensions
- By Anonymous
Follow my new Instagram: theeKaylasKorner (my old one was hacked)
#halfuphalfdownquickweave #organiquehair
Hello, hey, hi, how you doing? Today's video is a tutorial on how to do a half up half down quick weave. This hairstyle is super quick, easy, and affordable. The the hair that I used for this styled was purchased at my local beauty supply for $21 and it is by the brand Organique. This hairstyle turned out so cute so give it a try if you're thinking about it. I hope you enjoy this video & find it helpful.
Creators Note : Thank you for watching this video. Every view, like, comment & #subscribe is appreciated. xoxo Makayla
Help my channel grow & don't forget to #subscribe to Kayla's Korner before you go! ___________________
Videos You Should Watch Next
How to Make a Lace Closure Wig: https://youtu.be/yuUvQh9J750
FreeTress Valentino Wig Review: https://youtu.be/_ZD-MAO8Fjo
iseeHair Review: https://youtu.be/yGLh2jP9o2E
Kanekalon Crochet Hairstyle: https://youtu.be/F2lI9Wx3nLI
___________________
Let's Connect
Business Inquiries: [email protected]
___________________
Recording & Editing Equipment
Iphone X
iMovie
Track Info:
Track: Want You by Vendredi & Sterkøl [Audio Library Release]
Music provided by Audio Library Plus
Watch: https://youtu.be/o32YDL3_7Wo
Free Download / Stream: http://alplus.io/WantYou
Song: Good Old Days by Joakim Karud (Vlog No Copyright Music)
Music provided by Vlog No Copyright Music.
Video Link: https://youtu.be/Zl3r_HPulLk
Hello, everyone and welcome back to Calais corner in today's video, we're going to be doing a half a path down, quick weed and showing you all how you can achieve the same hairstyle. So if you guys are interested in seeing how I achieved this hairstyle, just starting this hair off and flush a washed hair, and I'm only going to be blow-drying the front, because I'm trying to leave as much heat off of my hair as possible as I've got In the front, blow-dried, I'm just going to part from ear to ear making as big a section as I want for my for the back, I'm going to bread it while it's wet - and I did put some leave-in conditioner in it for moisture and I'm going to Allow this to dry overnight. I prefer to do my hair in different settings, because I thought I have too much hair and not enough patience. So do my hair in one sitting depending on the style so yeah, I just rented it up, and this is what my hair looks like later, that night after I've allowed the braids to dry for a little bit so the next day and the hair that I'm Going to be using for the fifth week is by the Brandt, organic organic. It was $ 20 and I got a 14 16 and 18 inch. I did use the full 18 inches and a little bit of a 16 in the back, and I saved the 14 inch for the ponytail. So for the back of the braids, I did split them into two and then break them into two praise. I'M just gon na pin those up and then put the weave cap on. If I was thinking I definitely could have crocheted the end of the braids up into the base of the braids but yeah. I didn't do that um next after I put see we've capped off. What I basically want to do is just outline my part so that I know where to stop the tracks now, if you have somebody that can help you do this part, I definitely suggest that, because I could not see what I was doing, because the cap is So dark I couldn't see where the part was it, so the next part is pretty easy and basic. What you're gon na do is take your tracks and measure them out across your head. Once you have that measurement you're just going to cut them and then put the glue on them and allow the glue to dry just a little bit. And then you just go into your head and repeat that process. Until you have filled up the back of your hair retract, if you want to speed up the drying time of the glue, you can also use a blow dryer to help you do so after the track is on your head. How call she put your tracks in the back just depends on how cool you want it to be. I knew that I at least wanted one bundle in the back, so I glued my tracks pretty close to each other. So I thought I recorded me cutting the cap, but I didn't you basically just cut the excess cap at the top sides and back now what I'm doing is taking one last track and kind of just ruin that from ear to ear to make a seamless appearance. I really wanted to do my tracks in a u-shape so that you wouldn't be able to tell where the tracks were and weren't, but it was kind of hard for me to see what I was doing, so I wasn't able to degree shape thing, so I opted For the final track, in the end, the pony tail cut was in anyway, but it would look better for a pony tail if I were able to do the huge u-shaped track. Now I'm going to tie on my hair, like I said, I'm trying to keep as much heat off my hair as possible. So, for me, the best way to do this was the only cast into the roots and then all honestly, the only part that matters, because the ends of your hair is going to be braided up and wrapped under the tracks of the pony tail anyway. Now it's time to start constructing the ponytail right here, I'm using the murse pomade that comes in the orange container, and I use it around my edges in the base. Just to give my hair a little bit of shine, I didn't really want to use anything water-based. Like a jail because it wasn't gon na do anything but curl my hair back up, and I wanted this ponytail to be sleek so that I wouldn't be defeating the purpose of that on my hair. So the rest of my ponytail is constructed using some got to be doing free spray and some pump it up, and you want to be generous with this product, because this is what's going to make your ponytail sleep. So what you want to do is spread some and then brush it and then spray some and then brush it and then repeat this process. Also remember whatever you do in the front, you want to make sure that you're doing in the back of the ponytail. Also, another thing I think is important is part of your hair and spraying some of the products in between the parts to make sure that all of your hair is getting coated and not just the outside. So I'm going to part my hair and spray. Some of that product in between and then I'm also going to be using the blow-dryer to help speed up the drying process and hardening process. This also using the blow-dryer also just helps to make the ponytail sleek, because I'm holding down the hair in place where I want it, while it's drying. So when it's time for me to put my hair in a ponytail, I did it twice the first time. I kind of just put it in a ponytail so that I could continue to mold it where I wanted it taking more of the product while using a brush in the comb. I think that the comb really helps too, because the fine teeth are really able to get in between those hairs and shorting them out. Then. The second ponytail that I did was my final ponytail and this one was really tight, secure and sleek. If you're thinking about doing your hair in this style, I definitely recommend it three products that I use, because they give your hair a good hole so that the hair is sleek. They don't flake and they give you her a nice shine. So that looks natural and dance with the weed. Now I'm just going to tie my hair down so that I can begin to rock the ponytail I'm going to braid my natural hair down and since my hair is too long for the link that I want this hairstyle, I'm just going to fold it in half And put a rubber band around it to make it shorter, nowaday tried to leave the ponytail the regular length at first and they'll, be just too long, so I figure it. This way would be good now for the ponytail, I'm just going to second bobby pin and put it through the tracks, then that bobby pin will go through my ponytail. I'Ve got up on his head like this before and it was just fine. So I decided that I would do it again display during the wrapping process, just make sure that you are straightening the hair out as you go, because it can get all mumbo-jumbo and all over the place. If you don't make sure that you're straightening out, especially with the bobby pin method, I did add another bobby pin just for some more security once I reach the base, I bobby pins it in your piece like a track down. Then I'm going to go ahead and straighten the hair out, so it doesn't look all tangled and things of that nature. After it's been straightened out, I just took a piece of hair from the ponytail and wrapped it around the base of the ponytail. To give it a nice sleek look in to hide the treasure at the base using some got to be glue, free spray, I'm going to spray the ending of that wrap so that it stays in place. However, I think I should have been spraying it. While I was wrapping it just to give it a grade at home, but since I didn't do that, I took a little small black rubber band and put that around the rap part so that it stood in place and you really can't see the rubber band. So it works out. Who is she in my mirror girl? You look so cute, okay, hairstyle come through Pony. We love to see it. Alright, you guys so. That concludes this video. I'M very satisfied with how this book we've turned out, especially since it was my first time ever doing a quick weave honey. I can do it all telling you I can do it. Oh there's nothing that I can do so put some respect. Oh hey! Okay, but anyway again, for me, the hardest part was the ponytail. The idea was fun until like 5 times, and it was really just a wrapping part that I couldn't get down at first it was sued, the ponytail was too long at the top, so I had to redo that now. As I said, I eventually got it as you can tell, but I do see myself doing this hairstyle again. I'M not really sure how I feel about this track right here, but you know you can always flip it over to the side. I'M gon na flip it over and wear it on this side, which is cute too, where the tracks aren't showing as much because I messed up that side, but you know you can either wear like this, or this is also another option. This is cute suit. I really like that. So, as always, I want to thank you all for watching. If you enjoyed this video, don't forget to give it a thumbs up, don't forget to subscribe to my channel. If you have a car - and I will see it's up to you out in my next one -
Comments
Peachlaila30: This is really cute
Sierra McKenzie: The skinnnn, the beautiful face, the hairrrrr
Princess Mya: Yesss boo
Ally M: Rippedddddd