How To Install Tape In Hair Extensions On Yourself | Full Tutorial !
- Posted on 21 January, 2023
- Sew-In Hair Extensions
- By Anonymous
HOW TO INSTALL TAPE IN HAIR EXTENSIONS ON YOURSELF ! FULL TUTORIAL !
#tapeins #tapeinextensions #hairtutorial #howto #tapeinhairextensions
Tape-In Product Link : https://amzn.to/3D5u5Yf
Inches I purchased : 22'' , 24'' & 26''
Tape-In Remover Spray : https://amzn.to/3H0TqUo
Patreon Link : https://www.patreon.com/MelodyAlmeTV
#Join this channel to get access to perks:
https://www.youtube.com/channel/UCNBM3...
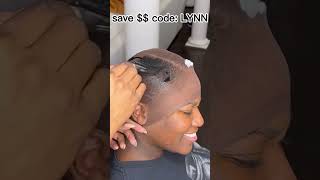
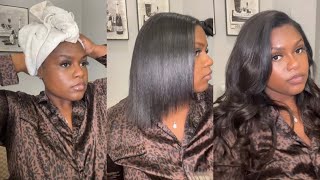
Tonight, if I might find my way, I find my way finding my way to you baby, okay, yeah good morning, my May babies and welcome back to another Banger baby. So I'm not on a thousand this morning. You guys, because it's actually like almost seven in the morning honestly missed three Bays. Looking at me film, this Vlog good morning, Mr eBay and as you guys can see, I just washed my hair and I just took a bath. I did some self-care this morning, we're beginning 2023 with self here. Okay, so we're just taking care of ourselves and getting ourselves ready to defeat the day today, I'm conquering taping extensions y'all. So if you guys watch my podcast episode three, my latest podcast that I've posted on my patreon make sure you guys go subscribe to my patreon. You always see that my girl Jay recommended some taping extensions. So I ordered these off Amazon I'll. Make sure that I link these products down in the description box below this is my first time trying to take things. Y'All know I do not like to spend money, so if I had to figure it out by myself and save some coin, maybe I will because one thing that I know I can do is my own hair and I got a little bit long, because the girl Is trying to do the healthy hair journey and my hair is growing as y'all can see. It'S been growing since the last time that I had my little hair update. I have never tried hair extensions, and hopefully this helps in helping growing and strengthening my hair. One pack comes with 20 pieces of hair and I got the 26 inch, 24 inches and 22 inches of tape. Here I got three bundles because it seemed like when I take it out. I'M gon na show y'all how thin it looks like it looks thin and I got thick ass hair, so I was just like. Let me get three of these and y'all. These are not cheap for one of them. It was like 70 dollars get off my dick for the longest one. It was like seventy dollars, let me see which one is the longest one, but they're good quality, hair extensions. This is my first time trying it out, and this is how long the longest bundle is. This is 26 inches of hair and y'all, I'm five seven. So this is gon na stop right here and it feels so good. It'S really good quality here. I'M just excited to put this in you guys. I watch so many YouTube videos, while I was taking about this morning to see which is the best procedure and I'm going to use deeper than hair TVs, video because she's, like actual professional and I'm going to use her little techniques of putting these tape. In so yeah you guys I'm about to do my makeup prep, my hair, which means I'm supposed to be protected in and I'm going to blow dry my hair flat iron it and then prep my hair. So I could just add the tape in so I'll show you guys the process of how I do these tapings. If you guys, like this video, make sure you guys thumbs up post smash that subscribe button to the my baby family, oh and smash that notification Bell. So you know whenever I make a new post and go join my patreon, I have new podcasts every single week so make sure you guys join that because you guys don't want to miss the exclusive content and let's go ahead and get into this video babies. It'S been a while, since I did a voiceover, but I got to show y'all how I slayed these tape and extensions, of course, starting off with freshly washed hair. I begin to start my blow drying process using my Revlon blow dryer under very low heat, because my hair is not really that wet it's more, so damn yeah and I'm using my Denman brush to easily go through my hair without any breakage y'all know I'm trying To grow my hair, so nobody got time for no splittings. I know many of you might ask: why do you have to prep your hair for these tapings and it's more easier for you to apply these tapings? If you have your hair straightened I'll demonstrate later on the video exactly where the tapings are applied on your hair, but you want to make sure that your roots are as flat as possible. You want to make sure that your roots are fully flat before you apply. These tape and extensions, so they can really look seamless, okay, my baby, so I'm back and, as you guys can see, I just flattered my hair. I know I'm probably gon na do for the rest of this video a little voice. Over of how I want to install this, because I'm doing all this by myself, I have my man here - he's probably gon na assist me a little bit, but for the most part I'm going to be doing this install by myself, but I just recently got a Trim on my hair, this is how my hair is. This is the hairline check right here? This is the before I have the part, my hair in, like this funky way like this way, because I've been doing my own sew-ins for years. I'Ve never really went to a stylist to actually get my hair done long story short when I was taking out my sew-in. I use the eyebrow razor and I cut off my edges, so yeah she's still trying to grow back so for the meantime, we're gon na have this funky part, and I have my taping extensions. My first set of taping extensions right here these. How the three bundles look together. Hopefully this is going to be enough, because three 20 pieces like it comes in 20 pieces. These are how they look. I'M gon na start with the longest bundle. First, of course, which is the 26 inches I'm so ready to put in this hair. It comes in 20 pieces, so I got some scissors and I'm gon na cut this little thing off and from what I've read and what I've saw from videos. What I'm gon na do is I'm going to section off my perimeter and I'm gon na braid, my perimeter, so it's not getting confused with any of the parts of the tape in. So that's what I'm about to do right now! Okay, I think I'm going to do it like this and they said away. So you could test. If you could see your tapings is put something right here and if you can see it through it, that means you need more hair, so I'm gon na get a little bit more hair than this, probably not that much right there. This is about how much Levi I will leave out the bare minimum, put a comb or something your pigtail comb, and if you can't see that comb, then you're good, I'm going to use this little section and continue to section off my perimeter and I'll check it Back with you guys and show you the steps of how I do these tapings okay, my babies, I am back with the voice over and, as you guys know, as I previously stated, I am sectioning off my perimeter and I'm braiding out these perimeter parts of my Hair, because these are the parts that would not be used to attach the tape on extensions, this hair is left out to cover any tape on extensions that you might want to cover up. So you can do versatile, looks such as the half up half down ponytail or any type of look you're going for without seeing your tracks when your tape on extensions. So, looking back a few things that I would have changed before, recording this tutorial quick side note, I did not feel like braiding the rest of my perimeters, so I just put in this ugly little twist. So please ignore this little baby twist I got in my head now that we're past that let's go ahead and get into the fact that, as you guys can see, I have naturally light brown hair and my abs done ordered jet black hair extensions. So, that's definitely something that I wish I would have thought about before. I made this video, but so that you guys don't make the same mistake, make sure you guys get tape and extensions that are close to or the exact same color as your natural hair color. So right now, I'm parting out the back of my hair for my perimeter to hide my tracks so right here. Clearly, it's way too much hair that I left out. I couldn't see the back of my head, so I don't 100 blame myself for this. I really wanted to mention this, so you guys do not make the same mistake. Make sure you think bare minimum when it comes to that perimeter. So I parted off a small section of my hair to add my first tape and extension. So, as you guys can see, they come with these adhesive stickers and I just peeled the paper off and I kind of sandwiched them when I apply them. But I'll explain that more in detail in a second so to prep this hair, I just flat ironed the track. I'Ve seen in the video that, when you part your first part, you're supposed to apply the first tape in underneath your section of hair first and then put the other one on top. So that's what I'm doing! I'M just going to put that first tape in on the bottom and then unpeel that and then put that second tape in on top. I make sure that I repeat this process all over my head, I flat ironed the track and I put the first tape in on the bottom. The second tape in on top kind of sandwich it within my natural hair and then just move on to the next part. I learned through trial and error that you want to work with smaller sections and as soon as you put down that sandwich make sure you use your flat iron to really seal in that adhesive. So your tapings don't slip out, because I had some issues shortly after making this video trying to dance I'm so glad I did not go to the dance class after I made this video because that would have been embarrassing if my tape rings would have fell out. So make sure you guys use a flat iron to really seal in that adhesive year here. So at this point I was getting kind of excited my babies, as you guys can see by my face, I loved how it was turning out how long it was. I really love the length I really liked how lightweight it was on my head. I was expecting since you know the adhesive is really technically pulling out your hair strands. It is surprisingly, very lightweight on your scalp, so it's not pulling or it's not bringing tension to your scalp. I also want to know when you're applying the tapings to make sure that you're applying it exactly next to each other. So there's not any gaps in the tape and extensions because you will see your natural hair through, especially if you have a different hair color than your actual tape. Extensions like I accidentally do so. I know a lot of you guys are going to ask me. Why did I give these tape in extensions, so I really wanted to try something new. I really know how to do everything sew-ins kind of wig installations, but I hate wigs and I really found that I, like clip-ins the best. So I wanted to try these taping for a more longer look and I wanted to try them out to see how it's going to work, especially with my hair, texture and the way my hair sweats out. So, let's see how this works, because I know that you have to have your hair straightened all the time with tape ends and my roots do not stay straight because I'm a bath girl. I like take baths every day, so every time I take a bath, I sweat out my roots, so I would say just because I previously recorded this video and I learned after I made this video. I would definitely recommend if your hair is not heat trained. Like me, I would not recommend that you get tape and extensions. Tapings is really for the heat trained girlies and for those who don't know what heat train means. That means your hair naturally stays straight. No matter what weather conditions your hair doesn't frizz up. It just stays straight and it's trained to stay straight now for those who have naturally curly hair. Like I do your hair is not heat trained, so I would recommend more so clip-ins for those who do not have few trained hair. So now we get to the big question of the video which is do tapings damage. Your natural hair tape ends usually last four to six weeks, and the only time that you really get damage is, if you do not know how to remove them. I'Ll link, the spray that I use to remove these tape ends down in the description box. It'S pretty easy, but overall it was an easy process. Okay, maybe my camera died, and I just had to finish doing this. So here is the outcome. I actually love these extensions. This is how the front looks the side, and this is how the back looks. It'S so full y'all. Like I love it, I did like a little loose curl and then you guys it's so versatile. I'M gon na love these tapings, because I can do so much with it like I could put it half up half down, I could put it in a cute little pony. I could just do so much stuff with it. I hope you guys like this video. If you guys, like this video, make sure you guys thumbs up, go smash that notification Bell join my baby family and smash that subscribe button Happy New Year, my babies, I hope to have more Beauty fashion and just lifestyle content for you guys this year. So, thank you guys so much for tuning in and I will catch you in the next finger baby. Tonight, foreign

Comments
TheCarnivoreSoprano: This is such a look. Definitely looking forward to the lifestyle content. You look so pretty Mel
KaylaMaliseTV: I loved this! Definitely gonna try this out.
TexasAlabamaboi817: Dang Mel has really evolved! I been rocking with ya since you were playing One More Chance with your soros on the way to that step show! to 100K this year
The Kendom: Great job Mel
Callygirl Stewart: Hi Mel & Mystery Bae, Your hair came out great
creole king: I ❤ THE LIL PONY LOOK THE BEST MEL !
Mystery Black Studio: You Go Girl, Mmmm
Sammy Da Goat: