How To Make A V-Part Wig Full Sew In No Machine Ft Brazilian Hair #Hairstyle
- Posted on 14 January, 2023
- Sew-In Hair Extensions
- By Anonymous
In today's video I showed you how to make your own U-part wig at home yourself.
Watch the video up until the end and drop a comment.
Please don't forget to Like, Comment, Share and SUBSCRIBE
For Enquires and Collaboration
Email: [email protected]
♡ Say Hi on Social ♡
On Instagram
@theadunnii
On Twitter
@theadunnii
TikTok
https://www.tiktok.com/@nurseatheart?_...
@nurseatheart
Music
Youtube Audio Library
Other Videos to watch
* https://youtu.be/dt6_vnO_z2I
* https://youtu.be/A1AQB_jsmgI
Check my First YouTube Video
My First YouTube Video
My Sister's Channel
_________________________
#newtoyou #newyoutuber #hairstyle #hairtutorial #humanhair #nigerianyoutuber #sewinextensions #upartwigs #humanhairwig #wigs #protectivestyles #diy #upartwig
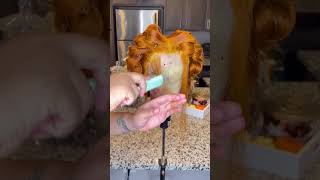
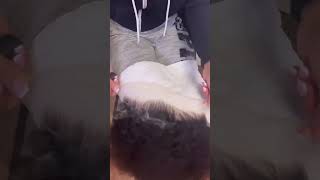
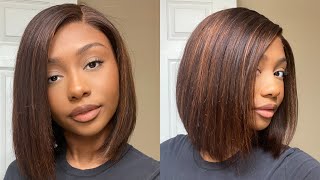
Foreign here again and today's video I'll be showing you guys how to make your own new parts wig at home, and these are the few things that I use in achieving that. I put the name on the screen and guys this week turned out so beautiful like it's so pretty and I totally love the outcome. I share with you guys specific techniques on how to achieve your own using sewing. So if you don't have a sewing machine at home, this video is definitely for you and also, if you're, avoiding using glue. This video is for you, so I went there to prep my wig cap so as opposed to my previous videos on this channel. This is the first time I will be using a spandex jump cap on this channel and guys, I think I enjoyed using it. I totally love it. I wanted to prep my wig and I'm just showing you guys everything that I need. So if you guys cannotice that the part where it has a transparent net is where I intend cutting out after finishing my wig, so this wig is actually kind of helpful because it already has the: U parts: um, the? U Parts designed cuts out. If you do not want to use closure on that part, so you guys are going to see how I will do that if you keep watching and do not skip any part of this video, so I'm using this old Brazilian weave that I have had at home. This this extension is very, very old guys if you're new on my channel, I am Anthony I'm a lifestyle content creator based in Abuja, Nigeria, Nigeria. So, if you're new on this channel, please, if you enjoyed this video - which I know you will give it a thumbs up - subscribe to join the happy growing family and turn on post notification, I am trying to have a pattern of uploading this year. So I upload my videos every Wednesdays and Saturdays guys, and you can always check my short section for any new updates, any new upload, any announcement to be on my community and if you have any question any comments, please feel free to use the comment section and I also have my Instagram and do on the screen and the link in the description box. Also, I have my email where you can reach out to me. If you want to ask me any questions, so I am using my tape Pro to measure out one inch apart on the wig, and this is just for me to create a is so in track, because I don't want my wig to come out messed up. I want it to look very nice. I want it to be well layered, so I am measuring out one inch apart, depending on how full you actually want your wig to be, but once each apart is actually going to give you the best results, and this is something that you can basically do at Home, if you have your extension at home, also, if you have your extension new and you don't want to cut it, I have all of the tips for you not to cut your extension into smaller pieces in this video, which is the reason why you don't want To skip any parts like you, don't want to skip any part, and all of the things I use in this video are things that you can get from your local beauty, supply store or from the market. You can get them like. They are basic things that you can get anywhere. You are leaving. Okay, all right, so I went ahead to carefully measure out one inch apart on my Spandex Dome cap, and this you part wig, is something that you can make with any type of extension. I will definitely be making another one using um, maybe an afro extension. This is a human hair. I already made something else, maybe with a synthetic. So what I'm doing at this stage is looking out for the right and the wrong part, and if you guys can see as opposed to the previous Parts, this part is laid down as opposed to war. You saw like a few minutes before that part. You guys understand so now, I'm using my needle and black try to just and Stitch it together. I'M going to see a more detailed part of that in a few seconds. I guess so. This is the first layer and I am just stitching it and I will show you guys: um I'll, just show you guys what to do next. So what I went ahead to do now is to use my t pin to hold my extension on my outline track. So this is, this is going to help you keep your tipping in. In I mean if you help, you keep your extension in place, because imagine if you don't have this extension pinned down to your mannequin head and you're, just using your hands to drag these and you're seizing the same hands to sew it like up by now. If you see the end, so what I wanted to do is just to use my extension to hold it down on my track, which will help my extension stay in place. As I am going ahead to sew it, you don't mix your what it makes your work. Easy, like you guys know as much as I enjoy DIYs. I will always show you guys. The easiest way to do it so now just watch closely how I am and sewing it and at each at each prick. I don't know the right word to use at this point at each sewing. I I made sure that I gave it double knots. Can you guys see so it helps my extension stay more secure. I don't want my extension falling out when I am brushing it or when I am flat ironing it. So when I am coiling it so giving it double notes is just like an extra security. You can totally avoid that if you do not want like, if you don't want to be doing the double knot at every sewing at every like you guys shall understand, you can totally avoid this, but for me I enjoy. I prefer doing it this way and it's just it just help. My extension feel more secure. Basically, so, as you guys can see that as I am sewing it in, I am removing the pin as I'm getting closer to it, and it just makes my work easy because I can't imagine sewing as using my hand to be placing it. No. No, I know you have a sofa head. Yes, we want to do it ourselves, but we are not going to suffer so you guys just keep watching and seeing what I do. Okay, no before you keep watching. If you haven't watched any of my previous video please after watching this one kindly go watch another video on my channel, I have a lot of helpful tutorials that will definitely help you saving money it will, and if you have all of these tutorials are things that You can start as a business idea, so maybe something you're interested in please do keep watching. So now, I'm going to show you guys how to turn over your extension without cutting it into pieces. So what I wanted to do is to make sure that the first line is well tucked in, and I did the double sewing again and cut out my thread now: you're going to follow your track again and just turn your extension over because cutting your extension into Pieces will actually make you start losing them, which you don't want. So this way your extension is not in pieces, although there are some of this air that are in pieces, but this is actually a way to save your extension from it's being in pieces. So you just want to go ahead again to use the PIN to hold it in track like we did earlier, and also it is just to make your job easy like who has time to be stressing nobody, nobody like absolutely nobody. So that is what I went ahead to do as you guys can see, and after pinning it down to my outline track, I went ahead to start sewing it again just the way I did earlier, as you guys saw, and now, if it's still remaining you just Go over it and fold it again, like you guys understand, I'm very, very sure you understand. Now we are going to get to the very tricky part, which is the closing part, and this guy. These parts you do not want to mess up, because apparently it won't be exposed, like your hair, can still cover it. But then again you just don't want to take chances. You want to make sure that it's well sewn it's well laid down, and at these parts, if you have any extra extension sticking out, you just have to cut it away, which is what I did in my own case. I had like very tense, like I think it's even less than an inch that was left out or maybe an inch. I had to cut it out. So I and sewed this part also, but I did it very tiny and I used like the under um under sewing technique. If you guys watch closely which I'll leave you guys to watch now, you will understand what I am saying: foreign foreign foreign foreign, to both sides of the upper part of the? U? U Parts wig, as you guys saw, and I went ahead to just beautify my wig by calling it guys the light shocked me where I was trying to call this week. Guys please, if you're, not subscribed to my channel, do not forget to click the Subscribe button. Give this video a thumbs up if you enjoy it, turn on post notification and just enjoy the beautiful outcome of this video. And if you want to contact me, my contact information are in the description box and I wanted to comb it out and it looked absolutely gorgeous. Thank you guys. So much for watching I'll, see you in my next video and do not forget to watch one more video before leaving the channel bye, guys.

Comments
OGOM’S SERIES: You did great with the wigging and it looks beautiful
THATPETITEPEJU: It came out so well