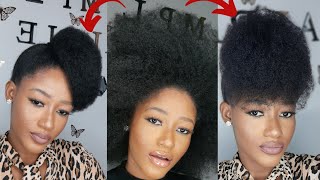
How To Do Box Braids On Natural Hair Without Extensions | Mini Braids Protective Style |
- Posted on 26 January, 2021
- Sew-In Hair Extensions
- By Anonymous
Learn how to do box braids on your natural hair with no extensions. These mini braids are a perfect protective style. Giving the knotless box braids look but this time it’s all you! All natural hair types are welcomed. We completed this look on blown out hair for length retention. Let us know in the comments what you think ❣️
Products used in video:
Blow dryer: https://amzn.to/2MakM1U
Cold wave rods: https://amzn.to/2M05uwW
Shea Moisture Coconut and Hibiscus Curl Enhancing Smoothie: https://amzn.to/3sXnqc7
Edge control: https://amzn.to/2YgOkxs
Equipment Used:
Camera: Sony a7III
Light Stand
Tripod
Because of our affiliate program with Amazon we do receive a small commission from your purchase. It does not affect the price of your item. Thank you for supporting us.
JOINT SOCIAL MEDIA ACCOUNTS:
FACEBOOK: https://www.facebook.com/YardeGirls
INSTAGRAM: https://www.instagram.com/yardegirls/
BUSINESS EMAIL: [email protected]
Shondell’s social media:
INSTAGRAM: https://www.instagram.com/thezendell/
Shonette’s social media:
INSTAGRAM: https://www.instagram.com/shonette.yar...
It'S chandelle it's shana and we're the young girls and, if you're tuned into this video chances are it's because you want to learn how to do this. Look. This is our natural hair box. Braids look with the curled ends. I know you came for it. So, let's just stay for it: let's get into it step one. We are going to part our hair first, we're going to start out by parting it into four sections and then we're gon na part, our hair in the back and boxes and in the front we're gon na do triangles. Okay, i'm gon na do the same thing box in the back triangles in the front and just an fyi tip. The triangles are much more easier to do than the boxes, because you don't have to be as perfect. They definitely matter. We have our four sections in two two and now we're gon na start step two, which is what is it parting more parting? I guess because we already parted our hair in four sections, but now, within those four sections, we're gon na do our little boxes that we are gon na start with we're going to start parting, the back first and then move on from there yeah and remember boxes In the back triangles in the front, our hair is all parted and separated into the sections and now step three. We are going to start parading and again we parted it like how we mentioned earlier triangles in the front boxes in the back. We separated it just for convenience, you don't have to separate it the way we did. It just helps us to make sure that our parts are. Our sections are as pristine as one person can make it how many braids or how many twists do you have in your hair 16.. I have fourteen, so i have fourteen chandel has sixteen let's go now for real, because these are natural, hair box braids. What we're gon na do is we already have the sectioned off and we already have it twisted we're gon na untwist, our hair, we're gon na use a little bit of edge control just to make sure we tame those little natural fly: aways, honey, okay, tame that Bad boy, we already blow-dried our hair, so we're gon na kind of have a little length, which is nice because there is no added hair into our box, braids. So tame the edges brush brush brush, oh yeah, brush brush brush to try to get it as sleek. As you can then braid the hair, yes and then do that over and over and over again until you're done true edge control, put a dime size amount on your finger and put it on your roots. Take the brush make sure you leave your edges out. Grab your three pieces, i try to get them split as evenly as possible because you don't want to run out of hair towards the end and then you have like skinny braids at the end, because you don't have any more hair and just begin your braid. Take your ends, take your moisturizer and moisturize. Those ends up okay, so we are at our last step. The fourth step. I think it's the fourth step. I'Ve lost count a little bit so too. Okay, so shawna just come first, the fourth step we're at the final stage and that is putting our curl rods. So you already know we have very moisturized ends and they are going to just curl up into these beautifully. You see waves tomorrow, okay, so we're just gon na speed through that, throw some curls on there and make sure that your ends are very moisturized, not just moisturized like very moisturized, because the more moisturized your hair is at the end, the better it's going to curl Up and that's a fact where you get that fat from sis i've tried it so from personal experience, she's telling you guys, that's the sound of us being finished. Oh that's a great feeling! Overall, it didn't take us much longer um, it didn't take us much. It didn't take us long um, we didn't time it, but we were also playing around. We were talking. We were facetiming, we were braiding, we were chilling, so that was like a couple hours overall, but it will not take you a couple hours. We assure you on that i would say an hour and a half yeah, including blow drying your hair and putting your braids in which is actually really great, because if you were getting your hair done professionally with weave like this, would not take no hours hours. You know it still playing all right, so we are going to go to bed and we're going to wake up and take these out manana tomorrow and we'll see you guys tomorrow, adios hey guys, so it is the next day and we are back. The perma rods have been in all night and we're about to take them out if you've never slept with perm rods too they're, really not that bad yeah they're, not the most uncomfortable um yeah rods, they're tiny, so they aren't too bad. We also when doing our braids. We left a lot of edges out, because you know this look is really about face, since you don't have any hair added to give you more volume. So we were like okay, so leave a lot of edges out and we will lay them and that'll be a part of the look. So we're all done. As you can see, the edges are laid, the braids are nice and neat and all done the curls are at the end, and then what did you want to tell me about the end? I like it so for the end, if you guys would like you, can unravel uh some of your hair at the end, to make it look like um that traditional, like you know, when you have the box braids and you dip them in water because they hot Water and it curls up yeah your natural hair can look like that too, because you have the flexi rod or not the flexi rods, rather the um perm rods. So it kind of looks a little curled and you can have that. Look too. Yes, i'll insert it right here what it looks like if you take the ends out a little bit. Thank you guys so much for joining us in this video. We appreciate you staying all the way to the end. Your love is much appreciated and we'll see you guys next time,
Comments
Addy,s lifestyle: They look really good ❤
arianna schroeder: You both are extremely beautiful
Breion716: Love the result. Did you have to curl the ends each night?
Coolin' with Cousins: We love a bilingual Mami! Edges are laiddd. Obsessed, per usual!
Just Me: Y’all Are so Pretty, Thanks for the idea!!!
Yolanda M: Looks great
Simone Jackson: help!!! I have a mixture of 4b and 4c hair. i have never used a relaxer, but for some reason my hair won't grow past my shoulders. how should I proceed? feel free to let me know in the replies :)
Deborah Gordon: Cute and smart
Clark McKinnon: Love the camera