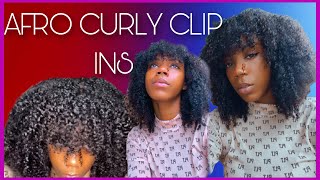
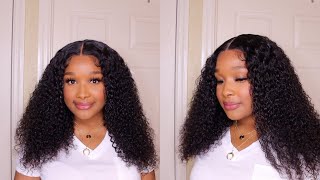
All Stiched Closure Sew In | No Glue No Gots 2Be | Beginner Friendly
- Posted on 04 November, 2020
- Sew-In Hair Extensions
- By Anonymous
THANKYOU ALL FOR YOUR SUPPORT!! DROP IDEAS OF VIDEOS YOU WOULD LIKE TO SEE DOWN ON THE COMMENTS SECTION!! FOLLOW ME ON SOCIAL MEDIA
TWITTER: TeeshaTee1
IG: 1TeeshaTee
Be yourself theees no one like you and what you are carrying, no one else can !
Thank you guys for tuning in don't forget to hit that subscribe button. So basically we're here to do an all stitch closure sew in. So this is the basic braid down make sure that your first two braids are the smallest. That will give you the flat look that you will need. I already bleached her knots for that natural look. So now i'm just going to put some foundation of her skin color onto her scalp for a more natural look, i'm going to do the same thing to her closure. I'M going to do a t-shaped um pattern, go across the front of the lace and down the middle, because she's getting a middle part. Now i'm going to place the closure right on top of the two smallest braids at the beginning of the hairline, and i'm just going to make sure that it's placed directly in the middle of her head. I just place my finger on top, so the closure won't move, as i am attaching the closure to the braid. As you move to the other side, you'll notice, the closure will move so just reposition the closures back to where you want it to be place. Your finger down and begin to attach the closure to the braid, while doing so ask the client to hold the other side of the needle and thread tight enough to where there is no bunch or any gappyness. Any gappiness inside the closure. You'Re going to take a rat tail comb and part the closure slightly in front of the braid just so you can be able to get a clear path of your sewing technique. You'Re going to start at the bottom like to do three stitches and then a lock. So i like to start at the bottom and then i go in the middle. I sew right in front of the braid making sure that it's the needle is going through the lace right in front of the braid, through the braid and and last but not least, i hit the top and after the top i bring it all the way back Down to the first beginning and lock it after that, i like to comb it through to make sure all of the tangles are out, and it's just as simple as that. As you are beginning and then you're just going to repeat the same steps for the other side, sometimes you may have to adjust the lace, because you don't want the lace to overlap the braids. You just want the lace to slightly be above or in front of your braid, make sure that you are keeping an eye out for the lace, because it will move sometimes so just adjust accordingly and just you know, begin sewing or continue to do what your next Step is i like to leave a little bit of the client's real hair out when i'm doing an all stitched closure just so she won't have that wiggy look um. Just you know i like to have that more natural flow to the head. Look! So that's the reason why you see me pull the her hair out some on this part, i'm going to sew the thread halfway down on the closure and then i'm going to do the same. On the other side, i don't like to bring the thread all the way down on one side of the closure, because you have to have that balance in order to have a flat neat look. So after i'm done here, that's when i start back on the other side and just finish off sewing all the way around. I like to bring the right side of the thread all the way around to the left side of the closure, and i do the same. Vice versa. And now we're just going to continue to sew around make sure that you are continuing to hold your hand down on top of the closure so that it won't move as you're sewing. So last but not least, add the foundation or concealer to the client. Um part. It looks a little orange, but trust me it isn't as orange as the light is making it. So i hope you guys enjoy don't forget to like comment and subscribe. Thank you for tuning in again to tv. Until next time, y'all you


Comments
SHANELL HARRIS: Very beginner friendly and it was just what I was looking for!! So many ppl post videos on sew in closure but still use glue and spray and I don’t want either. So thank you for making this flawlessly and completely hand sewn.
Aries Asata: Beautiful job, and you were very clear and concise with your tutorial! You are talented! I'm subbing!
Likedbymany: Short and straight to the point. It came out great and I definitely learned something new. Great video
Annmarie Nelson: Thank you enjoy your teaching, gave me all the information that I needed
MyLifeMyJourneys: I’m going to try this on my grandmother! Just gotta find a salt and pepper closure. Thank you!!!
kally well bad: I really love this technique
Chilcie James: Love this , well done
NTheStreetTV: Keep Going Queen
Liyah B: I'll take this over the melted method any day!
Simply Ti: Wow thank you sooo muchhhh!!!!!!!! I’m about to have a mmo and I need a hair style that will last while I recover from surgery!
Marcia Terceiro: Perfeito é muito caro
Jones Family: Your technique was very helpful
Safani Ooft: Hi i liked how u started with the importqnt stuff like the foundation, nice !
Tracie Spencer: How long can a sewn in closure last?
Ms. Hollywood: Very good 1st time video
vctxr: So consigo ficar pensando quando lava essa maquiagem escorrendo e ficando liquida a coceira que dá, acho muito idiota pintar
Marcia Terceiro: Eu quero uma desta
Kodi Cobb:
Azalea Toney: Where are you located??
Vulgar Nailz: I think I learned something
PrettyLuh Niya: HEY TEESHA