How To Do Full Sew-In Weave In 10 Minutes + Easy Lace Closure Beginner Friendly
- Posted on 03 August, 2018
- Sew-In Hair Extensions
- By Anonymous
“10 Minute Sew-in: Save Time & Money
100% Virgin Human Hair Weave”
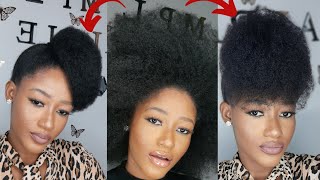
10 Minute Sew-in is a Patented 1 Unit extension that allows the wearer to have a full sew-in within 10 Minutes or less. The cap is 100% open and breathable and can safely be sewn in and worn for weeks and months just like a traditional sew-in weave. Unlike a u-part wig, the 10 Minute Sew-in gives you access to your hair underneath your unit.
The sew-in tabs around the unit allow you to sew down your unit without damaging the actual cap, preventing it from having tears or rips, which allows it to last longer. The 10 Minute Sew-in is easy to install. This tutorial demonstrates just how easily I installed my unit. I also show you how to install this new easy lace closure.
PRODUCTS used:
Hair Dye (Developer https://amzn.to/2Mg9vbm & Powder https://amzn.to/2KnH0H3 ):
Hair Oil: https://amzn.to/2MduI5O
Needle/ Thread: https://amzn.to/2vfgYAW
Mielle Organics: https://amzn.to/2LY8ojx
Blowdryer: https://amzn.to/2Mdv2S4
Edge Control: https://amzn.to/2ALivUK
Curling Iron: https://amzn.to/2Mh53ZV
Products I am wearing:
Traditional Mongolian Kinkyy Straight Virgin Human Hair
6.5oz 14/16 inch (I cut the hair to be closer to shoulder length)
https://tenminutesewin.com/shop-hair/t...
Tear Proof & Lay Flat Lace Closure in Traditional Mongolian Kinky Straight Virgin Human Hair
14 inch
https://tenminutesewin.com/shop-hair/l...
Supreme luxury Virign
https://tenminutesewin.com/shop-hair/s...
https://tenminutesewin.com/shop-hair/l...
The Traditional Virgin Hair Lasts 9months -1 yr.
The Supreme Virgin Hair Last 2yrs.
I bleached the Traditional Virgin Hair just to see if it would bleach. It did bleach very well. However, its best to go with the Supreme Virgin Hair if you want to bleach it. The Supreme hair will last longer when bleached and colored. I did not have any issues with the hair after I bleached. I did not experience shedding or tangling.
Here are more details on Virgin Human Remy Hair:
Virgin Hair has been cut from one human hair donor and is chemically unprocessed. It is 100% human hair with all cuticles intact and facing the same direction. Virgin hair should be tangle free. The hair should have been permed, dyed or processed in any way.
More on Hair Textures:
Kinky Straight Virgin Hair: Kinkyy Straight hair is a texture that mimic coarse hair that has not been relaxed or pressed. This texture can be straightened and will return to its natural coarse pattern once wet.
Traditional Kinkyy Straight Human Virgin Hair
https://tenminutesewin.com/shop-hair/t...
Supreme Kinky Straight Human Virgin Hair
https://tenminutesewin.com/shop-hair/s...
Brazilian Body Wavy Virgin Human Hair: This Brazilian virgin hair has a slight wave pattern to it. It holds curls well and can also be straightened. This Brazilian human hair weave texture can be worn in its natural wavy pattern.
Supreme Luxury Virgin Brazilian Wavy:
https://tenminutesewin.com/shop-hair/s...
Traditional Luxury Virgin Brazilian Wavy:
https://tenminutesewin.com/shop-hair/t...
Kinky Curly Virgin Hair Weave: Kinky Curly weave is a virgin hair texture that matches natural hair that has not been straightened. It has a tight curl texture and is perfect for those with natural hair.
Kinky Curly Hair Weave
https://tenminutesewin.com/shop-hair/s...
Brazilian Wavy Curly Hair Weave: This raw virgin hair texture is great worn in it natural curly texture and can be found here:
Brazilian Curly Hair Weave
https://tenminutesewin.com/shop-hair/s...
https://tenminutesewin.com/shop-hair/t...
_________________________________________________________________
Order custom wigs at SAVIHAIRCOLLECTION.COM
For business inquiries email: [email protected]
______________________________________________________________
❤️FIND MORE ABOUT ME HERE:❤️
BLOG: http://bit.ly/2g2rnrv
INSTAGRAM: http://bit.ly/2xzazPl
PINTERST: http://bit.ly/2yZ2Jjg
YOUTUBE: http://bit.ly/2yETBnJ
TWITTER: http://bit.ly/2zfmPXe
FACEBOOK: http://bit.ly/2ydIQWA
SNAP: SIMSITY124
WEBSITE: SUGARCOATEDJOURNEY.COM
So girl, let me hold you meeting all around make me feel like it's us symmetries and today in this video, I'm gon na, be showing you guys how I installed my 10 minutes so much so I love sew ins and it's kind of like what I started Off doing so, I love to always just kind of go back and just find easier ways on how to really install your so in and how to do and still in and how did this make it life easier. Okay, so in this video, I'm gon na be showing you guys how to do a sewing using the 10 minute sew-in. Also, I'm gon na be showing you guys a brand new method on how to install your closure. Now I haven't use a closure, and so long so when I seen this new technique, I was like. Alright, I've got to show my audience how to definitely definitely install this closure, so it's called the lay flat closure. It comes with these like little tabs all around that. Allow you to pretty much sew on your closure and as easy as possible and make it as flat as possible. I'M excited to show you guys that enough of me talking go ahead and watch the video and towards the end we will meet up, and I will tell you my thoughts when I thought of everything. So here I am starting off on a freshly-cleaned head, as you can see my edges, that laid back because I went ahead and I used some edge control from lovely bees which I've been using in, like my last, like 10 videos. So go ahead and check out that link down below to get started. I did go ahead and part my hair on the side, because I will be having a side part and I went ahead and brushed out my little fuzzy edges. Okay, I'm not gon na call them baby here, I'm gon na call them edges, alright, guys so starting off with the first braid. I'M tell you guys this from now. The first four braids on on both sides of that part will be skinny, because you want your closure to lay flat, try to avoid putting larger braids in the front, because guys it will be bulky okay, so to get to the next braid. I am going to be connecting ball the braids to one another. Now, if you do have long hair, though this may be a little bit of an issue because you do not want the sides to be bulky, so what I suggest is to take each individual braid, like that. You know that end pieces hanging and connect each braid to that corner. Oh that should take away from the bulkiness because you do not want it to be. You know just not lay as flat as it should be. So, let's get into this sewing guys. Now you guys know, I have been on the wig trail. Ok, the wig life style for so long, but you know what I've really been craving like a really good sewing. It'S just. I don't feel like putting in the time to actually do the sewing, but there are benefits to a sewing. I will say that and that's what I miss, I missed the whole natural look. I missed the whole being able to touch my damn scalp or just not having a wig. You know not having a wig on, so I was kind of really happy to go back to a so on my sewing days, and I benefit with this one though it was like an itch of my scalp, and I can like grease my scalp and I can Wash my hair a lot of times when you are doing like sew ins or whatever, and you do put a net underneath. You can't really get easy access to your scalp and that's a problem that I always had the other problem that I always had was it just takes too much damn time like it takes so much time, and I think that's what just started turning me off. It was like I did not, especially when you doing about yourself at home. It takes a lot of time for you to do a snowman like you're gon na bout like to to like not even two hours, you're talking about like to read to like a good six hours, if you're doing about yourself and you're. Just taking your time, you know, and a lot of arms trunk goes into that, and I kind of just wanted a huge break from it. That'S what I liked about wigs you know, so I kind of gave a break from sew ins for that reason, but being introduced back to the ten minutes so away and kind of just reminded me of why and why I can go back to sew ins and Why I would love a product just like this? This is my end pattern and it looks really nice and neat. I want to show you got the full 360. I didn't sew up the part that was hanging. I went ahead and I pinned it up. As you can see, I have the gold pin right there. You can start up if you want it's totally up to you, but I didn't want to I'm gon na go ahead and just dye the hair. I want to add a little bit of color to it. The first video I didn't dye the hair. You know because I just didn't want to, but I wanted to know if it could die cuz all you guys asked me that in the comments last time, so here you can see, I am dying it I bleached it. I processed it for two hours. So I did this process about two times and then I blow dried it before I got to the next process, and here we are going ahead with the last setting. I also bleached the nuts you don't have to, but I went ahead and I wanted to, and Here I am just blow drying it. I love the color. The result came out amazing and then I blow dried. It put a little bit of oil on that bad boy, and Here I am alright guys. So here is the 10 minute sew-in the actual unit, and I want to show you guys how breathable it is. You can put your fingers through it. You can grease your scalp, you can moisturize and boom. This is how it looks: let's go ahead and get into the closure, so you see these little black tabs right. Those are gon na make your life so much easier. Okay, so take note on how I have it laid on the side of my braids: okay, that's where we're gon na sew it and the black tabs help you to kind of make her stolen just lay very, very, very flat. So it's the ten minutes. Owens new technique and honestly I love it because I were friends who so much so to go back to closures. This made my life so much easier, so I'm pretty much falling through the net and I'm someone to the braid okay, I'm told to both at the same time he's a little slow mo for you guys, a little slow mo and I braid one side. First obviously, and I braid the other side, I used two different needles. I didn't take this needle and bring it to the other side you could've, but for me it was just easier to sew on this side start off and then go on to the other side. With a brand new needle, so you know now, I'm just like trying to get my little edges in place. Please brushing it back and make it a nice and smooth a lot of times. Right here is the issue when it comes to, like your closures, a lot of times like it won't leave flat or just will not stay. So the point of this string right here that this piece of net on the closure, which comes on the cloche already sewn the point of it, is you can pull it tighter and it makes it label E flat, as you can see. So that's kind of the point of what these black tabs are. As you see, I sold this guy down already and none of the boys and have sewed on right here before I go ahead and go all the way around works a lot. It actually makes a huge difference. The mesh part like how its laying down flat you wish a good flow under that have such a issue, but it won't lay flat that part is so annoying for me, so this actually makes a huge difference to have these black tabs pulling it down so that It can go ahead and stay tight with it, so actually on on these black tabs right here, hi guys - and that was time to actually install the 10 minute sew-in unit. So right here is where we are going to sew along. This is how it looks and then we're going to go ahead and sew along these black tabs and then we're gon na. Take this go around our hey. I made my camera brighter so that you guys can see so see it kind of meets and now for my edges, I'm just gon na go ahead and same them things because a little crazy! Now I like this messy look, but I just wanted to go in and just kind of like and neaten it up a little bit, so I went ahead with my curling iron, as I'd mentioned before and yeah. This is pretty much my end result, so I loved it. I don't know what you guys thought I loved it alright guys. So I'm very curious to know what you guys thought about. The actual lace closure, like no technique, is / method and about the whole ten minutes soand. I kind of want to talk about and touch on a little bit of the benefits of the 10 minute sew-in, because I know in the last video you guys were like. Oh, my god, it's a u-part wig and, unlike bra it's not a! U part, wig like it is a whole different thing. Like a! U part wig, you don't really have much access to your scalp and it's not really as easy to put on, and it's not really intended for it to be sewn onto your head. Okay, a! U part wig with the 10 minute sew-in, you can literally like you're supposed to slow it down, cuz, it's a so in and if you guys know a sewing takes like 2 to 4 hours or even longer. Ok, if you're doing it by yourself at home. So the benefit of this is like, if you're at home and you're like an everyday person that cannot really do that here. This is really benefiting because, instead of taking two to four hours, it's taking you 10 minutes to actually install it. So I did it before. In my first video - and I actually really liked it another thing that this hair is a kinky texture and in the first video it was also a kinky texture. You know so I didn't know if it could like. I wasn't sure if I could color, but then I found out that it could so I wanted to go ahead and put it to test myself. So I went ahead and I colored it and it came out really pretty actually like it came out good. The hair. Still is nice and soft and has like a really good feel to it. One more thing about the closure that I love it's the part that part looks so good. Like looks really good. I posted a little bit, but I love how the part just looks realistic on its own, like yes, I'm gon na head and at least not as well as I showed you guys, but I love how it's just some closures. You don't have to do nothing to it besides a little bit of tweaks and this one, that's that you don't guide only thing, but just tweak it a little bit and it looks good. I have no foundation on this, like I swear to you guys nothing, but I like it my big hero, all right guys. Thank you so much for watching this video. I hope you guys really enjoyed it and I'll see you guys on my next one bye, guys
Comments
Amber Sheffield: I’ve never had a sew in, but this is so perfect for beginners like me. Thanks ❤️
Ceonn Edwards: Always a seamless finish love it
Maethomas78: Great job girl ❤️
Sophia Payden: I love it and the color combo its so nice
Deidre Rilry: Love this 10 min swing must try it
Bri Worldwide: First step for me: learn to braid
Tadriana Thomas: I love it
Beauty by Jay Morris: Loved it, I need to try this, yaaasss!! Simone#notificationsquad
Ebony Gray: Love your videos!!
Lillian Garcia: I would very much like one of these, just a different color burgundy, really really looks good
mental passion81: Great job, great look! I envy ppl who can sew hair onto their heads
Mrs Tychic Lee Shaw: Beautiful ✨✨✨✨
MS DLTV: Love the color!
Everette Williams: Simone u r very talented bless up ur self and much love and success
Lynn Worthy2: It IS Soooo SaTiSFYing to Watch YoU BRAID your HaiR!!! Thank You, and Ive also received LovelyBs Edge Control too!! And its so Wonderful!!!!
Annette Brown: Nice...very detailed
vivian panek: Wow I love the 10 min. sewing
Debra Morton: I loved it
Goldi M: Lease help me i would like to do this ,do the two pieces come together in a pack?The frontal closure and the 10 min unit for rest of the hair?Would I be able to this at a beauty hair shop?
vivian panek: You look beautiful and I love the hair color and all
lala: Thank you for this can you do a removal video
MyOwn DayOne: Are there updated affiliate links available?
Ariel Valentine: Sew in maintenance video please and you're so pretty
TOWANDA the STYLIST: Your hair is Gorgeous
Maya and James: This is cool a wig can get old putting on and off
Melissa Plair: @simonesharice is there another vendor that sells the units and closures in 2021? The site is no longer active.
Drea4U2luv: This look is cute. However it was 10min installments for each piece. Either way, it's great to know.
Asia Maria: Omg yess I remember when you took down this install on your live❤️
Tina S: I ordered a product 66 days ago use caution when buying!! Here is their policy "Cancellations: All sales are final. Orders can not be cancelled for any reason. Cancellations due to wait time delays: If for any reason your order is delayed beyond the original wait time and the new wait time is 90 days or longer, we will give you the option to continue to wait or you can choose to receive a full refund. " They will not refund you even if you request a refund 2 minutes after ordering keep that in mind!
Ty Diamondz: You look good
Mahogany Woods: Where can you buy a 10 min sew in wig
Ja-Nee Reviews: Cuteeeee.....
Bonita Johnson: You braid good af. Lol! My braids be fat and ugly
tessa bonman: Where did you buy this unit and closure.
yaya b: that's way too much hair, do they have one with less density?