Stop Doing This If You Want Your Lace Frontal Install To Last! | For Beginners | Ali Pearl
- Posted on 26 July, 2022
- Sew-In Hair Extensions
- By Anonymous
Shop Now➤https://bit.ly/3LAAgpb
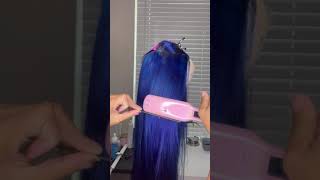
Hair Info: 30inch deep wave 13*4 HD lace frontal wig 250% density
❤#AlipearlHair Official Store:➤https://bit.ly/3x3GtpL
1.Join FB Group, Win FREE HAIR➤https://bit.ly/3uNpwgu
2.Lace Front Wigs for Sale!➤https://bit.ly/3LrDxXQ
3.Invisible HD Swiss Lace Wigs:➤https://bit.ly/3x3Gudj
#alipearlhairwig #alipearldeepwavehair #alipearlhdlacewig
Instagram @alipearl_hair: https://bit.ly/34I3Oyd
Youtube @Ali Pearl Hair: http://bit.ly/2H0Gmmc
Facebook @Ali Pearl Hair: https://bit.ly/3aKwxX3
WhatsApp: +86 15890076489 E-mail: [email protected]
So, what's up everyone, it's your girl, young, afrikaner and i'll, be showing you why your frontals are not lasting. So if you struggle with your frontals lasting this, video is the one for you continue watching to learn some tips and tricks on how to make your frontals last, so the hair i'll be using in this video is from ally pearl. I have their 30 inch deep wave, 13x4 hd lace front to wig and a 250 density, and that is how the wig looks like um. It is 13 by 4 all around and right now, i'm just simply just showing you guys how to style the wig. I'M just doing a side part, and then you know slicking uh, the roots down with my cara care, wax stick and then using my hot comb on the hottest setting just to press it down. I just wanted to show you guys quickly how i just styled the hair, so i'm not really going to be explaining much, i'm just going to just see how i style the hair just making sure that the hairline is nice and laid, and so i can see It'S she's looking good and now i'm just going to go ahead and put in some won curls. This is my chi lava hot tulle that i'm using and i'm just going to go ahead and just do some nice wand, curls all over the hair and i'm just pressing out the hair. And then i'm going to go ahead and use some hairspray. And this is how the hair looks like after i'm done. So i did do my ball cap method off camera and if you want to see a complete video on how i do my ball cap method, i have the video linked right here in the video. For you to watch it um so right now i'm gon na go ahead and use a paper towel and some 91 alcohol, and this is where a lot of people mess up as to why their frontals don't last and it's because the prep is trash. You need to prep your skin and make sure that is clean of any dirt or oils around your hairline in order for your adhesive to stick and for your frontals to last. So i go in with my 91 alcohol on the paper towel two times around. My hairline, i make sure that you know all the dirt all the residue, the gel residue that i have from the ball cap method and the makeup is all gone. Y'All and, as i can see, i'm going. I'M gon na go ahead and do another round just to make sure that all the dirt and oil is gone from my forehead. So let that dry and now i'm gon na go in with my erica j homemade down adhesive skin guard, and you want to make sure that you're using a complete adhesive system that is um together. So i'm using the erica j system and i'm using the skin guard just to prep my skin, so that the adhesive could last and now i'm just measuring out how the frontal is going to look like. I want to make sure that it's in front of the wig cap make sure that i don't have like any excess wig cap. I need to cut off because you don't want it to be sticking out through your lace. That'S not a no-go, and another thing: that's. Why people mess up with their lace? Frontals is because your wig is too small. Stop trying to force the wig if it's too small, the hairline must reach ear to ear, stretching out your wig, because it's too small can cause rippling and that little ripple effect in the front of your hairline. So what i'm doing now is i'm cutting slits at the temples of the wig. You want to do this just to ensure that the wig is fitting snug around your hairline and there's no rippling effect. So now i'm gon na go ahead and cut out the ear tabs, as you guys can see, i'm cutting right where my ear ends or stops at. I guess, and i'm just cutting around the ear want to make sure that you don't cut off too much because you still want to um. You know, adhere that little skin between your hair and then your ear. So yes, just cut right at the edges of your ear. You want to cut around that so now that that's done, i'm going to go ahead and just roll the wig back a little bit, i'm not going to shift it back, i'm just going to roll it back and now i'm going to be using the erica j Hold me down adhesive. Now, i'm going to start in the middle of my forehead and work side to side and i'm squeezing the bottle gently. I don't want to squeeze out too much glue and i'm just applying it in a zigzag motion. Now, where a lot of people mess up at is the width of the glue, you want to make sure that your width is big and not small. You don't want it to be small, because then your wig doesn't have enough glue to grip on which can cause your wig to lift so the bigger the width, the more it has grip, the smaller the width and got no grip. Okay and right now. What i'm? Using is my three in one baby: hair comb, i'm using that little spatula part and i'm literally just applying um. Well, you know smoothing out the glue and you want to keep it in that same area. You apply the glue at and applying the glue in. The zigzag motion just really helps spreading it out a lot more easier, as you guys can see, i'm not really having trouble, you know spreading it out and i'm just kind of like pressing it down and again. You want to make sure that it's between your wig cap and also your skin, you want it to stick to both the wig cap and your skin, and i went ahead and just did two layers of this. You could use three or four if you wanted to have it for a longer time, but i'm just having it for the night and i'm taking this off now. This should be a crime yeah. I see this all the time and a lot of people apply their lace on wet glue. Please do not do that y'all, let it dry clear and as soon as the dry clear, then you're able to apply the lace onto the glue and right now. What you want to do. Is you want to make sure that you're applying the lace, the hairline should be in front of the glue, not on top of the glue, not behind the glue but in front of it? So when you're cutting off the lace, you'll still have some, you know flaps going on, but i rather that and for you to you know, do a double check and then go in with more glue than to remove glue y'all so make sure that hairline is in Front of that glue, not behind and not right on top of it. Now what you don't want to do is use scissors and cut straight across. You want to use a razor comb or a razor blade, i'm just using this eyebrow razor and i'm going to go ahead and cut in a jagged motion, and this will just give you the most natural look ever y'all and, as you can see, i'm just going In sections i'm starting off in the middle first and then i'm going off to the sides and you can use either your hands or a comb to suppress the lace down into the glue now i'll be using some of the glue. I have it on my hand and i'm going to be using the rat tail piece of my comb and i'm just going to go ahead and start outlining the little pieces that are still flapping. As you guys can see, i'm going to go ahead and lift it up and outline where the lace ends at and i'm going to go ahead and apply two layers and let that dry clear before i apply it, i'm just going in sections i'm starting off in The middle first and i'm just using the rat tail comb just to map out the perimeter of where the lace ends at i'm gon na. Let that dry clear and then i'm going to go ahead and press it down with my comb, with the teeth of the comb actually and i'm just doing the same thing on the sides. You want to make sure that you're, just kind of checking to you know, lift up the lace, making sure that there's no like lifting lace, because that also causes your lace to lift further. If you have any pieces that you didn't glue down now, y'all y'all about to hate me, it's gon na be half and half okay, but i know some of y'all gon na hate me when i say this, but the reason why your lace front tools are not Lasting is because your lace is too exposed. Add some baby hairs. You guys, your baby hairs are like the armor in battle. Y'All, like the baby hairs, protect your lace literally, and i don't know if you ever noticed, but when you've seen people having their lace, lifting usually it'd be the parts where it's exposed that be lit, that be lifting and the places where they have the baby hairs. At aren't lifting it's because the baby hairs actually protect the lace y'all. So right now what i'm gon na go ahead and do is carve out some baby hairs. I have two on the side and one in the middle, so overall, together five baby hairs. You want to make sure that you're just taking out a pretty small amount, you don't want it to be too thick well, at least i don't want it to be too thick, but to each a song y'all. I ain't going to judge but yeah i'm going to go ahead and just take a little piece and as you guys can see it just also just makes it look a lot more natural. I i i understand, people want to go for the minimalistic and i get that every look doesn't go with baby hairs. I get that but hear me out. If you want this to last in your economic betty, you feel me. You'Re gon na have to use baby hairs. If you're trying to have your lace frontals last more than a week. Please y'all, please do it, you can keep them minimal. You have to do too much, but have some baby hairs to protect your lace. Literally, that's what they're there for it's like your eyelashes, it's like the hair on your eyelashes or the hair on your eyes. Protect your eyes without the hair it wouldn't be protected, will have all types of infections in our eyes so think about that. Like so now, i'm gon na go ahead and melt in my lace with my fantasia spritz and i'm gon na spray that all around the perimeter of my hairline, and this is also another reason why people's lace fronts probably don't last, is because you're not actually melting. It um this is a way to melt your lace, frontal and i feel like this is actually better than the gossipy spray. This thing it lasts. Okay, so get yourself some spritz. I know everybody. I know every ethnic background got some type of spritz in the bathroom somewhere that they haven't used in years, go ahead and use it on your frontals y'all. You would not regret it, and now i'm going to go ahead and just use my rubber band number band. Uh, i'm going to go ahead and use my band my elastic band and tie that and leave that on for 20 minutes, and now that i'm taking that off boom y'all see that melt. It was not looking like that before. Okay, it wasn't, it was not. Oh look at that melt. It looks like my skin. You guys all right so now that that's done, i'm gon na go ahead and start cutting the baby hairs. I'M just cutting the baby hairs about an inch, long inch and a half, maybe but inch long. The tendrils will be a little bit longer than the rest of the other baby hairs, because you know this is going to be longer and y'all. Whoever invented this way of doing baby hairs. I applaud them because this literally makes your baby hairs. Last longer, i'm going in with my tvx um pencil flat iron. I think it's in like a three and one four, three and a fourth inch, whatever yeah, it's a three fourth inch um barrel and right now, i'm just curling my baby hairs. I like to curl them inwards because i feel like it's a lot easier to just um. You know mold them, but yeah. The reason why these last longer is before i used to be the molding gal. I used to use the mousse and stuff, but a lot of people, especially for beginners, really struggle with that, and their lace always end up lifting. So this one is literally foolproof. You guys you're able to do your baby hairs without you having your lace, lifting aka. Your lace will last longer so i'm just going to go ahead and use the brush part of my baby, hair comb and some spritz i'm going to spray some spritz on the brush and literally just carve out the baby hairs like just shape it like shape it. The way that it's curled and you're just going to go ahead and just play around with that, i'm going to do that all around the perimeter and it's just that easy y'all. Of course it's going to take a little bit of technique and if you feel like they're lifting up go ahead and apply a little bit more spritz, but don't overdo it y'all, don't overdo it, just one two, a little spray and then go ahead and just you Know carve out those baby hairs, and this will have your baby hairs lasting longer. On top of you having extra spritz on your lace, so it will have it extra protected and extra molded down and your girl went ahead and did her makeup off camera, and these are the finished results. I hope you guys enjoyed these tips and tricks. I know my beginners they struggling y'all struggling, but i got you. Your girl, gotcha y'all, know always gotcha. Please comment down below and let me know if this video was very helpful for you guys go ahead and give me a thumbs up if you can, but i hope you guys enjoyed this video like comment subscribe to my channel. If you have not already click that bell notification to get notified of, when i drop videos and i'll catch, you guys in the next one later,


Comments
christine love: i have a question. i’ve been scavenging on youtube for someone to address it but haven’t. anytime i try to glue down my wig, there are certain areas along my hair line that just won’t dry, and those parts are usually on top of fine hairs on my forehead that aren’t quite my edges either, therefore i don’t really care for them. but do i really just have to wait for a lot more additional time despite all the other parts being dry or is there a way i can make sure those fine hairs aren’t slowing down the process? i’d rather not cut it. they’re literally like the edges to my edges, is this an issue anyone else has?
HAIR-VENTURES WITH ADRIANA : Very helpful tutorial ✨
Mrs Rockoletta Moss 😂: Love this so much! Thank you
Wiggins Hair: This is gorgeous!!
Mamiya: Hey love, could you please link the products you used in the video
Hermosa Hair: Love your hair video, you are so professional on hair tutorial, could we also have a collaboration with you?
Ali Pearl Hair: Stunning! Thank you so much for trying Alipearl Hair.
One More Hair: So stunning~~~
Zainab Jimoh: Another one, thank you
FLOTT Dmarie Forde: Glue and spray is not my friend. They don't work for me. I'm using elastic band to make it stay flat to my head and just take it off later...
Michelle Davis: Did you bleach your knots?
Dee Luther: Love Your Video U Definitely Slay this look Fuckn Baddie Alert Your Beyond Gorgeous u are Makeup always on Point Have a MarvelouS Week Too Stay Bless N Be safe Always
Kayy Gee: How do you shower with a frontal ?
G3na D: Ma'am excuse me imma need you to stop taking these long ass breaks loll . Slaying as always ❤❤❤❤
ItsKarryanne: loveeeee thanks for the tips
Zainab Jimoh: ✨✨
Elizabeth White: Alles sehr schön. Aber zuerst zusammen die Nummern 10 und 1. Eine verwohntt.online Brünette und eine anderes Blondine. Es wäre unfair, wenn ich 4 wählen würde
Highg Gon: ❤Only for fans over 18 year⤵️ Alles sehr schön. Aber zuerst zusammen die Nummern 10 und 1. Eine warmthh.Online Brünette und eine andere Blondine. Es wäre unfair, wennf ich 4 wählen würde
Elyse Elyse: Most wigs are too small for me. #bighead♀️
Traliajahnae Jim: Heyyyy!