How To Do A Dutch Braid With Weave | How To Braid
- Posted on 31 October, 2017
- Sew-In Hair Extensions
- By Anonymous
Hey GlamFam! Today I will be showing you how to do a Dutch Braid with weave! I already showed you all How to do a French braid, and then got several requests to do this video! I hope that you find it super helpful and informative! If you love this video and would like to learn more styles of braiding, be sure to check out my braiding playlist: https://www.youtube.com/playlist?list=...
Here are the tools I used for this video:
Mannequin head: http://amzn.to/2ygkdeo
Classic Denman Brush: http://amzn.to/2xJegUf
My Fave Braiding hair: http://amzn.to/2x8UtjX
The braiding hair used in this vid: http://amzn.to/2xaNCH3
Rubberbands: http://amzn.to/2xJWyAf
As always, please let me know what you think of this video on how to braid! Be sure to check out my other videos on this channel if you want to know how to do hair like a pro! If you like this braiding video, please give it a thumbs up, subscribe, or share it with someone you know!
I have many tutorials on this channel for braiding and hairstyling, you can find videos like, how to cornrow, how to make a wig, how to customize a wig, how to do children’s hair, how to do intricate braids, how to curl hair, and so much more!
Most of my tutorials are tutorials for cosmetology students, so I break them down and detail them as much as possible! My goal is to educate people on hair!
Thanks for watching, and enjoy the rest of Glamtober!
Love you GlamFam! Stay Glam!
Linwood
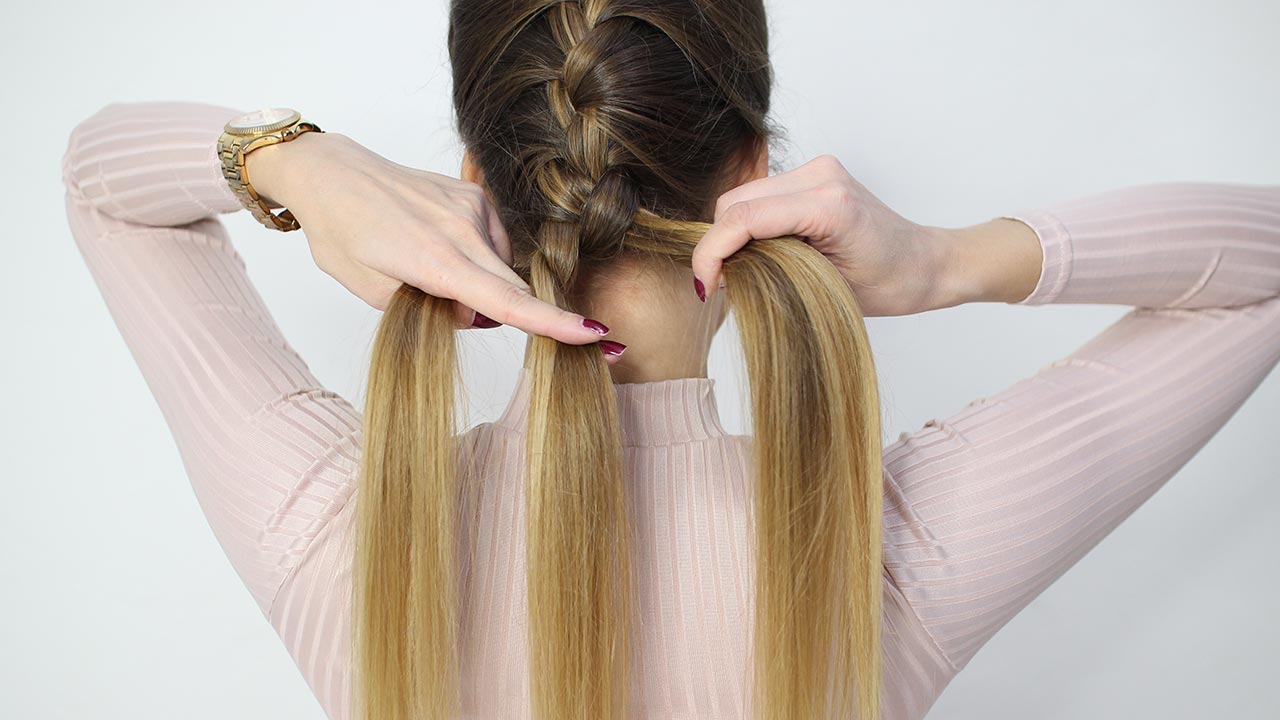
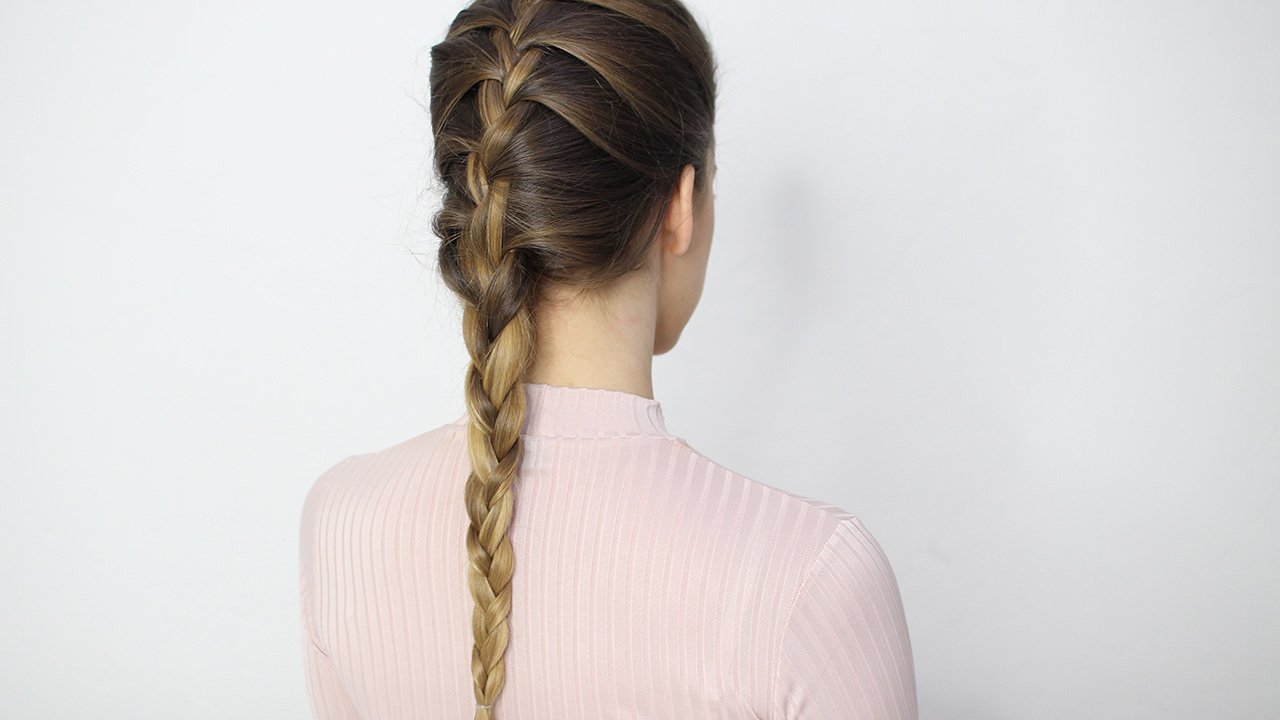
Hey glam fam Lenwood here and today, I'm gon na be showing you how to do the phrase with extension, hair added on my lovely mannequin Catherine here. Yes, her name is Catherine from the store. I did not name her that I probably woulda named her something else. Like bon Qui Qui, but that's not the point at any rate, she'll be linked in the description box below cuz. I know people always ask me where I get my mannequins from the hair that I'm using for this is the outrage jumbo braid. I just picked this up of my local man. You supply it is not my favorite braiding hair, my favorite braiding hair is actually rusta free, which I'll see if I can find a link and I'll put it in the description box below for you, because it's incredibly soft it doesn't cut the fingers, it doesn't cut The hair and it's really really easy to work with, but here locally is really hard to find. So I have my extension hair, which is about half a pack because I'm doing half of her head. You can make the Dutch braids as big or small as you want to it's entirely up to you, and I've already stretched this hair some, but just to kind of show. You guys, like the difference between stretch here and non stretch here, like see the difference in the ends. This one here is going to give you a much more natural fall when you're finish, whereas this one here would not so in order to obtain this. What you're gon na do is actually take this and you just pull at the little pieces at the end of the hair until it begins to stack or out like this, so I'm actually gon na save that hair for something else. So I'm gon na just show you here. I can take little sections of that hair and just begin to pull and just depending on how much you want it to taper down to look more natural. You can basically stretch that as much as you want. Okay, so to me, it's nice because it allows you have the length without a ridiculous amount of bulk in the hair. So let's go ahead and zoom in and we'll get started on these braids all right. So I'm gon na start off with my Denman brush. You guys know I love my Denman brush. I use the mess out of it. You can see it's all ate up from the blow dries. My lettering has rubbed off, but it still holding on strong, so I'm gon na be thankful for it and I'm just gon na start off by detangling this hair, because I just took it out a French braid with hair extensions. So if you were wondering how to do French, braids hair extensions check that out in my braiding playlist as well, I have tons of braiding videos in there for you to select from now. I will tell you, because this is a Dutch braid - is a style of underhand braiding. So if you don't know how to do underhand braiding, I would highly suggest that you check that video out first and then my video on Dutch braiding, before you attempt and adding in any hair, because if you don't have the basics, it's honestly gon na be very Difficult for you to do this, so basics come first and then everything else. So now I can easily drag my hands through the hair, fantastic good to go. Now I will tell you this style of doing. It is not like feet in braids, so it is gon na leave a knot at the top. If you want the most natural possible, you will need to do this in a feed inversion where you start with the hair and just gradually add it in. But this is just your basic, so I'm gon na go ahead and take my bundle of hair and I'm gon na section out some of this hair, and I want to pinch off, maybe like a third of the hair. So my goal when I separate it, is that my bigger bundle should be about twice the size of my bundle here, so I should have half of the amount of hair here as I do here. It feels a little thin. Let me add a little bit more to it and, honestly, the more you do this, the easier it will get in order for you to be able to feel that out so from there I'm gon na take my thin piece and I'm gon na wrap it around The thick piece like that and I'm just gon na add it to itself, so you guys see that just adding it to itself and then from there. I now have three pieces. A lot of people have different techniques, but I find that for me this one has always worked the best. It'S really easy for me to handle all right. So let me scoot you back in here, so you can see what's going on with Katherine okay, so I'm gon na start off by taking a triangle section of here and I'm going to basically take this here, I'm grabbing it here. Let me actually pick that up. I'M gon na grab it here there and there. So when you look at it, I've got it gripped just like this. Here it takes a little time to get used to. I will tell you and it can be really easy for your knot to slide. So just be patient. I'M gon na pick up a very small section here, so let me see if I can get that on camera very small section and we're gon na add it into my middle strand. Okay from there, I'm gon na go ahead and cross under with my left side, and as I do that and just picking up a very small amount of hair. I'M honestly gon na start this off like a cornrow. Rather than doing the incredibly precise sections like. I would for a Dutch braid, because I had to first make sure that I lock my knot in place before I can get into intricate details and from there I'm gon na go ahead and just go under with my right strand. Now you guys can see. I keep my fingers incredibly close, which I apologize. It doesn't make it a bit difficult for you to see what's going on as a viewer with the camera, but that's how I ensure that my knot is not sliding all over the place. Now you guys can see this knot here. It makes for a very non natural, looking braid. So if you're wanting it to look as natural as possible, I would highly recommend that you end up watching my video on how to do feet in braids and I'll show. You how to do feet in Dutch braids as well so from there I'm just gon na go ahead and pick up, I'm gon na. Add it to my outside strand and then pass under the middle pick up from the left. Add it to my outside strand, go under the middle back to the right, picking up very small section, so the smaller sections are the more neat your braid turns out, and this is what really helps us separate. A cornrow from a Dutch braid is the sighs sectioning. I know a lot of people like they get really testy with me about it, but honestly, when it comes down to it, Dutch braiding is a lot more detail-oriented on the sub sections. That you're picking up and cornrowing is a lot more detail oriented on your partings. When you are preparing to braid, so it's two slightly different ways of braiding they're, both underhand braids. So they are definitely in the same family, but it doesn't make a massive degree of difference in terms of how it turns out so from there just adding in a little bit of hair, and we just continue that process throughout that underneath side now notice. Each time I'm doing that, I'm taking my hands through there smoothing out adding it to the outside strand passing under, and then I go ahead and smooth again and tighten my grip if necessary. That allows my braid to look very neat and smooth, as I'm working, adding in small section add in keep in mind the smaller. The sections are the more neat and professional these braids look and they give it a lot more of a look of tightness without putting your client through a ton of discomfort. I'Ve seen some people were they braid incredibly tight, but their braids still turn out loose and a lot of times. It comes down to your section sizes and all that and they're just exerting energy in all the wrong places. So keep in mind whenever your technique is together, when it comes on to braiding, your braids will stay, they will last and they look incredible by the time that you finish now as you're braiding this. It will gradually get more bulky just from the adding on of hair, but the nice thing is because we tapered those ends. This is gon na taper down and blend perfectly with this hair, as you guys can see it already matches pretty closely and by the way, the color of this hair that we're adding in is in number eight, and I have not colored Catherine's here. It just came this color. I love her length because it's a great mannequin for me to use for demonstrating like updos and things like that and honestly, I'm not trying to purchase a billion mannequins to do hair tutorials, because I would not want a bunch of severed heads all over the house. Like that's crazy, I mean eventually I'll probably have more severed heads all over the house. I'M doing these tutorials, but still for right now we ballin on a budget boo, okay, so we're just continuing this process all the way throughout. So I'm gon na skip down at some until I get behind the ear and then we'll pick up with some more tips there, all right, you guys. So once you get to a point to where you are behind the mannequin or your clients ear, you are wanting to make sure that you have that mannequin or so that mannequin they can't feel anything. You have your client tilt their head forward. What this does is it stretches and extends they the skin on the neck. So that way, you're not pulling excessively tight there. It allows it to still be snug, but when they look down later it doesn't cause any uncomfortable pooling it doesn't cause any bumps around the nape and it doesn't lead to any hair loss, also known as traction alopecia. So that makes a massive degree of difference. Now. You guys can see. I can easily just continue braiding in, like let's say, for instance, if I don't want to finish my braid here. I want to finish it on this inside corner. The way that you direct your hands. It'S going to be the way that that hair follows. I see so many people that are like. Well, I don't understand. I'Ve got one braid, that's going straight down the middle and the other ones right along. My hairline and a lot of it comes down to the angle in which you're holding those hands so be very cognizant of how you're holding the hands and where you want that. Hair to go because, ultimately the hair is going to listen to you and the question is: are you a good leader, so somebody just got ta find it, but that's, okay, so we're gon na continue that process throughout here. Let me turn her thumbs. You guys can see so just continue to add this hair in and notice how that braid begins to kind of turn over this way for me or just continuing that process, all the way around all right, and now that I'm over here, if I wanted to, I Can then begin to kind of straighten my braid out and bring it straight down and notice? The positioning of my arms has changed. That'S directing my braid on where to go, so I know as a question I get quite frequently from people like how do i, how do I get my braids to go over here over there now? You know how now see here. I'Ve got like a few little strands that are kind of messy, so I want to stop and smooth them out just to make sure everything is as neat as it should be and it looks like you know. I should be teaching this video and we're just going to continue right on with that same process. Now now that I've gotten done here, I'm gon na go ahead and stop real, quick grip. That section and I'm gon na make sure everything is nice and smooth and then from there I'm just gon na continue braiding. So what I like to do is especially when I'm adding in hair to ensure that everything is nice and neat, because here it can get a little bulky. It can be a bit overwhelming for your hand, give it a slight turn before you pass it under. What that's going to do is it's going to help to merge together the commercial here that you added in and the natural hair, that's growing out of the scalp, and it just helps to make sure that everything looks much more appropriate and natural in terms of how The hair tapers down how well the hair blends in with hair that you have added all of that now, like I said, if you're wanting this, to look as natural as possible, keep in mind that doing so with the feed-in method is going to be quite a Bit better, I do already have a feeding method for cornrows and I will do a feeding method for Dutch braiding if necessary. Just let me know if that's what you want to see in the comment box down below so from there, I'm just going to continue this process of braiding all the way down through the and all right now you guys can see like say I have this one. Like short wonky strand, you see, if I can back you guys up something you can see everything. I'Ve got that one short wonky strand. So I want to add to that. So what I'm gon na do is now that I've got it on the outside. I'M gon na steal a little bit of hair from the one neighboring it then I'm gon na give it a quick twist and pass it under Neath that strand, so it basically just adds to the length of that strand, I'm literally just kind of borrowing from one Side or stealing, whatever you want to call it, and then I just continue that braid all the way down to the ends of the hair and anytime, that one of my strands begins to feel too thin like this. One is starting to feel too thin. I'M gon na do the same thing. I'M just gon na borrow from there give it a quick twist and go same thing here now borrow from there, give it a quick twist and go because to me honestly, I want to make sure that I'm able to braid all the way down to the tip Of the hair, this is a technique that really helps you out with making sure that that hair looks as natural as possible, and it allows you to braid all the way down all the way. So what you can do once you get to the end of this, is you can either roll it in hot water and dip it or you can just dip it in hot water like boiling hot, because it is synthetic hair, you don't have to dip the whole Braid just the end, just the ends don't get crazy and give yourself 50 second-degree burns, but you're basically going to go ahead and either roll it and dip it or, if you like to you, can secure it with rubber band or you can take a lighter and Just lightly graze across the bottom of the braid make sure there's none of the natural hair there, so the natural here on this man, you can stop like way up here and all the rest of this is artificial here, so you guys can kind of see there. That'S from start, which you can guys can see it's with and not added all the way on down, see how it gradually gets thicker, but then also gradually tapers down. So that's why I like to pull that here at the beginning. If you learn something in this video and you like it, please let me know by leaving a comment in the comment box down below until next time. You guys take care, god bless and stay clam. Thank you guys so much for watching and if you have any video requests, please feel free to. Let me know I'll see you next time. Bye,

Comments
Michelle Hamilton: Loved Glamtober!!! Thank you for the love, laughter and the lessons! Have a super holiday season!
Resurrect on Jupiter: I love love LOVE all of your videos!! They have been so helpful! I braid my own hair so it's a little tricky but it really helps!!
Eva B: just wanted to say thank you for this tutorial ! i have short thin hair and for our all star cheer uniform hair, we had dutch braids. i followed your tutorials and every competition i got so many compliments on them :)
Ruth Foxe: I’ve loved every day of “Glamtober”. Your videos are always interesting, informative and and entertaining. I can’t wait to see what you have in store for the months of November and December. In the meantime stay blessed and take care.
vaildes: Your Glamtober was great and may you, Alison and the kids have a blessed week.
Marisa Orr: Great video!!! I would love to see a tutorial on feed in Dutch braids
Beauty by Jay Morris: Great visual, this technique is very neat and precise, thank you again for sharing #glamtober #glamfam☺️
Rande Thorman: I have totally loved Glamtober!!! I have a ton of severed heads around my house. I lost a couple at school, then found them, lost a few in moving, then found them. My daughter loves playing with them.
Stacy De Souza: I enjoyed everyday of Glamtober your videos was very informative, educational and motivating. My favorite videos was the Children videos, driven, and videos on how to take care of your hair. Keep up the great job you are doing.God bless you and your family. I am looking forward to seeing more videos soon.
Genise Dever: We have come to the end or Glamtober but I enjoyed it! So informative. Y'all are a beautiful family.
Ashley Mitchell: I stopped going to cosmetology school in 2012 && watching u has really inspired me to pick back up and work hard to finish and teach also...thank u for being so informative
Tunisia Rawles: Glamtober is over? I highly enjoyed and appreciated Glamtober. All the work you put in and answering all my questions relating to my hair problems as well as bringing and sharing your family with us demonstrating and teaching us how to properly care for our hair. I will continue to watch, learn and enjoy your channel Linwood. Thanks for putting up with all my long and wacky comments. God bless you and your family.
vamp357: Thank you, Alison and your adorable children for Glamtober. I am going to miss the daily videos.
Princessa G: Loved Glamtober and looking forward to many more videos from the GlamFam!! Cheers
Fay Samuel: I can't believe that Glamtober is over! I really enjoyed the whole series. I hope you will do more in the future as I learned so much. Blessings to you and the family xx
Joce F: I would love to see the feed in Dutch Braids tutorial as well
Rack shorts: Amazing tutorial, l would love to see a feed in dutch braid tutorial
P P: 52nd degree burns! Thanks for making these videos very informative AND fun to watch.
Kiki Alubankudi: lovely hair piece amazing with extensions you were made to do hair yess liking the video
Sianna Maddy: Can you do a video on the differences between a dutch and french braid? Or have one?
B. Ogrady: Hi I really enjoy your channel. Do you know how to do stitch braids, if so would you mind doing a video on how to do them. I am visual learner I like your videos because they are very easy to follow.
Michelle Hamilton: Wait...did we see this before? No matter... this is a great tutorial!
Tanay: Is feed in versus not feeding in just a client preference or is there a different benefit to each besides how natural or unnatural it will look?
J K: "I prolly would've named her something else, like bonquiqui" DEAD.
Julie: Yes, Please do a feed in dutch braid. I hope I'm saying that correctly... Thank you
Zo & Bri's life!: The seriousness in your face when you said Bon qui qui
Ke Ke: Glam fam I know this is not related to this video but ur so knowledgeable I decided to ask u anyway. I have trouble cross checking my hair cuts and was wondering if u could tell me when u cross check a 45 degree angle graduated cut do u hold the hair at 45 degrees in the cross check or 90 degrees and when u cut a 90 degree cut do u cross check it at 90 degrees? Thanks for ur help in advance. I am learning so much from u
Kevin Dreyer: Hey I have just like the same hair as you if you could let me know how you style your hair it would be helpful. My hair is about your length I just use my hands.
Gabrielle Demosthene: You should do more hairstyles on your daughters on more videos
Purple Reign: Goodbye to Glamtober . I'm going to miss the daily vids. Bon-quiqui? Lmao
Devin: i know you said it was cathrine mannequin but it looks like its from pivot point. is that the long hair one from pivot point?
THE Connie Lee: This looks like stitch braids.
Just MJ: YOUR mannequin head looks like its from pivot point? Fantastic tutorial by the way
Maria Le Quellec: Where did u buy ur mannequin?
Musically Dance Battles: How much is manicans plz answer?
Kiki Alubankudi: its the end of glamtober nooooo
Musically Dance Battles: Huh your quitting? Im confused
Monifa Wilson-Morris: Does not help at all