Mermaid Hair Color On Virgin Hair | Vivid Balayage Tutorial (One Easy Step!)
- Posted on 11 July, 2018
- Sew-In Hair Extensions
- By Anonymous
I wanted to share a super easy vivid balayage technique I did on Jaedyn from SlyFox Family to give her a Mermaid hair color transformation!
Jade has never colored her hair before, so I wanted to make sure we didn't go too aggressive. The best part about this technique is that we didn't have to pre-lighten her hair so when it fades out, it will just be her natural virgin hair underneath.
If you want to see the behind the scenes of the process on their channel, check it out here: https://www.youtube.com/watch?v=UQ0WTg...
IF YOU LIKE THIS VIDEO, come over to Instagram, send me a DM, and let me know! I'd love to hear your favorite thing about this video! https://www.instagram.com/jamiedanahai...
------------
If you want to see a list of my favorite products check out my Amazon shop to purchase: https://www.jamiedana.com/amazon
------------
Are you a hairstylist who wants to get more Instagram followers and ultimately more clients in your chair?
What if you knew EXACTLY what to post on Instagram every single day without having to think about it?!
My latest resource ✨The Social Stylist Plan ✨ will help you easily map out 3 months of Instagram content in less than 3 hours so you can spend only 3 minutes a day posting on Instagram. And the best part is it's only $27!
Check it out at: https://www.thesocialstylistplan.com
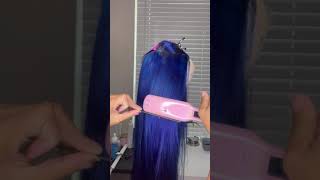
Hey guys, what's up, I am actually somewhere different, as you guys can tell, and I'm gon na be doing some fun. Hair for Jayden from Sly Fox BAM, adding some fun colors into virgin hair. Let'S go get started, hey guys. What'S up, I am NOT in my salon today, I'm actually at a house and I'm gon na be doing some fun. Hair for Jayden from Sly Fox BAM go check them out on YouTube. I will link them down below, but we're gon na be doing super fun. Hair for her we're gon na be doing something a little bit different, we're doing some summer, mermaid hair. So if you want to learn how to take virgin hair to a kind of mermaid color, adding some fun colors into virgin hair, this video is gon na, be for you and you're gon na want to stay tuned. So let's go get started alright. So this is our starting canvas. She has never colored her hair before so we're gon na add in some fun colors, I'm so excited, and then we're also gon na give her a nice little trim and adding some layers to kind of clean up her hair. But this is gon na, be such a fun summer transformation. Alright, so we are gon na part, her hair from the front to the back. So normally she kind of wears her hair, all different directions, so we're just gon na part it down the middle and then I'm gon na part it from kind of behind the ears going back and I'm gon na section the front outs on the back I'll put That away and it will get started on it in the back section. Do you want three different colors in your hair? We had instagram vote and everybody decided on mermaid hair. So what we're gon na do is we're gon na do some of this mermaid blue and a little bit of the full riot aquatic and that's gon na be our main color and then we're gon na also mix in kind of like a magenta, pink and a Little bit of a purple, so it's gon na kind of mix these up and I'll show you guys how I test my colors after all right, so I mixed up our colors and I did a variety of joy, hope and hope right and just so, you guys Know you guys can mix lines together. A lot of people are confused about whether or not you can mix direct dye lines together. I do it all the time this one is actually Cupid and hot paint from joy coat. So it's just different, like it doesn't matter, but the way that they test out my colors is: I grab a paper towel or some type of white canvas and it paints it on the towel just to kind of see where our colors are at before. This is something that's great. You can show your clients, like the actual, true colors. Now, of course, her hair is virgin, so it's gon na be a little bit different. It'S not like white hair, but at least I can kind of see the underlying pigments the tones of the color before I apply it through the client all right, so we're gon na start our first section and I'm gon na start this first one kind of around Her hairline, so I'm gon na do a V section just around her hairline, because that way, when she wears her hair forward, she's gon na have this kind of fun pop of color and when she wears it up, she's also gon na get this kind of pop Of color, so it's the same sectioning that I do for my balayage technique. If you guys have ever watched those videos, if not you guys, can go check them out on my channel and do tons more techniques, but we're gon na do kind of our B pattern. Just like that, we're gon na clip her hair up out of the way and I'm actually going to be using foils to do this technique today. Normally, I would just use saran wrap, but the reason why I'm using foils today is because I can't really out their house: they don't really the spot to like wash my hands and stuff. So this is gon na be a great way to keep it really clean. Without me having to wash my hands all right, so what I'm gon na do is I'm actually gon na take our hair and we're not going to be coloring this entire piece. If we do that, it'll end up being really blocky and chunky, so I'm gon na actually leave this section out pretty big weave, but nothing. You know not the entire piece. So this is gon na act almost looks like our low light and just add a little bit of natural touch in there. So, let's leave it out, we'll leave this guy out and then I'm going to actually tease her hair a little bit and the reason why is it's gon na help defuse our line a little bit. Then I'm going to take my foil and I love these clothes. You guys these are from frame art, they're, perfect for our color transformation today, they're super bright and colorful, but I love them because I can cut them to different lengths of what I need. Then I'm going to start and go in with the color that I want to use and we're just going to start going to paint it in it. Now, when you're using foils and you're not using saran wrap, you have to make sure that you fully fully saturate the hair. Otherwise you can get hollow spots in the hair. So if you're going to be doing this, you want to make sure that you're fully fully saturating. You guys, can see. I'M gon na be pushing that color into the hair and the reason why I like using a color line like pulp riot is because the consistencies kind of watery, and so it actually it gets in there pretty good. Then, when we go up to this kind of top area, I'm almost gon na, like just blend it in like we're doing a balayage, now we're not calling her entire head. We just kind of want to feather this up in there, so this is gon na really help kind of blend it in there. So she doesn't get like spots in the hair. So then, what I'm gon na do is I'm just going to take this little top boy, I'm going to place it over there, so that we don't have any colors like bleeding all over the place. This is gon na. Keep it really nice and clean, we'll fold up this bottom section and then we'll just lock it in place with a comb. So if you guys have watched my balayage videos, this is super similar to what I'm doing over there. But this is just gon na be with vivid colors, alright, so I finished the back and, like I was saying I did diagonals V's back and then straight across. I did two diagonals on the sides and then just straight across, so we continue that pattern. All the way up into our head teasing every section and then feathering it up into it and just kind of alternating the colors. We did some blue some pinks and purples. Our main color wants to be blue, so that's gon na be the pierced piece that I actually do right around her face, so I'm gon na do again. If you watch my ballgames videos, you'll know my sectioning this piece kind of right here. This piece is gon na, be our main blue piece, so we're gon na grab this little guy here, and I don't want it to be super super bold in her face, so I'm gon na kind of just weave it out that goes back there. We'Re gon na weed this out right here have a little bit of below like and then teasing it teasing. It will also help, like I said, defuse that line it's also gon na get rid of some of that color in there. So it's again not just like a blue chunk right in the front of her head. Remember, foil and I always like to start kind of a little bit lower so that it can have a opportunity to blend it up in there and again making sure to fully fully saturate these pieces. It can be hard sometimes to get that saturated spot, and then you get those like spots in the middle. You definitely don't want that. So I'm saturating the pieces at 100 %. It'S gon na be super super key, especially with colors like this, and now I'm gon na go back up and just kind of blend it in and guys like. I did this with every single piece just around her head. So it actually is pretty fast. It'S pretty clean, I'm not gon na wipe off my hands all the time. That'S why I like using foils for things like this. My hands are super clean, I'm not getting it all over the place and I can actually work faster than if I was like step doing each section by itself with saran wrap. So that's why I like using foil. So you just got to make sure that you fully saturate those pieces kind of opening the hair and making sure it's really saturated and yeah. I'M gon na say the word saturated. It'S like a million times so just be prepared. So my next section I took was kind of a triangular section. Now you guys can see. I'M gon na touch her hairline on this kind of front piece. This would be consider our money piece in a balayage or something like that, but obviously we're doing a pivot. So it's gon na be a little bit different with her, because we want this to be blue. I'M actually gon na take this money piece, this front section, I'm going to section it out and normally I would do this together if we were doing Lightner or something like that, but this is totally different technique. So I'm gon na take this little guy out and this guy is gon na end up being our little turquoise guy, I'm gon na. Do it a little bit higher up we're gon na weave that one a little bit finer, I'm gon na tease it real good! So it kind of tees it in there and I don't want to tangle her hair up too much. I'M gon na have her put conditioner in at that kind of root area so that we can detangle it better I've, a feeling, her hair, it's going to tangle. Quite a bit but anyways we're gon na take this up in here by our color and again she wanted this turquoise color to kind of be our main color. So that's why I'm making sure to add this around her face. I think gon na be a really pretty color on her face and it'll make the eyes pop so again just kind of blending this up in there and then I'm gon na go back in and that piece behind here. I'M gon na do a different color so that it's not just like all blue in the front, I'm going to do some pink there to add that contrast and that'll help it give that kind of mermaid scale. Look all right! I'M just gon na pull this line. Throwing a face, I don't need like a big long boil. There make sure to pull it in thirds. You'Re, not squishing the color back up here you could fold these in thirds the whole time I just like, laying the color down so that it doesn't. You know punch up or create lines or anything, but on this piece it's a little bit smaller. So we can just kind of fold that in half there now I'm going to go onto this section, I'm going to do pink through here and then we're going to continue up through up to this corner and just keep alternating colors all right. So since we are at her house, I'm gon na go have her shower out all of the color, but I'm gon na give her the acidic color care, shampoo and conditioner, and I'm gon na have to put on the color Kara static, no prints to close up That hair cuticle and help the color it last as long as possible, those mermaid colors, so pretty I'm so stoked with how it turned out. You guys voted over on Instagram and we're stoked. I love the mermaid colors that we did. It'S so beautiful. You guys make sure that kind of teal in there, the blue, pinks purples all the different dimension and the cool thing about this is. Is she had virgin hair? We just applied it right over the virgin hair. We didn't have to lift out her hair bleach. It out you guys, can see how much vibrancy and shine we got from that, and I also sealed off her hair with the biologic color care, acidic milk rinse, and what that's gon na do. Is it's gon na close down the hair shaft, the cuticle? It'S gon na make her hair color at last longer because you guys know these colors, don't last very long, so that's gon na help it last even longer you love it. I love it too. So make sure to go check out their video over on their Channel. I'M gon na link it down in the description below and make sure to hit that subscribe button. If you guys want to see more fun stuff like this and to learn more techniques, all about hair I'll, see you guys next time,

Comments
Gina Donnelly: Thank you for this video! My daughter didn’t want to go to a salon so she asked me to do this. It came out great!
Slyfox Family: So great hanging with you! Thanks for coloring my hair and doing an amazing job! I also loved learning about the process well you worked! :)
stb22: Ugh girl you teach me so much! So grateful hope to be as amazing at color as you!
Sigrid van Osch: I'm a natural redhead and would love the lower parts of my hair balayaged like this but in a more auburn/coppery color. It's awesome!
Karie Brown: I'm surprised how well that showed up on brown hair, I always thought you had to prelighten first !
Jillian: Absolutely stunning!!!!
jilliene pulk: How did you decide where to put each color? What was the color placement pattern?
saywink: I love love your videos! I find everything in the main portion of the video well edited, super informative and professionally done. One constructive comment would be perhaps try and illuminate the double intro. I am not sure if you do it for a purpose? I actually like the format of your branded intro then the slightly longer intro. From a viewer perspective it’s not necessary for the the super brief one if you introduce what you’re doing right after. You have an amazing format and vision I think this would help keep it more polished if that is something you’re going for. If not then obviously do as you like it is your channel after all! ❤️
TargetSquad: Wow so gorgeous!! She can do a beautiful photoshoot in sunset by the beach / mountains it's gonna look sooooo amazing !
Alex Mojica: Love your pink nails! The color turned out great! I was so nervous of the colors in the white countertops lol
graciella !: love her hair. so cool :)
Kayla Scott: Love !!! How did you determine not to prelighten ?
urwa imran: Love it
Oh my god Becky: Those glasses and hair suit you super well
Kelsea Mills: When your adding color .you need to decide on a comfortable pigment of "blonde" beech it good enough that your colors you add r the right shades of color...I enjoyed your video .I want to experiment on colors best for me based on warm,cold, and neutral ! What would best suit me
Yari Montanez: I love it also, where did you get your apron?!
Perfectly Weird: I’m doing something like this to my hair tomorrow, but I’m gonna bleach the ends first. Wish me luck
Loc Kri: Thats a sick combo! Liked!
Cristobal Dominguez: Hi, I love love your channel. Please you can do a video with a total makeover of natural dark hair to a very blond hair balayage almost platinium! how to fading without warm color ! Love your work
jenjajane: How long did you let it sit for?
Heather Rodriguez: What colors did you use?
Kelly Beth Mcgrath: I have a little girl coming In on May 8th. She’s wanting the same thing except for blues, pink and some orange in there! I’ve always lightened them first. She’s never colored her hair before so I’m wondering if I could just apply it? She’s wanting pretty light colors though
Kelly Beth Mcgrath: How did you determine not to prelighten? Because they are darker vivid colors?
Donna Hartzman: Do you have to bleach first?
Pratima R Swaharu: I have virgin black hair and i want to go for this type of highlights, do i have to bleach it first? and i have greys in between how do i cover it ?
Brittany Peeples: pretty!!
Cindy Snow: I just came across this didn't know it was yours( I'm watching your cutting videos). Hi! Sadly you're not near me to do hair, but you do a great job!
Cheryl Collier: Beautiful
katlin macleod: I wanna see what the mothers hair looks like! Lol I just watched the video on their channel
maggie caputo: Kind of wished you posted the whole back or showing the application of the different colors :( but still awesome!!!
Kali Channel: How long does color like this last
Heaton Beauty: Soo bomb !!
Nancy Martinez Quintanilla: If I have a customer with natural black what level of lightness I need to bring it up to apply like the fushia color ?
Summer Bianca: What about when you rinse because pulp riot isn’t supposed to be shampooed or conditioned but doesn’t joico need to be washed out ?
belajar Fonny:
Sneha Ghosh: I want to know which company's colour is that ???
LeAnn: Why are you calling it virgin hair? (No hate just wondering) Edit: ouhhhhhhhhh ok I get it know!!
The Baldwins: How much did this cost?
Sandeep Kagda: Hello mam how are you your work is very nice
Deborah Wallace: So bread to use those colors in a white kitchen!
Jamie Roberts: "HEY GUYS!!!" *Eardrums die*
Mariam Rodriguez: Ohhh waooo beautiful!!! You are close to Texas . I love your work. ❤️❤️
Oishee Tasnim: Slow down while you talk. Love your videos though.
Nisha Mandal: How to rainbow hair colour natural at home
Vaish S: No bleach??
A J The Introvert: That kitchen is AMAZING!
Veronica Kumari: You work really well but you talk too much and fast
Tracy: Yet another YouTube channel I’ve been unsubscribed too. I swear youtube. Now let me catch up.
pamela valeri: Fun !
Nicole Zundell: Where in the heckin is your concentrator