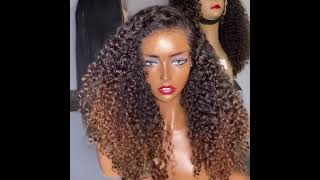
How To Get A Ombre Without Coloring |Clip In Hair Extensions
- Posted on 03 July, 2015
- Sew-In Hair Extensions
- By Anonymous
How cute is Jordan! She was in a Rut with her hair. She really wanted to thicken up her hair, She tried out for MRS UTAH and got 1st runner up!!!! Thank you to BOMBSHELL HAIR EXTENSIONS for hustling her clips ins to me!! Jordan Has tried the do the ombre and her hair got too damaged so this is a PERFECT alternative! The color of clips are 10/16! Go check out http://bombshellextensions.com/bombshe...
Also if you want to start LOVING a oil as much as I DO... GO check out my website! I sale it!!!! http://mandiesuestylez.mymonat.com come learn more about Monat and join my Facebook page https://www.facebook.com/groups/Mandie... ALSO check out one of my FAVORITE blogs out there!! http://funcheaporfree.com
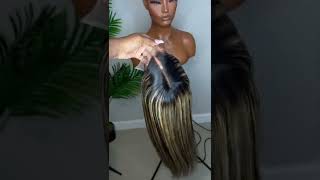
Hey you guys, it's me Mandy, and I have beautiful Jordan here, which we are so excited. She'S in my chair, we'll just say that it was a quick, fast little life, holy cow, Mandy. Listen, I'm doing something huge this weekend and I need clip-in hair extensions here. I'Ve been following her all around social media and I think she kind of follows me around. We stalk each other. We kind of do we didn't look like social media stalkers. We don't know absolutely when there's a good channel or there's a good Instagram or a blogger. You stopped up some clipping hair extensions. She'S never had that, I'm losing my extension virginity. If you will she's no longer a virgin no, but she is a clip in hair virgin, but not an important is a very, very busy mom busy bloggers always on the go, and she doesn't necessarily have time to keep up maintenance on her hair. So that's why her beautiful hair color is a lot of her natural tones throughout and clip-ins are going to be perfect for her lifestyle, because she can just wear them when she wants. She doesn't have to get a permanent extension and she doesn't have to see a stylist every six weeks to keep them up. So this is a great choice for Jordyn, because she'll be able just to put it in when she wants. She can put in what she wants to have a sexy night with husband day sure, but the day what she's going to a pageant and she can just wear them whenever she want her. It'S actually perfect for her because we're gon na kind of do the ombre effect in a way which I tried, and it did not work on my hair with dye it like ruined my hair. So oh yes, see. That'S actually great. This that's a great alternative like if you want ombre effect hair, and you want you happy. You want to have that beautiful hair. This is a great way to go, because you now can get clippings where you can have a lighter ends and that's beautiful. But the reason why I'm getting them, because some people say here's long, why do you need extensions? But honestly, I really want the ombre effect and it isn't working in my hair, color wise, but also I do want a little thickness, especially when I pull my hair back. Even though my hair is long, my ponytail is like puny yeah. I really have to put a lot of product in it and I have to massage it and cheese it, and I just I can't when I'm been, to give it some extra I'm fat boom. Yes, we all want that. I just don't a perfect option for her. Then, honestly, and for any woman and effort any person honestly, we all want more voluminous hair, so that will be perfect because she's not doing anything to damage the hair she's, not no, nothing, tired of dying. Yes, no more! That he's actually mashed Jordans caramel highlights perfectly, and if she comes around in the winter she's, I can't bandy I kind of want to go a little bit darker. It'S the easiest fastest thing to tone these and that's what we may just do. So I am using bombshell, hair extension company and they're my all-time favorite love the owner. The color that I'll be using is the color 1016, and these are twenty inches. So I'm going to show you guys today how I'll be applying her clip in extensions in the correct way and I'm gon na try to make as easy as possible for her. So she can just put them up. Do them on the go, but I'm gon na show you the perfect professional way of how to apply them and also to when you just start off with clipping extensions. You do have to do a blending haircut, so I want put these in her hair and blend them up to match her own hair. She they have long luscious, beautiful, caramel leave, dimensional hair. So could Barbie. I have long. Do you have a yeah? You get mermaid hair in just a second. All my dreams are coming true. They are right now they are they're gon na right after this okay, so I've been here um with Jordan. I explained to her how the clip ins look Holly, Phil and how all of it works so with bombshell extension company, a set of eight pieces of hair, and then you get two little extras that you can actually do like a little. You can put your own clip on them if you just need them just in case these little guys are for more like the front tools or, if you need like you, can actually put these together and put a braid in them and put like a cute headband Braid around your face, it's super cute to do something like that, but this look like this and what's amazing about them, is they have a little silicon insight, so it's a comfort fit so it doesn't actually slip. Um there's a lot of different type of clippings that don't have the silicon in them, and so they slip and they're heavy and then you're like whoa. Well, there's my hair, it's falling out of my head. So this is not a bird yeah. You know what that to happen, so you actually don't even have to really tease the hair to keep these estate. They just stay on them on their own, which is AA very flexible, and it's on each piece. So each different size of hair is heavier or not as heavy. So this piece right here is a heaviest piece and I'm gon na explain to you where each piece goes in the hair. So that's really important. I like to prep the hair with an oil, and I like to prep it with a little bit of dry shampoo to hold, in the extension a little bit better through the missed shot to the end. I'M gon na just add in three drops of rejuven of oil, and this is actually a really good to blend and whip your extensions, this oil. So I'm going to just use here one two: three: okay, this oil. I use this um really for anything and everything, but you want to really put that into your hand, put a lot of friction in it and I want to show you most. Oils are a very, very, very shiny residue and the reason why they are so shiny is because they're silicone in them the rejuvenant oil, has zero silicone. So it doesn't just sit on top of the hair shaft. It internally works and actually gives your hair a lot more volume and thickness, and it goes all the way deep down into the hair. Shaft touch the roots, because we don't want a shiny roots and I'll really just kind of work, my hands in it. It smells good, definitely 100 % natural, eleven mineral Minerals, omega-3 fatty acids, there's a lot of amazing stuff on it. I would just be like. Oh you guys, so the very first thing I like to do is I would like to go in and just give her a little bit of texture. So I'm gon na put a little bit of red camp pillows proof dry, shampoo in just at the base. Just like that, and the reason why I like to do that is just because it does kind of give it a little bit more of a grippy texture. The very first thing you're gon na want to do is you're gon na take on a good section. Underneath you want enough hair left out, but a enough hair to actually hide the wait line of the hair when you're putting it and when I'll explain the wait line. When I put the very last piece in so you guys can understand. Just take a little small section here and I had a little weaving teasing comb, but I just like to go very lightly at it. Okay, I'll just go one two three I will just go in here: just tease, tease, tease, tease like that, because that's damaging and that creates breakage - and you really didn't even have to do a cheese on this extensions because they have that silicone. They have that little silicone band in there that helps it stick, and this is a perfect size for around the nape area. So when you're around the nape, it's a little more narrow and when you start getting a little bit higher into the hair, it becomes a little wider. And so that's where the hair extensions. They go with the width of your hair, which is awesome. Some unis unclip. Those pebbles, of course, clipped up, and the first thing I like to do is I'll measure. Okay, so we have that's a pretty good size to measure out, that's a perfect fit for her head and I will start with the middle clip and I'll get my good starting point. So I'll go in here and I'll just place. Those and I'll clip that right in her hair and then the same thing just like that: okay, so that will hug around the base. Then what I like to do to make sure that it's really in there is I'll hold my hand right here, both Oh with her own hair, with the extensions and I'll just tug at the ends to make sure it's not slipping out. So, as you guys can see this, it's a pretty good hold at that point. So this section is perfect, as you guys can see her ends and right here, but it's heavy enough. This hair is heavy enough to kind of not show her ends, so that is the perfect start up clipping extensions. Now, let's move to the next section, you start going a little higher on the head, your head rounds, so you want to make sure you're doing a section and a party where it's rounding, the very end and the very nape area, you're able to kind of do A little straight shot of the parting, but let's go ahead and do a round party. So I like to take from the top of the ears once I have the first left in and I'll take that, and I will just kind of direct that go down and round that you're really wanting this to be like a very professional way to clip in Your hair, this is a great fit for you. If you're just doing something quick on the go, you can just throw them in and it's really not that difficult. So, as you can see here, I want her hair to have a point up to her ear. So we're gon na round that up really nicely just take a white teeth, one two three and then what I'll even do is I'll, just kind of squirt that right there, maybe through a little bottle action to kind of give it a little volume right there. I'Ll do that on every section where I know the clips are going to be attached, so one two three and one two three perfect has a little bit more length in it, so meaning width wise. So this is now going to be able to start at this point right here and then go to that quaint. So that's a perfect amount of hair to go right through the occipital bone area, so starting with the middle clip clip that on it. Take it to where now points and what I'm doing this you guys you want to make sure you're kind of pulling at it and that it's going tighter against the hairline. You don't want it to be loose at the base perfect. So how that's kind of hugging that base Arthur is exactly what you want to be yeah now again holding my hand here, and it's tugging at that and making sure those are staying in really good. This is going to be so beautiful, okay, you guys so now that we are pretty much to the top of her hair um. You really want to have enough hair left on top along with enough hair. That'S let down so you are covering a heavyweight line. Okay, so at this point you still see a weight line and that's why we need to cover that. So with this section, we I have about a a good, solid inch section from the last Watts I applied in her hair. So start with that middle. Put that on in and really tug and pull that back with the heaviest wet um out of the bunch, and this is the one that needs to go higher against up on top of the head. So you really want to pull tight and this right here. It'S amazing, because if we take her to the side, this is what you have. This is what you consider a connecting point with the hair, and then we have our little side, clip ins that will be able to blend together. So this this one you'll want to make sure it's ending at the corner of the connecting point before it hits to the side of the head. Perfect. We have all of the most important wets in her hair. So now we have here beautiful, luscious, caramel, Igor jazz hair. You don't really see a weight line at that point. Okay, so this is now to the point where you're like okay everything's starting to blend really. Well, you also to have to remember if your brand new equipment, the very first thing you need to do is you do need to make sure you have a blending haircut and the reason why is because we're ends so her natural hair you're, going to just take Your shears and you're gon na kind of just slither into those and it's a teeny, tiny bit to kind of help. It have more movement so now that we have this section done again hold the hair really good tug at that. So right now, Jordan is having long luscious kind of mullet in here a little mullet action is happening, but that's okay, because right now her own hair is curled and it's not blended yet and all that jazz. So let me explain so: everyone normally parts their hair in a certain spot for hair a little bit off-centered, which is perfect. So we want this side of the hair to have more hair the mid/side, because she parts on this side right. So we have a great little weft. That is the three piece left and you guys this is what's amazing about clippings. Is you can customize where you want to put them? You can move them around. You have to have them in a specific spot, all the time where the temple starts. You want to leave enough hair on top so nothing's, showing on top we're going to take the middle one and start where you you kind of, can customize so with Jordan. She'S gon na be wearing your hair down today. So if she's gon na be wearing her hair, all the way up, you can like place them in different areas, and this will kind of go a little bit off to the back as well, which is perfect because you always lie any more extra hair. You can put in anywhere that's great. We have four little pieces that come individually just like this and they already have their little clip in attached. So normally what I like to do. It depends on everyone's hair, but if she has more hair on one side than the other, I can use all four on one side. If she has, you know little less hair. On the other side, then I'll just use two on each side, even with them very high you're, going to see them on the top. So you don't want that. I'M gon na do one two three little teases we're teeing up that hair is such a tease. I know now we're gon na squirt. Some dry shampoo give it a little bit of volume there where it needs it, the most where the heaviest point of her hair is so. She has a lot of heavy heaviness right through here. So I'll pick up the hair. Go okay! We need that to be covered. So that's about this section right here, so I'm going to just take that little guy and clip that one in right through here and it's kind of nice. When you do them closer together, they can kind of support each other. So if you do them right next to each other, they'll sit on top of each other, so they even have more options that stay in, and this is so nice you guys, because it's giving her a pop of color without having to color her hair. It'S gorgeous and we're going to add two on this side right next to each other. So again take another section and do one two three little teases you could use hairspray, but I don't like how hey hairspray fills. It depends on what hairspray is but dry. Shampoo does give it more of a textured fill so we're gon na now go in here. We want to clip this little guy right closer to her face because she's wearing her hair down today. Now we're gon na go ahead and put the last one on this side right here, press and hold and make sure the little guys stay in and those are perfect right there and that somebody plays pretty close to her face because, again, like I said we're having Her hair down today, but she would still clip them up. She can put him back at their beginner. So that's why that little guy's gon na go and you guys look how amazing this. This is giving her a pop of color without coloring, her hair and awesome by him and boom. She had her clippings in so now. We'Re going to do is we're gon na have her stand up and I'm going to blend in all this hair. So right now you guys, you can see it kind of is a straight shot. The hairs brand neo needs to be washed. It needs to be intertwined with her own hair. So she has a perfect piece of new colors and kind of that. Ombre effect that we have going on so I'm gon na go in here and take off the desired link that she wants. She wants it's about right here, so I will go in here and kind of just cut off those ends and then the biggest thing and biggest trick about making these don't not looking fake. It'S point cutting into those ends super important to have the endpoint cutted into because you want more movement and you want them to not be so blunt because then that's where they look fake. So we're going to just cut off some length hair and that's what's fun about extensions. You can't customize them. You can have another whatever length you really want. I actually have a lot of clients who get clip pins and I cut them like shoulder length because they just wanted for thickness. You see where her own hair is were not going to touch that. So what I like to do is I'll take my hand, and I will put my knuckles into that and I'll kind of fan it out. Just like that and then I'll take my shears and wear her own hair is I'll just kind of chip into those just like right through there. So we can blend that really well and then I'll point cut into those in just a tad bit. So again, you guys here on this side, you see where her own hair is ending case. We want to make sure we just take those shears and just slither right into those, should go beautiful, like it's crazy, being able to watch, like my clients, transform and to just their confidence in their face like having nice luscious thick hair again is like oh, my Gosh, it is like this final touch. I need in my life, so these extensions, the color, the way the blending cut. Everything looks amazing. So now we're going to do is I'm going to add just a teeny, tiny bit more rejuvenant boil smoothing
Comments
Yeya: Loved this! I would've liked to see how well it blends with the hair straight, as that is a problem I encounter often.
Erin Ashley: Wow her hair looks amazing! I love it so much!♡
Bill M: OMG Mandie another beautiful client...no surprise she scored well in the contest. Your vids are awesome, just love every one. ♥
Caroline K: And can you do a clip in tutorial with a straight style? You're the best!
Caroline K: Mandie- I've been using clip ins for about a decade and its soo hard to find good highlighted ones!! These are beautiful and the clips look so secure but they are SO thin looking! Does the company have a higher gram set?
sabrina khomari: Great video as always !! You ve helped me sooo much with your tutorials thanks u mandie , from algeria :-)
Hailey Rose: Great job! Mandie your hair looks so great! What's your secret?
Lauren Saunter: I'm loving the new natural video format with less cuts and edits as well as longer time, but could you still try to do more "live" videos?
Shine The Light Kenzi Babenzi: This girl, Jordan has a youtube and has been on TLC! Wow.