Custom Colored Wavy Hair Extension Install [22 Inch Wavy Hair Tape-In Extensions]
- Posted on 30 October, 2021
- Tape-In Hair Extensions
- By Anonymous
This two-part video tutorial was filmed over two days. One day for the color correction and one day for the hair extension install.
This is part two to this major hair transformation from chunky highlights to natural copper hair color with wavy tape in hair extensions. This video is filled with tons of information on how to remove tape-ins, custom color extensions, and creatively install when dealing with an undercut.
You can find the PART ONE HERE: https://youtu.be/OAQGA5IzYoo
Hair extensions & Tools @donnabellahair
22 inch Pro Way Tape-ins - color 6/10 and color 600
3 barrel waver by Donna Bella Hair
Color from @Kenra Professional
Formula
Demi 8C, 5N, 1-inch ribbon 4RR 9vol
Foils and tools by Framar Click the link to shop my faves: https://framar.com/?rfsn=5729303.eb090...
The extra big color brush https://zerotimesystem-com.3dcartstore...
Color correction tools https://malibuc.com/shop/rebelfemme
Need a mannequin to practice on? Buy one here: https://hairartproducts.com?aff=688
My favorite weaving combs: https://vellen-hair.com/collections/co...
For more education visit http://mirellamanelli.com
Instagram: https://www.instagram.com/mirellamanel...
Facebook: https://www.facebook.com/MirellaManell...
TIKTOK: https://www.tiktok.com/@mirellamanelli...?
Pinterest: https://www.pinterest.com/mirellamanel...
HairB&B IG https://instagram.com/hairbnb_podcast
Learn how to upstyle in 7 days course: https://mirella-manelli.mykajabi.com
Rebel Femme https://rebelfemme.com
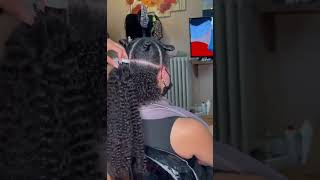
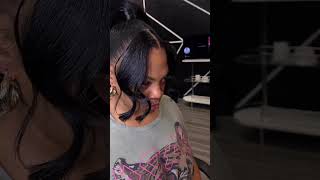
Hey it's marilla minnelli and welcome back to my youtube channel today, i'm going to show you how to do a full, install using the brand new 22 inch pro wavy hair extensions from donna bella hair and i'm even going to show you how to custom color your Tape and extensions for a dimensional blend, but before we get started, make sure you hit that subscribe button and turn on all notifications. So you don't miss a tutorial now, let's go ahead and get started all right. So this is the part two video. That'S all about the hair extension install, but just to give you a recap from the last video i took my model from these pink hair extensions with some really grown out, highlights and chunky highlights and transformed her into a much more natural copper shade. If you want to check out that video be sure to watch the part 1 to this hair tutorial, so i went ahead and removed her hair extensions, using the tape and bond remover from donna, bella, hair and just carefully removing those tapes. And then i basically did a full on color correction, including some highlights and low lights and a full glaze, and we decided to go ahead and color match her with some tape and extensions. And basically, she came in a week later and we custom colored her tape and extensions and just a little disclaimer since she came back about a week later, we did do a new refresh glaze on her just to be sure that the hair extensions matched perfectly. So what i decided to order was three packs of the 22 inch pro wavy tape and extensions in color 610 and color 600, and then i decided to custom color them. So since we adjusted her color for the second time, we basically did a combination of 8c with 5n and a few swigs of the 4r one to two mixing ratio with nine volume developer. And this is the exact same formula we even put on over her copper shade that she had put prior - and she just kind of decided over that week - that she wanted to richen it up just a little bit more onto the red side. So i took those tape in extensions and what you want to do is make sure that you thoroughly saturate the hair extensions with the hair color, really working it in onto both sides of the hair, so make sure you're flipping it over onto each and every single Tape, another tip is you're only going to want to use a demi permanent or a semi-permanent color line when coloring the hair extensions you're never going to want to use a lightener or anything. That'S super strong ammonia-based, something really gentle is key, especially since hair extensions in general are heavily processed, so you want to make sure that you're taking care of them, so they have a nice longevity for your client. So this is my model's hair freshly glazed before her hair extension install service, and we just did a rough dry with only shampoo, no conditioner. So you want to make sure the hair is nice and prepped so that way, you're not having any oily hair or any residue before installing a tape, in extension, so for her sectioning, i just took her right down the middle and then right behind the ear, which Is where she normally parts the hair down the middle and for the back? I actually started up a little higher because she has this really cute undercut going on. So of course, we had to compensate for that. So there's gon na be a little bit more of a creative placement when getting started with this. As you can see, her hair extensions match really beautifully and we even got the highlights to match really nicely as well and if you're wondering why i didn't just order a color that match your hair perfectly at the end of the day, you're never really going to Find extensions that match a t, so i typically will do a glaze, even if it's just a minimal adjustment. I typically use two different shades of extension colors and the reason for that is so that way it stays looking really dimensional. But what i'm gon na do on these first two sections is: make sure that i'm using the darker shade. So this is the color 610 and it's going to be slightly darker, because her hair overall appears darker. So i'm going to use that darker shade and sandwich it on the top as well as the bottom. You can see i'm using lots of clips really clean sections, and even these hair grippers, which are the pink little square tabs right on the top. So this actually helps keep all of those little flyaways at bay, and that is probably the most important tool that i like to use, because when you're doing, tapes or honestly any type of extension install you want to keep the fly-aways as far away as possible. So that way you don't have any tugging or snagging or anything like that. Another little tip is i like to install from the top right on down to the bottom. So i put the first tape right on my top section, with no space in between my tapes and using my quick pick, i'm just separating any little baby hairs that could be there but you'll notice. When you pick up the hair, it already sections the hair right on out for you, which is kind of a nice technique to use, because everybody's hair density is just different and then i just sandwich them together. Now, since she has this really creative undercut, i did have to custom cut my last little section, so i'm just using my stork shears and creating a little mini half sandwich just to complete the row. So you'll also notice that i'm never going right to the hairline. So since she has that undercut, i actually started about three fingers inside so that way, if she does wear her hair back we're not going to see the point of origin of where those hair extensions are coming from now to get started on my second row and This is where i'm also going to add in another set of the darker hair extensions. So this subsection is about a half inch thick and i want to basically make this pretty small subsection so that way we're doubling up on that weight line towards the bottom. So that's really, the key to hair extension is getting them pretty close together and then you can start spacing them out as you get towards the top. So i'm still going three fingers in from the exterior, even though she has that undercut and i'm applying the tape from the top lifting it up. Separating those hairs out and a really important key here is when you get ready to sandwich that bottom section. You want to make sure it's lined up, so a really quick tip is to make sure that your body position is standing right in front of the section that you are installing. This is going to help ensure that you're lining up the tape completely in line with the other tape. So that's super key because if you do have it out of line, what happens is other hairs kind of start to snag on it? And you really don't want that to happen. You want them to line up perfectly and press the tape right onto the center and then on the sides and completely seal that tape completely closed. So a you get a lot of longevity out of it and b you're not going to have a random little hairs. Snagging on any exposed tape, once i get the third section completely installed, i'm now going to create my fourth section or row, but this is where i'm going to marry the front into the back, keep in mind that for those first two rows, i only use the Darker hair extension color and then for the third row and for the remaining rows. What i'm doing is applying the darker install on the top, which is color 610, and then i'm sandwiching, color 600, that i colored. So it's a little bit more brighter right underneath. So i decided to do this type of install, mainly because the overall appearance of her hair is the darker shade, but i wanted those pops of lighter copper red shades poking through. So i felt like the underside was perfect, but for the very front right here to add for that fullness, since she does have so a little bit more highlights going on, because she had those prior chunky highlights. I decided to just go ahead and sandwich two of the color 600 shade right in that front section, so it's a little bit brighter and a little bit more pop of red. Now i'm completing my fifth row so keep in mind again in that back section, i'm putting the darker shade on top lighter shade, underneath and just sandwiching two lighter shades towards the front. Now everybody's front hairline is going to be a little bit different, so she has a pretty fine hair texture and it is a little bit more shallow. So i decided to be extra careful here. We actually decided that she wanted a little bit of extra wiggle room since she does wear her hair up, and this was actually the perfect marriage for what she was trying to achieve. So once i get those first two rows kind of stacked, really close together on those front sections. I want to continue to go up just a little bit higher, so i'm going to install a third section for the front, but i decided to bring it right on back to that back section. Just in case, i decided to put two tapes right next to each other, which is exactly what i did. What i love about tape ins is they're, super customizable and they're easy to install. You don't need any tools, and these are going to last her about six to eight weeks and when i'm doing the install. This is something that we actually talk about before, during and even after her appointment, and we already know that when she's complete with her service she's going to rebook for her next service, so we can make sure we're maintenancing her extensions properly. So once her install is completely done, i'm just combing the rest of her hair down making sure that everything's looking good and it's good to go and now we're going to get ready to cut and blend her actual hair into her extensions. So i decided that i like using a razor, especially for this wavy type of texture, look that she's got going on and i'm just basically splitting her hair right down the middle. You can see it's a little off center. I like to part the hair, where it naturally falls so that way, it's just easier to style and we're creating a custom cut according to how she wears her hair. So i'm just creating some really soft face framing layers and then for the back section, i'm just taking vertical sections holding the hair up, making sure that her natural hair is lined up with the starting point of where i'm going to start. That blend for extensions and cutting the extensions vertically really really helps for a beautiful blend for her final style. I'M using one of my favorite tools, which is the three barrel waiver from donna bella hair, and this might sound a little odd. But i actually like holding the waiver upside down or basically in the opposite direction, on how you normally would use it, which is the clip facing down or towards your client's head. Basically, what this creates is a much more deeper form of a wave versus holding it. The other way, if you held it, the traditional way, you're going to get a much more relaxed type of wave but holding it upside down, makes it much more deeper. And i think this enhanced not only her natural wave but also the waves of the extensions and then basically to finish it off. I used a one inch wand to add more texture, so it looks a lot more lived in and here's the final result of this custom install using the brand new 22 inch pro wavy tape and extensions from donna bella hair. So, just to give you a little recap: we went in with a total of six packs of hair in color, 600 and 610 and then custom colored them with demi permanent in kenra color for a dimensional and seamless blend, and then for her final style. I used the donna bella hair waver to enhance those natural waves and then finished her off with some one inch curls on some random pieces of hair for more added texture and volume. So i really hope you enjoyed this hair tutorial and if you did, please give this video a thumbs up and make sure to subscribe and comment down below what your favorite part of this entire tutorial was and i'll be sure to respond for more free education. You can head over to mirellamanelli.com and subscribe to my email list and get free education sent right to your inbox, and you can follow me on all my other social media channels like facebook, instagram and tick tock, all under mirella manelli. And if you enjoy listening to podcasts be sure to listen in on my podcast called hairbnb, it's a podcast all about hair beauty and business and finally be sure to check out my other hair tutorials right here on this channel, and i will see you next time.

Comments
robert björnesjö: Oh i love this colors on her. And waves makes it look so flowy and natural
Susan Scoville: Wow! That is a beautiful look.
Yevette: Beautiful!!!! Can you advise the Brand of the 1 inch wand ! I love the length of it ?
olivia li: Hi , love your video so much! May I have your email for business inquiry?
Ana Sufitchi: I suggest research fast hair growth fortified shampoo.