Diy Tape-In Extension Install | Yaki Straight Tape-Ins On Relaxed Hair - Ywigs.Com
- Posted on 01 September, 2022
- Tape-In Hair Extensions
- By Anonymous
Direct link to the Yaki Straight Tape-in Hair Extensions:
More Tape-in Hair Extensions:
https://www.ywigs.com/collections/tape...
Ywigs Clip-ins Hair Extensions:
https://www.ywigs.com/collections/clip...
Ywigs Micro Links Hair Extensions:
https://www.ywigs.com/collections/i-ti...
Ywigs U-Part Wigs:
https://www.ywigs.com/collections/u-pa...
Ywigs HD Clear Lace 13x6 Lace Front Wigs:
https://www.ywigs.com/collections/13x6...
Ywigs official website: https://www.ywigs.com
Connect with Ywigs:
http://www.instagram.com/ywigs_officia...
https://www.facebook.com/Ywigstore/
Snapchat: Ywigs Hair
IG: ywigs_official
TikTok: ywigsofficial
———————————————————————-
Join the QTE CLIQUE and hit the red Subscribe button!
See All Products I currently use on my Amazon Storefront! http://www.amazon.com/shop/qtepiee88
SHOP My WIGS! https://qtescloset.bigcartel.com
*•*•*•*•*•*•*•*•*•*•*•*•*•*•*•*•*•*•*•
Thanks so much for tuning into our channel! Remember to rate, comment and subscribe! Thank you for helping me grow my channel!
••••••••••••••••••••••••••••••••••••••
Camera: Canon Powershot Mark G7 X Mark ii
Iphone 12 Pro Max
Software: Imovie | Videoshop
**************************************
My Channel | https://youtube.com/user/qtepiee88
My FAMILY YOUTUBE Channel | https://youtube.com/channel/UCjg8MQCk3...
Help me get to 19,000 Subscribers! ‼️
Follow my hair page on INSTAGRAM
https://www.instagram.com/qtepiee_hair...
Follow me on TIK TOK
https://vm.tiktok.com/ZMeM8R4bN/
Follow my Family page on social media:
https://www.instagram.com/4love__4life...
Family YouTube channel: https://youtube.com/channel/UCjg8MQCk3...
Business Inquiry? Video request? Email me! ✉️ [email protected]
Let’s get this video to 100 Likes!
Hit that notification Bell !
***Hair or products shared in this video express my OWN TRUE, honest, personal views, opinions & experiences. The video may contain sponsored content and/or affiliate links. Items were sent to me for review unless otherwise stated. I may receive a small percentage that I use to invest back into my channel to help me continue to bring you all great content! Thank you for your support!**
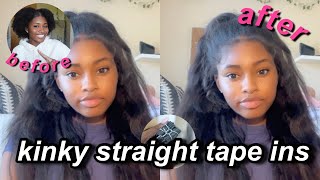
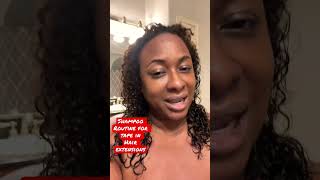
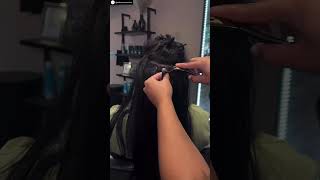
Foreign, hello, everyone thanks for tuning back into my channel today we have a special tutorial for you all. I will be installing some yaki straight tape in extensions from y wigs, so you guys stay tuned to this unboxing and tutorial. So in the package i received three bundles and each bundle has 40 pieces in it. Each 40 piece bundle is equal to about 100 grams of hair. So i have a total of 300 grams of hair here, which i will not be using all of i'll, be using just about 200 grams, which is two bundles or about 80 pieces or four sandwiches. I know it's kind of weird, but two pieces make one sandwich. So if i use 80 pieces, i'm going to put 40 sandwiches in my head all right, so, let's get into the install so first off you want to start out with fresh freshly washed pressed hair, no matter what your texture is. You want to make sure your hair is very clean and pressed or in the style that your tape ins are in. So if you have curly hair make sure your hair is curly and match the texture, this hair matches my hair texture perfectly so definitely want to start off with clean, washed hair. The next step is to part off your leave out so you're going to need a lot of leave out to cover these tapes. So i did a big horseshoe area in the front because my hair is pretty thin, especially when it's flat iron. It looks like it's thick, but once it comes to covering tracks and wefts, sometimes you can see through my hair. So i leave out a lot in the front and you want to be sure to clip that part away during this process. You will need a lot of clips or hair bands to keep your hair out of the way during the process, all right. So now i am parting my side, so you definitely need a lot of hair left out on the sides um to cover the tapes, especially if you plan on wearing the hair back in a ponytail or at the top of your head in a high ponytail. You definitely need the entire perimeter of your head with leave out so definitely bring leave out out around the entire perimeter of your head. If you're going to wear it in any other style rather than just straight down, and then you want to clip those sections off as well all right, so i will go ahead and start off with the back of my head um. So you want to go ahead and part out your leave out for the back as well. So actually, this is just me parting out the leave out. As i said, i'm going to leave hair out my entire perimeter. This is how much i'm deciding to leave out in the back to cover the tape ends, so nothing will be done with this part. I know it seems like it's only a little area that i have to put tape ends in, but i promise it's enough area. So i'm going to continue to take out the perimeter of my hair, the areas between the back of my ear and my nape. So that's just this little triangular section right here, so i can have the entire perimeter of my head left out all right. So now that i have all my hair parted, i want to get this out of the way, so you can either like flat twist it or braid it. I decided to braid it just so it can kind of stay and you want to either clip or put a hair tie around it, so it doesn't unravel when you're trying to put in the tape ends alright. So i have everything sectioned off my leave out is done, so this is how my leave out is looking around the perimeter of my head and the part in the middle. That'S up in the ponytail is where i am going to put the tapes alright. So let's go ahead and get them all brushed out and ready to install this hair is thick. It'S shiny, it's gorgeous and i feel like it's going to match my hair texture perfectly, so this is going to be a pretty repetitive process, so you want to section off a very thin amount of hair. You want to start off with a thin amount of hair. Well, keep doing a thin amount of hair because between the two sandwiches, the two pieces, you don't want the hair to be too thick, because then the tapes won't stick together. I'Ll explain some of that more, so you want to put the rest of your hair out of the way and only work with this little thin section. So what you want to do step one is go ahead and remove the white part and reveal the sticky part of the tape. So i've decided that i'm going to put two tapes on this row and it's going to be a lot of feeling around. You can't really see because you need both hands and you don't have a really a mirror to work with, but you want to place the tape either at the top or at the bottom of that piece. I find it better to place the tape at the top. First then, flip the hair over and place the other tape at the bottom, so your hair is wedged or sandwiched in the middle of these two tapes. Sometimes it won't stick right away, but i promise after pressing it and hitting it with the flat iron it'll stick. So here's the second tape, so what you want to do you want to flip your hair over with the tape end still attached to it and put the other tape underneath and you want to squeeze those two glued tapes together with your hair sandwiched in the middle. Try not to get too close to the roots of your hair, but put it close enough to where it's not like super loose. But that's all you do is just wedge your hair in between the two tapes and i'm going to do the same for this side. So i put the tape on top; sometimes it doesn't stick. So if it falls off it's okay, just keep trying and put the other tape underneath and then smush that smush those two tapes together and really really rub it together. So both of the glue sides of the tape end meet and does not fall off your hair. So now you want to just hit it with the flat iron, so press it with a flat iron on a very low setting, maybe 300 and squeeze those two. Those two tapes together and make sure you let them cool off, and then you want to use your fingers and really rub those two glued pieces together. So it can really have a tight bond and that's it. Your first two pieces are done. So this is how it's looking. I love how soft and flowy this hair is so far, and it took me about an hour and 50 minutes to do my whole head, which is not bad, so i'm just going to let you guys see the whole process. It'S really repetitive, you pretty much do that around your whole head and i'll be back once i get to the sides of my head, hmm and here's a tip for you all so try to have two pieces already waiting for you like take two pieces. Take the white part off and put them aside for the next time. Um that'll help you kind of speed through the process to have the tapes already ready with that white part removed and ready to stick on your hair. So now i'm at the side of my head, so you want to make sure you put these in diagonally. I like the fact that i parted my hair in like a horseshoe. U pattern because you don't want to put these tapes in straight across when you get to the side, make sure you're putting them in diagonally you'll, see what i'm saying in just a minute just make sure they're angled and not going straight across this will help when You go to put the hair in a ponytail, the tapes won't show and it'll be smooth, and you can flip it up and down without any bumps, and this is how it is looking so far for the side section, and it is looking pretty good and they Are holding in very well, like i said i believe, the flat iron method works really well to get that glued kind of warmed up, so it can stick better, so so um all right. So this is how it's looking so far. I am about halfway done. Um yeah and it's going really well um. I went pretty fast. I know it's, it's really hard to try to film and do this at the same time, but this was faster than what i expected you guys can do it just give it a try. Alright. So i am done with my first bundle. You guys so i made it about halfway through with one bundle, and i am about to show you guys how the back of my hair looks. I know sometimes it's going to look messy, but it's okay. It'Ll, give you a great result: i'm not a professional. So this is how it looks for me it can look choppy to you guys, especially to professionals, but i'm not a professional. I did my best, but it turned out great so on to my second bundle. So this is another 40 piece pack that i'm breaking into all right, so i am all done you guys, sorry. The process had to be sped up. I didn't want this video to be too long, but i'm so proud of myself. I am all done and i must say it looks great. It will feel weird at the beginning with these pieces in your head, but you'll get used to it. So this is how many pieces i have left from my last bundle. So i have a few piece pieces left like seven or eight, and i have an entire bundle left. So i'm going to show you guys in another video how i wash these and replace the tapes and yeah that's it. So you want to just take out your leave out around your perimeter and flat iron it and make sure it's as smooth as the tape ends. So alright. So this is the fun part: blending your hair into these tapes and look how well my hair matches this texture. I absolutely love it. So i'm taking out the leave out in the front now and i'm just going to brush it down and blend it, and you want to make sure you part the back and cover those back tapes. Well, you don't want any of that shine coming through, and i am absolutely in love with the thickness. I love this hair. It is so flowy and nice and it looks so realistic. Now, of course, everyone that doesn't have the same length of the tapes as their real hair if their real hair isn't the same length. You'Re going to have some short pieces show in the back, but that's okay as long as it's the same texture or curled along with the hair. It'S no problem and you guys look how great this blends in, like even the sheen of my hair and with the tape ends, you do not. You can't even tell where they start where my real hair ends. I absolutely love it, so i'm just going to style these tape. Ins really quick, show you guys how you can put it in a ponytail, it's so easy, and when you angle the tapes, it really makes it easy to put it in a ponytail. They they flip and lay flat right against my head, so i'm just going to curl these and just play with it. Y'All stay tuned until the end. So so you so that's it! You guys thanks so much for staying tuned. Remember the link to this hair will be below in the description box drop me a comment hit the like button and make sure you subscribe, so you don't miss any of my future videos. I work really hard to create these videos. You guys. So please, please. Let me know in the comments, if you enjoy videos like this, and if you want to see more thanks so much for staying tuned to this long video, you guys thanks again see you later bye.

Comments
Carla Campbell: Yasss sis, looking gorgeous
Young godeees: Great video! What length is this? ✨
Qtepiee88: Watch in 2160 4K HD!✨